Quantcast
Viewing all 346 articles
Browse latest View live

Review: Nerf Mega Bigshock (grey trigger)

Every Nerf series needs a Jolt variant or repaint. The Elite and ZS lines got basically straight repaints, while the Rebelle line got a bunch of reshells. Now the Mega line has its Jolt in the form of the Bigshock.


The box is fairly ordinary, outside of the MEGA banner down the right. Not much of interest though.
Everything out of the box, just like a Jolt.
All loaded up.


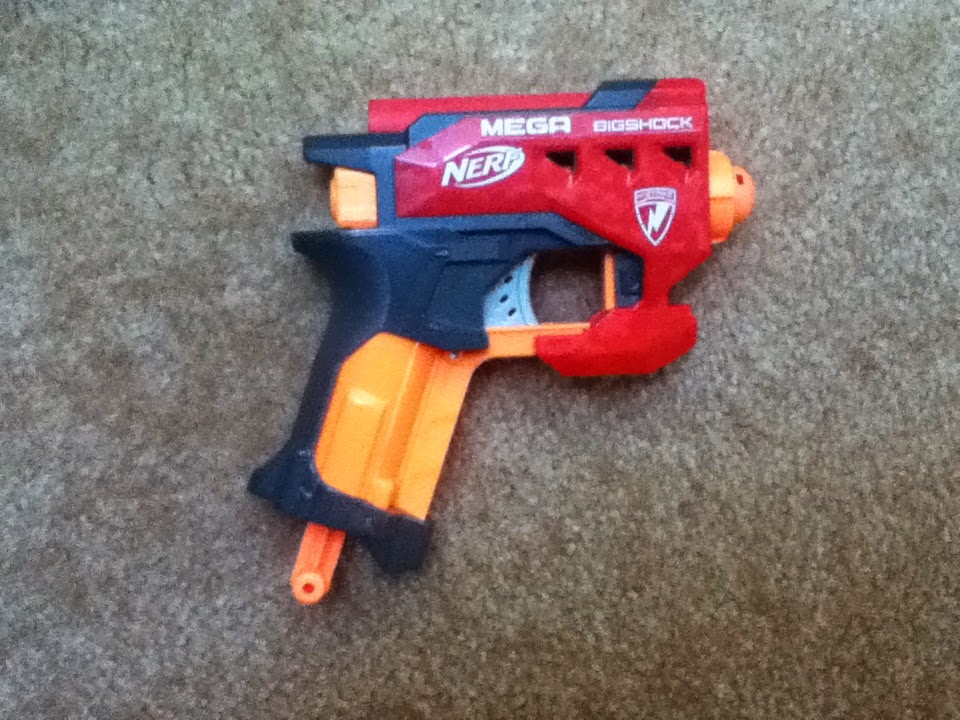
The Bigshock is pretty much exactly what it advertises - an enlarged Jolt meant for firing Megas. It bears many similarities to the Jolt (a few comparison pics are below). The large red/grey shell is a big addition to the blaster, which without the shell is very, very plain (again, see below).
The Bigshock has a small aperture just above the barrel that acts as an iron sight. It's too small to properly use, and as with Nerf blasters the iron sights are pretty useless anyway.
However the iron sight is but a side thought. Its true purpose is to act as a dart holder, and it does that well. The stored dart is quite secure, the front grips the head of the dart and two ridges further back provide sufficient friction on the body to keep the dart from moving.
Naturally the stored dart blocks the iron sight.
Interestingly (and rather annoyingly), the Bigshock is not marketed as an "Elite" blaster as all the other Megas are, but a mere N-Strike blaster instead. This combined with the grey trigger (even the North American ones including my one, for which all other blasters have orange triggers) make for some ominous signs for the Bigshock's performance.
The handle of the Bigshock is quite substantial to account for the surprisingly large plunger tube. The extra red/grey shell provides a solid grip surface on the back of the grip, which makes it quote comfortable. The Bigshock doesn't fully escape from the Jolt's ergonomic shortfalls however...
The Bigshock retains the Jolt's sharp front edges, which conceal the trigger/catch mechanism. They cut into your hand especially when gripped tightly or when priming strong springs. It's a bit of a shame considering how good the back of the grip is, I reckon it could have been covered with a little more plastic in the shell.

The Bigshock, being a Jolt variant, primes by a basic priming rod in the bottom of the grip.

With the shell, the Bigshock completely dwarfs the Jolt.
This picture illustrates particularly how much bigger the handle is on the Bigshock, and also the extent to which the shell covers up the base body to form a more comfortable handle.
The Bigshock clearly has a significantly longer prime than the Jolt, thanks to its larger plunger tube and handle.
From behind, which even further emphasises the size difference between the giant Bigshock and the tiny Jolt. Note again how the Bigshock's shell forms the back of the handle.
Here's the Bigshock with the shell removed.
Even without the shell, the Bigshock is significantly bigger than the Jolt, however this picture better illustrates how much larger the shell-less bigshock is compared to the Jolt.
Let's talk about the Bigshock's performance. Now the Bigshock has caused a little controversy, thanks mostly to its grey trigger and partly to its N-Strike badge. N-Strike blasters have been making a return recently with some blasters classed as N-Strike and not Elite, and getting N-Strike level ranges. Additionally, grey triggers are a sign of reduced power for most blasters. So does the Bigshock live up to its Mega siblings or does it disappoint like an N-Strike blaster?
Ranges are decent, but not fantastic. The mega darts fly very, very erratically so one shot may yield 15m, while the next may nosedive at 9m. Based on my experience, I'd have to say the average range of the Bigshock is around 13m, ignoring nosedivers. Naturally as a Mega dart blaster the Bigshock gets extra points in the power category. Its inconsistency however leads perfectly into the next category.
Accuracy is absolutely horrendous. I usually judge blasters on how frequently/consistently they'd hit a human target at 8-9m, which is simulated by firing them through a door at 8-9m. In about 80% of the test shots I took with various Mega darts, the darts would veer off and hit the door frame, the walls, basically do anything besides go through the door.
ROF is pretty standard for a single shot, though the Bigshock is helped by its convenient dart holder just above the barrel. 1 dart every 2 or 3 seconds is pretty standard for it.

Being a Jolt variant, the Bigshock is the smallest blaster of its line (Mega), and so serves the purpose of being a backup/last resort blaster. It doesn't perform as well as the others in its line, but it fires Megas well enough to be usable.
Unfortunately for the Bigshock, because it fires Megas, its overall size ends up similar to that of a Triad, so realistically the only reason to add the Bigshock to your loadout is if Megas have special power in your games (e.g. damaging zombies resistant/immune to darts), as you'd otherwise survive much better taking a Triad instead.

The Bigshock retails for 8USD. I got mine for 10CAD, and it's only recently become available in TRU for 14AUD (on discount from 20). Considering the Bigshock is just an upsized Jolt, the retail of 8USD/10CAD is reasonable, while TRU's price of 14AUD is a little high when a Jolt retails for ~5AUD. Since TRU is known to be overpriced (and is currently the only Aussie retailer stocking Bigshocks), I'll use the US/Canadian RRPs for the Value for Money category, giving it a pretty solid score.

The Bigshock is a pretty fun blaster to use. After all, shooting oversized foam projectiles can only be made more hilariously silly and fun by using even larger projectiles. It fires with enough power to not feel excessively weak, and fires with quite a nice pop.
If you have a little spare money to spend on something fun and silly, I'd say the Bigshock is certainly a reasonable choice, but not if you live in Australia - I feel that 14AUD is a little high and I would recommend waiting for the price to drop further/other retailers to pick it up for cheaper.

Power: 6.5/7
Accuracy: 1/5
Value for Money: 4/5
Usability: 3.5/5
Rate of Fire: 1/5

Overall: 2.9/5

Personal Rating: 3/5 - a big Jolt with heaps of power to spare, and a pretty cool looking shell. Shame it still has the Jolt flaw of the front of the handle cutting into your hand. The terrible Mega dart accuracy is also a problem, as is its significant bulk.

Game Report 4/7/15

I went to my first Melbourne HvZ event today with a friend. Peak attendance was probably in the 20s, though I wasn't counting at any point.


Gamemodes:
Since the group is called Melbourne HvZ, every game has some zombie element to it, and each game's zombies run by the same set of rules, so I'll go through them here.

Zombies tag humans with their hands onto any body part, blaster, tactical gear, etc, turning the human into a zombie. If a human hits a zombie with a dart, the zombie is stunned for 25 seconds. A human can also stun a zombie with melee, but only a direct hit to the back.
There are 3 standard zombie upgrades: 
Infector - zombie(s) get to use foam swords, pool noodles, etc. Tags with said foam melee weapons on humans count as regular tags. Said melee weapons can also be used to block darts.
Tank - zombie(s) get to use shields, which block darts. The shields cannot be used to tag humans, presumably as a precaution against shieldbashing which could certainly cause injury.
Husk - zombie gets to use a Titan firing rockets. The rocket counts as a regular zombie tag. There is usually only one Titan and one rocket on the field at any time. Other zombies can pick up and return the rocket to the Husk.
There was an additional zombie upgrade used for a specific gamemode. I don't remember the exact name of the upgrade so I'll go with Hand of Freedom. This particular zombie class was partly derived from this event being hosted on the 4th of July. The Hand of Freedom carries a flag (in our case an American flag) as well as a handbag which holds fake hands and feet (of freedom). Said hands and feet can be thrown by the Hand, and count as regular zombie tags. The hands and feet cannot be thrown by other zombies, but can be picked up.
Zombie upgrades can be stacked, so for instance a player could take both a pool noodle and a shield.
 
Survival - standard HvZ gametype, humans try to survive for a given amount of time (or until the last human falls). Zombies are given access to upgrades at various times, for instance Infectors at 5 minutes, Tanks at 10 minutes and Husk at 13 minutes.
Three Squares (made up name)- the three zombie upgrades of Infector, Tank and Hand of Freedom are placed in the centre of three spread out squares, about 2-3m wide. A human is designated as a flag holder (in our case a British flag). Zombies can pick up the upgrades if they get to the upgrades in the middle of the squares. If a zombie is stunned within a square, they must move outside of the square before counting down their stun. If the human flag holder is within a square, zombies cannot pick up the upgrade contained in that square (thus making the flag holder the most important human). The humans try to survive as long as possible.
Blind Bomber - one human is designated as the Blind Bomber and is blinded (in our case with blacked out safety goggles). They cannot be zombified, and so are invincible. They are given a "bomb" (just a timer), which has two time settings - in our case 3 minutes and 5 minutes. The objective for the humans is to get the bomb to the first location, protect the bomb for the first time setting, then move the bomb to the second location, and protect the bomb for the second timer setting. However the Blind Bomber is the only human able to touch and move the bomb. If zombies tag the Blind Bomber, they must drop the bomb. Zombies can move the bomb, and if they get the bomb outside of the play area, the zombies win. If the humans protect the bomb long enough to complete the bomb's journey, they win.
6 Round Team Sweep (also made up name) - two balanced teams are assembled, and each player is only allowed to carry 6 darts or a single melee weapon (with no blaster) into the play area (darts are left on the ground from previous rounds). In the middle of the play area is a collector, who collects the darts from each team. The team that delivers the most darts to the collector wins. Each player has 3 lives, with each hit from a dart taking one life and requiring a respawn at any tree. A melee hit depletes all lives. Once a player is out of lives, they become a zombie and drop all their darts. A single zombie tag immediately turns humans into zombies, regardless of life count. Players are safe while depositing darts for their team.

Blasters:
Normally I'd go through every blaster that got used, but due to the number of players and blasters I can't go through each individually, so I'll stick with the major ones and the ones I used.

Rebelle Sweet Revenges - my standard modded dual wield pistols. Worked very well when I was able to use them, however the holsters often fell off my belt if I ran too fast, and I often didn't have the time to draw them in Survival. I'm looking at getting some better holsters.
Elite Alpha Trooper (typically spring upgrade) - an all round solid pump action blaster. Slam-fire was useful to overwhelm and ward off zombies, especially Tanks since they can just block potshots.
Pump Action Elite Retaliator (various internal kits) - saw a lot of these in action. They often used the pump grips sourced from Taobao, and often had buffer tubes/stocks, angled foregrips and custom muzzles/iron sights. I held one and it was quite comfortable and fairly hefty, though as it's not a particularly fast firing blaster, I'm not likely to build and use one as a primary. They performed very well, similar to EATs without slam-fire, however the Retaliators seemed to be exceptionally accurate and quite powerful - a lot of Retal wielding players could land reasonably accurate shots from farther away than most blasters.
Elite Rapidstrike (various motors, LiPos)- there were a number of these as well, and IMO they were the best all round blasters . The ability to put out a hail of darts within a second was excellent for ensuring that the zombies got tagged, and the ability to one-hand them if necessary also helped a lot of humans survive back attacks from zombies. The Rapidstrikes also got respectable ranges. They weren't as accurate over longer ranges compared to the Retaliators, but in close ranges the rate of fire made it pretty much impossible to dodge. A group of Rapidstrike users could typically only be taken down by a constant barrage of zombies, usually also requiring Tank support to drain their ammo faster.
The only issue I had with the Rapidstrike was that even with relatively conservative bursts, I tore through my 5 18 clips quite quickly. I'll be looking at practicing tap firing with the Rapidstrike as well as getting a few more clip pouches.
Rebelle Rapid Red (Meishel motors, 2S LiPo) - I used this in the final Survival round, and it worked extremely well. While the rate of fire was not as good as a Rapidstrike, it handled very well and I was able to get a lot of zombie tags with it. The only issue I had was with a thin dart getting pushed up too far by the clip, causing a jam and causing me to get nommed. I'll be remedying this in all my main flywheelers.
Doomlands Lawbringer - didn't actually see it in action, though it did get a fair bit of use. I'd assume it performed similar to a similarly upgrade Hammershot, except with a larger frame and a much higher capacity.
Absolver'd Drain Blaster (Cobra I believe) - it was set up to fire 6 dart absolvers. It got ranges probably close to what I was getting from my Sweet Revenges, but naturally with 6 dart bursts. The Drain Blaster was exceptionally effective for immediately stunning one or two particular zombies, as well as suppressing Tanks who pretty much had to stop to block all the darts. In Survival the threat of being blasted by a burst of 6 darts was enough to pretty much prevent single zombies from charging.


The play area was a relatively open park area with a couple of trees, notable a few large trees in the centre. Early in the day there were some light showers, dampening the ground though only making a select few patches of ground slippery. It also rained a little in the first rounds, so most people opted for non-flywheelers. The weather was otherwise overcast for the whole day, and reasonably cold.


Survival was your standard HvZ gametype, fun and fast paced once the tags start happening. So instead of writing about the gametype itself I'll talk more about how the zombie upgrades affected play.
Infector simply gave zombies more range, as expected. We did see some zombies try to dart block, but for the most part if the zombie got shot at, they would get shot at by several people or by a number of darts, making dart blocking largely ineffective. Infector simply gave zombies longer range, meaning that humans had slightly less space to work with, and also made human melee much less viable since the zombie melee range was the same as or longer than the human melee range.
Tanks were probably the most dangerous of all the zombies, as they were near impossible to take on alone. Tanks required solid teamwork and a fair amount of space to take down, making objective based gametypes that much harder, and also made late game survival very difficult, due to the abundance of other zombies and the lack of human allies. Some Tanks were victims of long range potshots from Retaliators, but for the most part could be stunned by any coordinated pair of humans. Charging Tanks were quite a threat, due to the difficulty of hitting a running zombie, as well as the protection offered by the shield, however they often charged with their shield in front, making side attacks very easy.
The Husk wasn't much of an actual threat, due to the scarcity of its ammo. It felt more like something to keep humans on their toes and keep them from becoming complacent, though honestly flanking zombies did that well enough. I feel like having multiple Husks with more ammo would make them more of a credible threat, but considering the bulk of bringing multiple Titans to supply said Husks, that's probably not too practical, and the extra zombie threat may not be too great anyway.
The Hand of Freedom was much like a Spitter from my previous Equalz Dee games, in that they're a zombie whose range is however far they can throw. The main difference is that the Hand has a lower range (and probably worse accuracy) due to their use of an unaerodynamic ammo (Hand throws hands/feet, Spitter throws Mini Vortex Howlers), however they carry much more ammo around, making them a much more persistent threat than Spitters. Both have their place in the zombie ranks, however I feel Spitters work better as a "common" zombie as their limited ammo makes them more balanced, but the persistent threat of the Hand makes it a good "elite" zombie.

The Three Squares gametype was rather odd. Since the humans have a head start over the zombies, they have time to set up defensive positions around the squares. While humans in the squares are less vulnerable to regular zombies since zombies must move outside of the square when stunned, the Hand is still a big threat since they can just stand outside the square and pelt the humans with hands and feet. This made the square that contained the Hand handbag quite important to guard for the humans, as protecting it preserved the humans' relative safety within the squares. The human flag bearer was placed in the tank square, and the rest of the humans were spread around each square. The Hand was the first square to fall, due perhaps to a lack of communication. From there the zombies were able to push through into the Infector square, leaving the Tank square as the last one untouched by zombies. Due to the Hand, the flag bearer was not safe within the square, as the Hand could simply stand outside and keep throwing hands when not stunned. This produced an odd situation where the flag bearer and Hand would have a stand-off, while the rest of the humans would hold off any other zombies from getting close to the Tank square. Naturally at some point the flag bearer was tagged, and so zombies got shields and the humans fell shortly after.
I didn't like the Three Squares gametype much. I'm not a fan of these sorts of standoffs where players are forced to stay in a specific location, however I do admit that it does promote human teamwork, since a coordinated group of humans could hold off the zombies pretty much indefinitely due to their lack of upgrades. The squares do at least keep the zombies at bay if you keep tagging them, and prevents zombie "creeping" (zombies slowly moving forward despite constant stunning).

I found Blind Bomber to be more fun than Three Squares, as I find having an actual objective/win condition is a much better motivator and makes the game all round better. I like escort missions as I feel like they promote assigning various players actual roles (such as assigning someone to specifically watch the rear), however in most of the games I play with friends, there aren't enough players for an escort mission to work properly. In Blind Bomber the humans must defend the bomb (and blind bomber) at all times, including when the bomb has been dropped on the ground or when the bomb is stationary during either of the timer sections. The problem with this is that the approaching zombies, while they keep getting stunned, will slowly creep forwards towards the bomb. While ok for the Blind Bomber escorting parts, for whenever the bomb is not moving, especially if the Bomber has dropped the bomb, some zombies will inevitably end up right next to or on top of the bomb, making it incredibly difficult for the Bomber to relocate and reacquire the bomb, and usually in that scramble for the bomb some zombie will have un-stunned and made it a few metres with the bomb. This distraction ended up with a lot of humans getting taken out by sneak attacks, and both rounds ended before the humans got to the second location.
Perhaps these issues occured because the humans were unorganised and had poor communication, which allowed the zombies to get close enough to creep towards the bomb, and let other zombies hit the humans from behind. Nevertheless I still feel that the game would have been perhaps just that little bit better/less cramped near the bomb with an anti-creep mechanism, maybe just a stunned zombie free zone like in Three Squares.
Alternatively a zombie respawn instead of stun system may work better for Blind Bomber, but as I've said before the games I have with my friends usually don't have enough people for escort games.
Considering Blind Bomber seems to be a standard gametype for MHvZ, I suspect it just didn't run quite as intended the times I played it, presumably it would have worked out better for the humans in past events.

6 Round Team Sweep was just a way of making people competitive over dart sweeping. It worked well enough and certainly helped reduce the number of darts on the field. The only potential problem was identifying teammates/enemies, as there were no team markers like bandanas or armbands. Since everyone answered quickly and truthfully when asked though, it wasn't much of an issue.
The threat of zombies kept people from camping and being lazy, so the main portion of the field was fairly well cleaned up by the end.


Despite some of the issues I had with some of the gametypes, I had loads of fun and will definitely attend more events if possible. My legs were quite sore when I returned home, but I've been told that if they don't you haven't played properly. Since my events don't have the sort of turnout MHvZ gets, I can't play games to the size that MHvZ can, so MHvZ is the only way I can experience these sorts high player games.

Game Report 7/7/15

Back to Equalz Dee for this event.
Apologies for this pic, I didn't forget to take one until the very end when it was dark and we were packing up.

Gamemodes:
Old: 
Runner HvZ v1.1- humans would try to run back and forth between two safe zones, with only a short time in those safe zones to reload and rest. The winner would be the final survivor, who would try to make one last run between safe zones for an "extraction" win, while getting tagged on the final run would result in a regular win (extraction win having more prestige). Early runs would have time limits so as to prevent human camping or circumventing the zombies.


New:
Trouble in Terrorist Town - all players are given a playing card from a specific deck at random - the joker indicates the "detective", aces "terrorists" and any other card "innocents/civilians". The detective can generally be considered as simply a special civilian. Naturally no player can show any other player their card, except in the detective's special circumstances. The deck is formed such that the civilians outnumber the terrorists and there are very few (or only one) detectives (for instance: 7 civilians, 3 terrorists and 1 detective). Terrorists try to eliminate all other players besides fellow terrorists, and know who each other are. Civilians and the detective(s) try to eliminate all terrorists. In this manner, a player who eliminates everyone else will win regardless of which side they're on. Friendly fire is on, so civilians can eliminate other civilians, and terrorists can eliminate other terrorists. The detective can "inspect" an eliminated player's body by showing their joker, and the eliminated player must show the detective their card, this being the only situation in which a player should show another player their cards.
Bounty Hunter (mini) - all players are given a number, preferably with playing cards or other similar physical item. A small number of bounties are randomly placed on a few of the remaining players. When a player is eliminated, they must give the eliminating player all of their numbers. Players hand in all of their collected numbers (but not their own) to the "bank". If any of the collected numbers are bounties, the depositing player is safe for the rest of the round. If a player survives such that there are no remaining bounties, or there are no remaining non-safe players (usually if the player themself has a bounty on them), then they are safe and proceed to the next round, in which a new set of bounties is placed. The last surviving player is the winner.
Octozombies - a small scale version of Runner, using a small play area such as a basketball court. Effectively a Nerf-ed version of the beloved primary school game Octopus. Humans are given just a single dart/disc/etc, and the starting zombies get swords. If a zombie is hit, they are eliminated for the remainder of that run (but return in the next run). If a human is tagged, they become a zombie in the next round. At the end of each run the humans pick up their one shot if used (or just load a new one in). Humans are not permitted to scavenge off the ground during runs.


Blasters:
Regulars:
Rebelle Sweet Revenges (modded) - my standard modded dual wield pistols, devastatingly effective especially in HvZ.
Elite Roughcut - performed as usual.
Elite Strongarm - performed as usual.
ZS Hammershots - same usual, solid all round pistols.
Rebelle Secret Shot - saw only a little use, and no significant combat use.
Mega Thunderbow - same as before, a large, silly and intimidating Mega firing blaster that gets solid ranges.
ZS Flipfury - as usual, a Strongarm with a higher capacity.
Elite Triad -  solid compact pistols that also worked well dual-wielded. Naturally the ROF was a little lacking compared to a lot of other blasters but dual wielding helped to cover up that weakness.

New:
N-Strike Thunderblast - operated as the only rocket launcher today. It got enough range to be usable, but as none of the games gave a bonus to using rockets it wasn't worth taking over a regular dart blaster.
Rebelle Messenger - basically a more powerful Triad with a larger form. It seemed reasonably accurate though I did use Kooshes which tend to be much more accurate.
Elite Crossbolt(armless) - easily one of the best blasters present. It got very good ranges, on par with or superior to my Sweet Revenges, and also had incredible accuracy even with Elites. I saw a lot of shots fly totally straight out of the Crossbolt, even at longer ranges. Though somewhat uncomfortable to hold and use, and a little slow firing, the impressive range and accuracy made it a very dangerous blaster.
N-Strike Raider - I never thought I'd see one of these in action after 2012, considering the Raider's unreliability and the existence of the totally superior Rampage. It did work well enough to get a solid ROF, but also jammed up frequently as expected, and being an old N-Strike blaster was also quite weak. Honestly I would rather take a Strongarm than the Raider.
"Boomstick"(homemade small HAMP) - the Boomstick was designed to utilise Maverick cylinders to fire a burst of 6 darts, however due to poor design could only fire 3 at a time, and even then the darts rarely reached more than 7m. At close range it more often than not hit its target, but at those sorts of ranges a regular blaster would have nearly as high a hit chance anyway. Its owner does intend to overhaul the design, this version was a pretty cheap and basic thing put together very quickly.
Mega Magnus - acted basically as a low capacity hand cannon. It got respectable ranges, comparable to the Thunderbow, but of course the low capacity, difficult reloading and scarcity of ammo drastically reduced the viability of the Magnus in any serious firefights or fighting off more than ~2 zombies.
Vortex Vigilon - again, basically the Strongarm of the Vortex line. Worked reasonably well, much like the Strongarm. Its superior range was effective at suppressing dart blaster users, but the low disc velocity made it quite easy to dodge at range.


We played in the same school as the first time I attended one of these, which has a sufficiently large built-up area in the main play area, with an oval on one side and a carpark on the other, and fences acting as the main boundaries.
There were up to ~13 players at any one time, usually being a minimum of ~10.


Runner HvZ was played using the fences on opposite sides of the school as the two safe zones, and with a time limit for the earlier rounds to prevent camping or going too far out of the main play area. In the first few rounds it was practically impossible for the zombies to get any tags because of the sheer number of humans and thus potential for number of rounds fired. However the zombies were able to get a first tag through very poor communication among the humans, with no humans covering a stunned zombie while a human picked up the used darts around said zombie. This first tag was all the zombies needed, as they suddenly became much more organised and were able to separate lone humans from the pack, easily getting the tag. Later in the game the time limit was ditched as it was no longer needed, with the zombies being much more of a threat that was not easily avoided. As the game progressed, the humans got more and more desperate and the zombies became more and more organised, often forcing the human pack to leave behind stragglers to improve survival chances.
I ended up as the final survivor once more with my dual Sweet Revenges. To maximise their chances, the zombies split up to cover the three possible exists from the starting fence, however this possibly worked against them. At its peak the horde was ~11-12 zombies strong - too many for me to stun without reloading my Sweey Revenges. However as they split up to cover the three exits, I was able to stun all 3 zombies covering the middle exit, run past them (thus avoiding the zombies covering the other 3 exits) and outrun or stun any zombies in the middle of the area, successfully reaching the finishing fence for a win.
Considering that the zombies would have seen which exit I was going towards anyway had they *not* split up, they would have been able to swarm me with their full strength, which likely would have had enough numbers to overwhelm and tag me. Being that the three exits were spread apart and not within sight of each other, the zombies guarding the two exits I didn't use didn't know I had broken through the middle exit until I was at least half way across the school, and so had no chance of catching up.
I really like Runner HvZ. Although the zombies can struggle at the start if the humans work together properly (with double-tap often being implemented if the humans are untouched for too long), once the zombies start to get organised and start getting a few tags, then the game really takes off and becomes quite intense and fun.


Trouble in Terrorist Town is a very different sort of gamemode in that the primary warfare going on is psychological warfare, rather than actual combat. As at the start of the game everyone appears to be a civilian, firefights rarely erupt within the first few seconds - civilians want to preserve as many civilians as possible (who are the majority) and terrorists don't want to risk revealing their identity too early on. It is only when suspicions start to arise that foam starts flying, and usually only a few people are taken out while the detective attempts to inspect the fallen. The detective is the only player whose identity you can know for sure, as they must prove they are a detective (by showing their card) to inspect a body. The detective's ability makes them very much a target for the terrorists, as if the detective finds out that the fallen are mostly or all civilians, then it makes it very likely that their attackers were terrorists (or just anarchistic civilians, who you want to eliminate anyway). The easiest way for a terrorist to eliminate a group of civilians is to convince said civilians that they are also a civilian, and proceed to eliminate them all once their trust is earned. The easiest way for a player to survive until late-game is to stick with a group of people, regardless of their allegiance, due to the extra firepower they bring to a firefight.
Often the players would split into a number of small groups, and suspicions would quickly arise if any player appears dangerous. As soon as a few players are eliminated and the firefight stops, the detective would usually come out to inspect the bodies and confirm their identities. As the detective counts as a civilian, and the terrorists know who their fellow terrorists are, the detective has no reason to lie if asked about the bodies.
The detective's inspections would often place significant suspicion on the surviving attackers, often causing further combat. The terrorists would usually attempt to remain hidden within the civilian groups and try to instigate civilian vs civilian combat to eliminate civilians without risking their identity. More often than not the player who preemptively attacks other players is treated as a terrorist.
Generally both the terrorists and civilians would win some games, primarily depending on whether or not the civilians grouped together (through luck) and could protect the detective long enough to identify the terrorists.
I found the game to be very chaotic and involve a lot of paranoia, and it was a lot of fun to watch people argue about who could be the terrorists, which usually resulted in the conflicting groups attacking one another, sparking a firefight. However the relative lack of combat compared to other gamemodes was something I didn't enjoy as much, as I'm pretty terrible at psychological games and prefer not to engage in them, especially when the alternative is direct combat. Additionally games with permanent elimination are not that fun especially if you are eliminated early on, and I far prefer games that have respawns or other mechanics to keep eliminated players in the game (like zombies).

However later in the day a new feature was introduced, and I personally feel that it totally killed Terrorist Town. A small area was designated as a room of safety where players could not be eliminated. If 3 people assembled in the room, they could show each other their cards (something not normally permitted). Naturally as the civilians were superior in number, it was more likely that they would group together with at least two civilians in the room, thus forming a core of civilians who knew they could trust one another. This heavily skewed the game towards the civilians, as civilians knew they could just stall until the room opened, go inside and form a core of civilians, then proceed and verify or eliminate everyone else.
Because of the insistence on stalling, it was near impossible for terrorists to get any tags without instantly revealing their identity *before* the room opened. Because of the safety of the room it was impossible for terrorists to discreetly eliminate civilians within the room, and so there was no reason *for* terrorists to enter the room. Thus anyone who refused to enter the room was labelled a terrorist and eliminated. There was no potential disadvantage for civilians entering the room, and there was no potential advantage for terrorists entering the room, except in the very unlikely scenario in which two or more terrorists entered the room at once. Therefore the room did nothing but heavily disadvantage the terrorists, who were already on roughly equal footing with the civilians *before* the room.
I somewhat enjoyed Terrorist Town before the room for its chaos and paranoia, however wasn't a fan of the lack of combat and the standoffs. The addition of the room removed much of the chaos and paranoia and did nothing to reduce the combat, standoffs and threat of permanent elimination from the game. I personally absolutely despised the room as after it was implemented I spent most of my time just standing around doing nothing, and more often than not getting quickly eliminated.
Additionally throughout all the games players would often shout out information even when eliminated, further ruining much of the paranoia of the game.

To make matters worse, I was often eliminated by teammates. Admittedly that is part of the game as a civilian, however I was eliminated in the most irritating of circumstances. One time as a civilian I was eliminated for getting too close to a player who survived a firefight, wanting to understand what just happened (as I'd heard a lot of shouting but not seen enough), despite my blaster being holstered and thus not being a threat. Several times I was eliminated as a terrorist by fellow terrorists for no good reason - they would suddenly run right up to me and shoot me, despite all terrorists knowing each other's identities from the beginning of the game.
A further issue is because of the permanent elimination aspect, eliminated players would often take to wondering around to watch the action (after being inspected by the detective if still alive), which made it very difficult to know who was still alive and who was eliminated.

All in all I feel that the addition of the room was a very, very, very, very, very, very, very, very bad idea as it totally ruined the whole point of the game. I somewhat enjoyed Terrorist Town before that, however some serious gameplay issues such as terrorists forgetting fellow terrorists and not being able to differentiate between alive and eliminated players at a glance ruined much of the experience. I feel that if the room is to be kept in the game, it needs to be very seriously nerfed so as to give the terrorists a more sporting chance, and that rules should be put in place to more easily differentiate between alive and eliminated players.


Bounty Hunter was another paranoia like game that had more combat than terrorist town, however due to the way the game worked was more of just an FFA than an actual organised game. Although the idea is to eliminate specific targets then hand in the bounty to be safe, the biggest challenge is returning to the bank to verify the bounty and obtain safety, because you become a target as soon as you get anyone else's cards. As such, it becomes effectively just a hit train, where one person gets *a* bounty, a player quickly eliminates them, then another player quickly eliminates them as well, proceeding until there is just one player remaining.
With better organisation and possibly something to prevent non-bounty eliminations from being full eliminations, Bounty Hunter could work better, but as is you might as well play a FFA, which is faster to set up but works pretty much the same.


Octozombies was a gamemode made up on the spot as a finale game while others had to pack up and leave, yet ironically turned out to be a great gamemode (with some tweaks). Early on, like with most other zombie games, the zombies would have to work together and try to isolate humans as they had no chance against the collective group. This was much easier than most zombie games however, as the humans only had one shot each and so would not use their shot unless absolutely necessary. This also meant that most humans would simply leave behind stragglers instead of using their shot to try and help.
In the early game, the zombies actually have a lot of trouble against a well organised group of humans, who have more than enough shots to just pummel the zombies into submission, then simply stroll to the other end at their leisure. 
As the zombies began to get tags (helped by starting with foam swords for extra reach), the humans were forced to work together to have any real chance of passing the zombies as a single human would be unable to stun more than one zombie, and thus would have no chance of passing the blockade of zombies. Because each human only had one shot, a single miss left the human completely vulnerable, thus forcing humans to have to fire only at close range. This of course gave the zombie a much better chance of a tag if the human missed or mistimed their shot. This period of the game was by far the most competitive, as both sides had solid chances for success provided they worked as teams.
However as the zombies started to outnumber the humans, it became practically impossible for the humans to win. Having insufficient shots to stun all zombies, the humans would inevitably just be run down and tagged, and even if a human or two made it through, they were doomed the next round.
However this iteration of Octozombies was very much a prototype, and has since already been significantly improved and balanced. I played this balanced version of Octozombies in another recent game, which I will be writing about soon.


I thoroughly enjoyed all the zombie based gamemodes because they involved a lot of running and a fair bit of combat, however thought much less of Terrorist Town and Bounty Hunter, especially despising Terrorist Town with the room.

Game Report 8/7/15

3 events in 5 days, that's a heck of a coincidence. This one was done with just my friends, no special group or anything. The blaster set is totally different to the Equalz Dee games, more akin to a toned-down MHvZ blaster set.
Gamemodes:
Old: 
Capture the Flag - steal the enemy's flag and return it to your flag, and be in possession of both flags in a particular location to win. One-shot-respawn at a respawn point behind your flag collection point, with minimum 10 seconds out of game (ie however long it takes to get back to spawn or 10 seconds, whichever is longer).
Bombing Run - stolen from UT. Effectively 1-flag reverse CTF. You try to take a central bomb to the opponent's goal, while they try to bring the bomb to your goal. You cannot fire while holding the bomb. Uses the same respawn system as CTF. The team who gets the bomb to the enemy's goal wins.


New:
Juggernaut/Killbox - a small number of players ("defenders") are constantly attacked by a large number of players ("attackers"), and try to hit as many attackers as possible. The defenders are restricted to a given area. The attackers operate on one-shot-respawn, respawning instantly outside of the defenders' area. The defenders take three shots to be eliminated. Ideally you'd rotate around squads of defenders, and the squad of defenders that hits the most attackers wins overall.
Octozombiesv1.1 - a small scale version of Runner, using a small play area such as a basketball court. Effectively a Nerf-ed version of the beloved primary school game Octopus. Humans are given just a single dart/disc/etc, and the starting zombies get swords. If a zombie is hit, they are eliminated for the remainder of that run (but return in the next run). If a human is tagged, they become a zombie in the next round. At the end of each run the humans pick up their one shot if used (or just load a new one in). Humans are not permitted to scavenge off the ground during runs.
Additional rules:
Once the zombies outnumber the humans, the humans as a group get one dart for every extra zombie (for instance for 4 zeds, 3 humans, the humans get 4 darts).
Octopi-ing - instead of zombies getting eliminated from the round, they turn into an octopus and can still tag humans, but cannot move.
Double-tap - if a zombie is hit once, they are stunned for 3 seconds. If they are hit again within those 3 seconds they are octopi-ed, otherwise return to regular zombie duties once the 3 seconds has elapsed.

Blasters:
Regulars:

Elite Alpha Trooper (spring replaced)- pretty much the benchmark to which all other springers are compared. A solid all round blaster with good range, usable accuracy and a reasonable ROF.
Elite Retaliator (spring replaced) - slightly more powerful than the EAT, with a slower ROF. Also more compact without attachments, so quite good at corner shots. Personally I prefer the EAT but the Retal is more readily available and more internally robust.
Elite Stryfe (rewired, 2*IMR) - a basic entry level flywheeler. Lacks the power of an upgraded springer, but is very easy to rapid fire, though being semi auto stable ROF is much lower than maximum ROF. Since it's not running upgraded motors rev time is significant, and the lack of range overall made the Stryfe one of the weaker blasters on the field.
N-Strike Alpha Trooper (spring replaced, AR removed, powerstock) - this thing is a relic of the bygone N-Strike era when the NSAT was widely regarded as the best all-round springer, before the Elite line came out. With the powerstock it had sufficient power to keep up with the EATs, however a lot of darts seemed to helicopter out of control within the first 8m. Given that the EATs were easier to use, got similar ranges and were more reliable (with no helicopters observed), there was no reason to use this NSAT over the EATs.

New:
Elite Crossbolt (no arm mod) - as described in my previous game report, the Crossbolt is uncomfortable and awkward to use, and slow to fire, but gets very solid ranges (comparable to the Stryfe at full-rev) and more importantly incredibly good accuracy. The accuracy made it quite good for cover to cover potshots, and the relative quietness of its firing made it very difficult to pinpoint the Crossbolt user if they quickly ducked back behind cover. The slow ROF made it very vulnerable to the flywheelers though.
Elite Rapidstrike (minimised, rewired, 2S LiPo - "RapidPDW") - can be thought of as a larger, bulkier Stryfe with a stock that got slightly superior ranges, faster rev time and a much higher stable ROF (around 6dps with a full charge LiPo). It handled quite well in close quarters, being full auto and highly maneuverable, however appeared to struggle at longer ranges where it had very large spread.
Elite Rapidstrike (overhaul - Falcon motors, rewired, 3S LiPo) - easily the star of the show. This Rapidstrike got ranges comparable to the EATs (with basically no flywheel residue buildup), yet spat out darts at around 10dps, far beyond anything else present. Accuracy was lacking again due to the lack of flywheel residue, but given the ROF that was not particularly important. I was able to easily outgun basically any other blaster, and single-handedly won several of the rounds we played purely thanks to the firepower of this Rapidstrike. I look forward to building more primary-worthy Rapidstrikes.


We played at the same school as the day before's Equalz Dee game, as I felt the terrain would be suitable not only for the primarily zombie games played with Equalz Dee, but also the more tactical games I play with friends. We stuck to the built-up area, avoiding the more open areas since they had no cover.
The built-up area has more cover than the playgrounds I usually play at with my friends, which certainly made combat more fun and less dodgy.


I find it hard to talk about CTF and BR as they ran relatively smoothly and as expected, including the obvious shortfalls of real-life games compared to video games, primarily relating to respawning and players running out of ammo. For some stupid reason I didn't think to just dump the spare (filled) clips at the spawns, which would have fixed that. Regardless, the games ran relatively smoothly and quite quickly, the longest game being around 4 minutes (as expected for such a small player base).


We had to play the CTF and BR games as only 3v3 due to people having issues preventing them from arriving on time, which meant that we had to restrict the play area slightly more than I'd like to prevent players from just circumventing all combat and capturing the flag/bomb. If possible, I would have liked to use slightly more of the built-up area, as the firefights usually involved the entirety of both teams and so turned CTF basically into a slightly more tactical TDM. Had we had more players, we could have used more area and had a more interesting game. More players and more area would allow for more smaller skirmishes rather than a few large firefights, leading to more teamwork required to adequately defend and attack at the same time.

Juggernaut was just a filler gamemode as we only had a few minutes before one of the players had to leave. It wasn't planned or thought out much, and probably isn't intended to be played in the manner it was in the future. We had 7 players, so the juggernaut was given the overhauled Rapidstrike and a buddy with their choice of blaster, against 5 attackers. This gamemode in particular highlighted the ease of abuse of full-auto, the need for spare clips for the Rapidstrike and the value of cover more than anything else. The juggernaut had about 3 18 clips, however the juggernaut + buddy only managed to score 3 hits.
Watching the juggernaut's footage, it was clear that the juggernaut, someone inexperienced with such a high ROF Rapidstrike, was unable to properly fire short bursts early on. As such they used 5-7 darts on bursts that only needed 3-4 to get hits, depleting the juggernaut's ammo twice as fast. The availability of cover further highlighted the need for trigger control. Often the juggernaut would fire off bursts at attackers, only for them to duck behind cover. The juggernaut often fired off 5-7 dart suppression bursts, where just 1 or 2 darts would have done the same job, with far superior ammo conservation. Where the juggernaut would have reflexively fired off just one or two darts with say an EAT, he fired off extended bursts resulting in him depleting his 3 18 clips exceptionally fast (despite 2-3 18s being a standard loadout for my friends).
I get by with the Rapidstrike with 3 18s and 2 12s for the short CTF/BR games, however ideally I would like at least 6 18s as the Rapidstrike can eat through clips incredbly fast, especially so in larger engagements. In just a 3v3 CTF/BR I was running through all 3 18s, so in a 4v4 or 5v5 I can foresee running through 5 or even 6 18s. In MHvZ as well, I found myself running through my (5) 18s quite quickly, though because most other humans packed a lot more clips than me, I could survive longer firing less by relying on their fire support.
Juggernaut very much emphasised the need for practice and trigger control with the Rapidstrike. It can be extremely easy to eat through clips very quickly, and waste a lot more darts if the user is more used to manual blasters like the NSAT/EAT. However as with CTF/BR, the volume of fire put out by the Rapidstrike was deadly if players were caught out of cover.

An altered version of Octozombies was played late in the day with 7 players (2 OZs), and IMO it worked really, really well. Early iterations of Octozombies saw zombies have little issue getting the early tags on humans, due to the humans splitting up, missing, being incompetent etc. However if the humans worked and stuck together, it was practically impossible for the zombies to get to get any early tags wen operating on one-shot-elimination, so changes had to be made.
In early game (ie when humans significantly outnumber zombies) zombies operate on a double-tap. This greatly improved zombie chances early on as double-tap gave them a second chance against any stragglers, and also reduced the ability of the humans to just annihilate the zombies. Originally the humans would start off with 5 darts to 2 OZs, which operating on one-shot-elim gave the humans a huge margin for error when firing their shots. Doube-tap meant that if a single shot missed, the humans would have to hit every subsequent shot to be able to stop all the zombies. Naturally if the humans moved fast enough and were sufficiently coordinated, they could still all just single-tap the zombies and run past during the stun, however in practice this level of coordination was not usually necessary as once one zombie was octopi-ed, the humans could easily deal with the second. Usually the most threatening zombie (or the one in the way of the humans and the other side) would be hammered with several darts once they got too close, followed by the human pack sprinting past/around the octopi-ed zombie while the second zombie did what they could to deal with stragglers. The new octopi rule meant that the zombie wasn't completely eliminated from play, but instead simply couldn't move, which allowed them to block off a small area. This effectively increased the chances of the human pack having to contend with both zombies, and increased the threshold of dart hits required to be able to get past, which greatly improved early game competitivity and fun.

Once the zombies started to get reasonable numbers (3 in our case), double-tap was removed but octopi was kept in play. Because the zombie-human numbers were roughly even, double-tap was no longer necessary to give the zombies a fighting chance. Octopi was still kept in place so that the eliminated zombies could still be useful, and so the humans can't just completely ignore downed zombies. In the 3z/4h situation the humans have a very slight advantage, but in the chaos of the run the zombies still have a solid chance of a tag or two.
As the zombies start to outnumber the humans (starting with 4z/3h), the humans start to get more darts, with one for every extra zombie. This is to give the humans a fighting chance, as they are otherwise just screwed going into late game. In the case of 4z/3h, the humans as a group get 4 darts, which is typically split 2/1/1 so each human has a chance of survival. The human who has the most darts usually leads the pack, however as the zombies still octopi the humans can't take a direct route to the other side. At this stage there are not yet enough zombies to block the whole area, however the humans are forced to work together as one human vs the horde is a very bad matchup. This and the previous stages of the game are the most competitive and hectic as both sides have roughly equal numbers.

Once into the final stages of the game, where the zombies far outnumber the humans (starting with 5z/2h), zombie octopi-ing is removed (and replaced with standard elimination) as the zombies can almost block off the entire area by standing in a line. Once at this stage it becomes very difficult for the humans to progress, and it becomes even more crucial for them to work together. Without working together, a human would potentially have to face two zombies after using all their darts, which is a practically guaranteed tag. Considering the chaos of the game, pairs of humans rarely survived more than one or two runs at this stage, usually with the slower one getting trapped by zombies while the faster one sprints by.
The very last run of the game is a last stand type run, with the last human getting enough darts to hit each zombie once. The zombies typically just charge the human as that gives them the best chance of success, however it is possible to win this round as a human. Using an EAT with 6 darts, I was able to eliminate the first 3 or so zombies who charged at me, which gave me a little breathing space to work with. I used the remaining darts to eliminate as many zombies as possible, and I ended up eliminating 5 of the 6 zombies, and just outran the last zombie to win. Nevertheless this last run is quite difficult as you have the pressure of facing down a far superior horde, and have nowhere to run. A single misfire or jam will get you tagged, but even without that you need to be able to fire quite quickly to eliminate all the incoming zombies. Even with the pump action EAT I was barely able to hit all of the charging zombies, so I'd certainly recommend using a pump action or semi/full auto blaster in this last run.

The ammo scarcity is a key part of Octozombies and contributes much to why the zombies are a threat. If you were allowed in the earlier rounds to have more than one dart, it would be far too easy for humans to take turns suppressing and warding off the zombies (or even just going for the double-tap at longer ranges). In later rounds it would be far too easy for a player to fire on the zombies at long range and cut a path straight to the other side.

I really enjoyed Octozombies, it gets everyone moving and running, and does well at honing zombies' dodging skills and humans' close range/pressure situation accuracy. Besides having the cluster of eliminated zombies in the last few rounds blocking both humans and zombies, and zombies overruning their stun/octopi hit locations, Octozombies had no real negative points or issues.

Once I can get a few more videos edited and uploaded, I'll be adding them here.

Review: Blastersmiths UK Battle Belt (MkI)

Back when I used the Nerf-made tactical vest, I found some serious flaws in its abilities. While it could hold 6 dart clips ok, it struggled with anything larger, with 12 and 18 dart clips frequently falling out. As such, I needed a new piece of tactical gear that would be able to properly hold 12/18 dart clips, and due to my financial situation required it as cheap as possible.
Enter the BSUK Battle Belt (MkI).
The BSUK Battle Belt is a piece of equipment designed to be worn around the waist, and is meant to hold 4 12/18 dart clips.

Each "section" of the belt holds two clips, and besides the buckles the two sections are basically mirror images.
The clips are held in these pouches that flatten when not in use and open up to accept clips. This method produces an unfortunate ergonomic issue which I will describe later.
The clips are held in using friction in the pouch and these bungee retention cords.
The Battle Belt is designed to hold 12/18 dart clips, but will hold any size of straight clip, as well as straight Vortex mags and banana clips. Shorter clips like the 6 clip will have no use for the bungee cord, as they will fit straight into the pouches.
Retaining the 18 clip requires stretching the bungee cord slightly, which gives a tight and solid fit. Removing the clip requires simply flicking the bungee cord off, then pulling the clip straight up.
As the bungee is by default set up for 18 clips, it needs to be shortened for 12 clips. With the bungee shortened the 12 clips fit in nice and snug as well.
One additional job the bungee does besides retaining the clip is also retaining the top dart, which if worn down and thin can potentially pop out of the clip.

 The rear straps of the Battle Belt can be adjusted based on your size.
The Battle Belt clips together in the front, allowing for easy wearing and removal. Pretty standard stuff for tactical gear.
The Battle Belt has four velcro loops at the bottom, meant to fit on a belt if you're wearing one. I personally use it with the Vortex belt and Sweet Revenge holsters. It's very useful to have a belt, as I will explain later.

The Battle Belt is covered in PALS/MOLLE webbing, a webbing pattern designed to allow easy customisation of tactical gear. BSUK manufactures a number of PALS/MOLLE compatible attachments, such as clip/mag pouches and the zip pouch I use. Additionally a lot of other aftermarket tactical gear uses the PALS/MOLLE mounting system.
PALS/MOLLE retains its attaching strength through having something (in this case a BSUK MOLLE Attachment Bar) weave through the PALS/MOLLE webbing of both pieces of equipment. In this case I've attached a BSUK Small Zip Pouch to my Battle Belt.
PALS/MOLLE equipment is designed to be removable with reasonable effort (outside of combat), but be solid enough to hold up in combat, as it was initially designed for the US Army. As such when sufficiently attached (and properly manufactured), PALS/MOLLE attachments are near impossible to forcibly remove outside of the correct methods or breaking/snapping/cutting/etc of parts.

Here's the Battle Belt loaded up with 18s. They stand up quite high, though they're 18s so that's kind of expected.

And here with 4 12s, much more compact than running 4 18s.

Here's the issue I was referring to earlier. Each clip loaded bulges the clip pouches slightly, tightening the belt. The more clips you load in, the tighter it gets. As such, the belt is significantly tighter when fully loaded compared to when it's empty. For comparison, with 4 clips loaded and the belt fastened relatively tightly around me, with the clips removed the belt is very loose and moves about easily.
Hence why I recommend wearing a belt when using the Battle Belt - the belt will keep an empty Battle Belt from shifting around too much and will remain tight around your hip regardless of what your Battle Belt is doing.

 Here's me wearing a empty Battle Belt. Note how the Belt wraps around my body and ends up under my arms.
 My back, with just the back straps of the Belt.

 Here's the Battle Belt loaded up with 4 18s. Their length brings up another ergonomic problem.
The side 18s are tall enough to come close to jutting into my armpits, which besides being plain uncomfortable also hinders arm movement slightly, particularly in shouldering blasters that have large buttstocks.
Additionally, the proximity of the clips to my armpits makes it that little bit harder to pull the clip out of the Belt. With a little practice or angling the clips forward, this problem is largely avoided, though arm movements and shouldering blasters can still be an issue.

Here's the Belt with 4 12s. No height issues here, they fit well and are easy to access, though you lose out a lot of capacity compared to using 18s. I'd use this setup for supplying a slow firing blaster, though as I prefer high ROF blasters personally, I don't use this setup much.

Here's a compromise that avoids the discomfort of 18s under the armpits, while still retaining some 18s for higher capacity than using all 12s. When I don't need absolute maximum capacity I'd this particular loadout of clips.

Here's the Belt with a Small Zip Pouch mounted. Naturally you can mount the pouch in almost any position, but I've got it mounted here in a position similar to the Nerf Tactical Vest, as that's what I'm used to. I plan to mount extra clip pouches on the other side, as I found that 4 spare clips is pretty small for MHvZ.

This is my standard medium capacity setup, Battle Belt with Small Zip Pouch, Vortex Belt with dual Sweet Revenges, 2 18s and 2 12s, usually with another 18 in my primary.

The Battle Belt costs 25GBP excluding shipping, which at the current exchange rate converts to around 50AUD. There are a couple of things to consider when deciding if you should get a Battle Belt.
  • What you need it for - if you're just goofing around with friends and not playing any sort of competitive games (or don't need to carry many/any spare clips for that matter), you could probably get away with homemade duck tape holsters and pouches, or repurposing a cheap bag/pouch meant for less vigorous use. Heck even a Nerf-made Tactical Vest might suit your purposes better if you don't need to support a large clip system ecosystem. The Battle Belt is a piece of equipment useful only to someone who needs to carry a reasonable number of extra clips. If you're going over say 15 spare clips, you'll probably want a backpack as well/instead, and if you're carrying less than 3, you could get away with a simple belt pouch. If you use exclusively drums then the Battle Belt will be of no use to you as it only supports straight and banana clips.
  • Money - the Battle Belt is one of the cheaper tactical gear options for holding clips and is designed as such - if you have the money to spend you should certainly consider building a tactical vest which can be specifically made to your dimensions, and set up specifically to your needs and abilities. Alternatively you could get pre-made tactical vests covered in PALS/MOLLE for reasonable amounts, and go on covering it with clip pouches and whatnot. A custom made tactical vest would probably also be more comfortable than using a Battle Belt, because of the aforementioned clip pouch bulging. Alternatively, you can buy a variety of basic belt or drop leg clip pouches for less than the Battle Belt, if all you need is to hold just a few more clips. The Battle Belt is a product designed such that you can expand it with extra parts in the future (thanks to the PALS/MOLLE) but will work straight out of package for carrying some straight/banana clips.
  • Availability of other Tactical gear - if you live in a place where airsoft and/or paintball are legal, you could probably find some cheap airsoft/paintball gear and repurpose it for Nerf use. For instance, I've heard that pouches made for AK magazines fit Nerf clips well, so if you have easy/cheap access to such, you could probably build your own basic rig for as much as, if not less than, the cost of a Battle Belt. You could certainly also repurpose military surplus gear if you have access to such.
  • Your manufacturing abilities - if you (or someone you know) have the ability to sew, have access to the necessary fabrics and have sufficient spare time, why not try your hand at making your own basic clip pouches? Like with many other hand-made products, a large part of the cost in the BSUK tactical gear comes from labour. It's certainly worth considering whether you can make your own gear rather than buying someone else's, as that way you can design it to exactly fit your needs and style.
For my situation, the Battle Belt was perfect. As a Uni student, I don't have a large amount of money to spend, but I knew that I would probably get more into the hobby over time. As such I wanted something that was relatively cheap (compared to other options), but could be easily expanded upon (ie have PALS/MOLLE). Being that I live in Australia, airsoft is illegal and paintball is very heavily restricted, so airsoft and paintball tactical gear are practically non-existent here. The cost of importing such gear meant that I might as well import tactical gear specifically made for Nerf. Though I am competent with tools and modding, I'm completely useless at sewing, so making my own tactical gear was out of the question.
If I had significantly more money to spend, I would probably have purchased a tactical vest and some clip pouches instead of the Battle Belt, and if I lived in a country where airsoft and/or paintball are legal, I would probably purchase some discounted tactical gear from those and repurpose them.

If you need to carry some spare 12s/18s, want something more sophisticated and expandable than some belt pouches and are on a low budget, then the Battle Belt is certainly an option to consider, but as with all tactical gear there are many options that could be more suitable to your situation/needs.

    Review: Buzz Bee Ultra Tek 3/Star (15m) + Internals & Ultra Tek Darts

    When Nerf first released the Elite line, they bumped up the standard for blaster ranges, making a lot of the non-Nerf market obsolete range wise. Now Buzz Bee has joined in the bumped up range claims with their Ultra Tek line, the smallest offering being the Ultra Tek 3/Star.
    The Ultra Tek blasters were kindly sent to me by Buzz Bee for review as they're yet to hit Aussie stores, however their contribution will not affect the review in any way.


    The box is a pretty basic open box, standard minimalist Buzz Bee fare. Note the 15m range claim instead of the usual 22m/72ft. Unlike Nerf blasters though, downtuned Ultra Tek blasters are externally identical to their full power version. Note that the US release UT3 is called the Ultra Tek Star instead.
    Out of box, 3 Ultra Tek darts and the UT3.

    Since the UT darts are a new ammo type, let's look at them first.
    As clearly obvious, the UT darts a little shorter than Elite darts. From my limited experience, Elite darts all seem to work in UT blasters, and UT darts seem to work in most Nerf blasters, though the blasters I tested the UT darts in are all modded.
    The UT head is shorter than the Elite head, and while it has a similar taper, lacks the air release hole in the side of the head.
    The UT head is completely solid and is much, much harder than the Elite head.
    A rough comparison of the foam. The UT darts have a larger hole through the centre, but have roughly the same OD. From qualitative squeeze testing, UT darts feel slightly softer than Elite darts.


    One thing important about UT darts is their weight. UT darts are significantly heavier than Elite darts, and even Koosh darts which are already heavier. I don't trust my exact scale measurements as they differ greatly from what others have measured, but the relative weights are still relevant. The UT darts are approximately 20% heavier than Elites, placing them around the 1.2-1.3g range.
    Because the UT dart head is solid, the UT dart has more weight in the head than the Elite dart. This is likely the cause of the difference in performance between the two.
    From my experience, UT darts typically get less range than Elites (thanks to their higher weight), which is noticeable from both Nerf and Buzz Bee blasters. However, I find UT darts to be significantly more accurate and consistent, as they fishtail and veer a lot less than Elites. I believe this to be due to the smaller head and higher head weight (though primarily the latter).

    Let's look at the UT3 now.
    Buzz Bee have been upping their game aesthetically from their roots with basic shaped boxes. The UT3 has a lot of extra details, such as the weird circle thing at the bottom of the handle, and the finger grooves in the handle. The one sticker is much less prominent than most other Buzz Bee things, and the coloured parts are plastic inserts rather than paint.
    Physically the UT3 also feels more solid than previous Buzz Bee blasters, though still noticeably less so than Nerf blasters.
    The UT3, as its name suggests, is a 3 shot blaster. The barrels are fixed in position and do not rotate, unlike the old Tek 3. There are ARs, but my iPotato was not good enough to capture them in this picture.
    The trigger and handle are fairly standard fare, though the handle is noticeably quite well designed besides the obvious circle construct at the bottom, which is just plain annoying and uncomfortable. There's no trigger guard, and the trigger has a relatively light pull.
    The UT3 is a slide primed blaster. Its slide is surprisingly wide, though I personally find it still a little short to comfortably hold.
    The priming draw is quite short, no more than 3cm. It's a little stiff/rough as well. At the end of the prime, you get a click of the catch popping into place, as well as what feels like rotating something, which I'll elaborate on in a second.
    The UT3 loaded up, it looks no different from any other multibarrel small pistol. What makes it different to the likes of Nerf's pistols however, is how it indexes through each barrel.
    The UT3 indexes counter-clockwise from the user's point of view. So for instance starting with the bottom right (bottom left for user) dart, the UT3 fires the bottom left (bottom right for user) and then top darts. However the UT3 does not use Smart ARs, as that's a Nerf technology which is possibly patented, making it difficult or maybe impossible to utilise. Instead, the UT3 uses a rotating plunger tube. Each prime rotates the plunger tube by a certain angle, closing off the used barrel and moving on counter-clockwise. As such, if you fire a single dart the reload the barrel, the UT3 will still fire the next dart.
    What this means as well is that unlike Smart AR blasters, each of the UT3's barrels performs the same.
     Here's the UT3 next to the Messenger and Triad, Nerf's 3 shot pistols. The UT3 is perhaps a less space efficient blaster, and so is slightly larger than the very similar Messenger, and far larger than the extremely compact Triad.
    So how does the Ultra Tek 3 perform? Does it compete with Nerf's Elite blasters?
    Range is usable, being around 10-11m at true flat using UT darts quite consistently. Use of Elite darts bumps the range up by about 1m though consistency goes out the window. The range claim of 15m is certainly possible at an angle. I expect US-release blasters will get stronger springs for more range.
    Accuracy is quite good, though primarily thanks to the more stable UT dart. Hits on human-sized targets at 8-9m are quite easy, and hits at 10-11m are still quite possible. Naturally switching to Elites completely eliminates any accuracy.
    ROF is about what you'd expect from this sort of pistol-sized blaster, firing all 3 darts takes up to about 1.5s at best.

    The UT3 however has a major reliability issue. The UT3 relies on the plunger tube being rotated on prime to index through each barrel, however due to a slight design flaw the priming bar doesn't always fully engage with the rotation mech. As such, you can sometimes get weak shots resulting from the plunger tube not rotating fully, or have the UT3 fire the same barrel multiple times due to the plunger tube rotating insufficiently or not at all.

    I'm not sure how much the UT3 will retail for, however based on past and current pricing for other blasters I expect it won't pass 5USD. The reliability issue is easily fixed with a piece of cardboard/thin plastic and a bit of adhesive, however should not have existed in the first place. Nevertheless, the UT3 performs well enough to be usable, so if you're looking for a multishot sidearm that isn't a revolver, do consider the UT3 if you're willing to dive into its internals. Just remember that the UT3 has a rotating plunger tube instead of a Smart AR system.

    Power: 5.5/7
    Accuracy: 4.5/5
    Value for Money: 4/5
    Usability: 2.5/5
    Rate of Fire: 2/5
    Overall: 3.39/5

    Personal Rating: 3/5 - a usable sidearm/pistol, however the reliability issue brings the score down a lot.

    Again thanks to Buzz Bee toys for kindly sending some Ultra Tek blasters to me for review, and again their contribution does not affect the review in any way.

    Now lets look at the internals and my fix for the reliability.
    First up is removing the slide, which is held together just by 2 screws.
    Here's the internals, fairly standard Buzz Bee fare. Note that I have to hold down the catch or else it will spring out, which is very annoying for reassembly.
    Just a few closer up pics.
    A better close up look of the barrels, though still super blurry.
    Here's the back of the barrel block, note each trapezoid air inlet for each barrel.
    And here's the front of the plunger tube, with 4 trapezoid outlets. Instead of the plunger tube having a single outlet and being rotated a full 120 degrees to engage the next barrel, the plunger tube is simply rotated 30 degrees to a different outlet engages a different barrel. As such it takes 12 primes instead of 3 to return to exactly the same state.
    Here's a look at the reliability problem. Now the priming rod usually ends up in the former position, bent slightly upwards. The problem is that for the priming rod to properly engage the rotation mech, it needs to be perfectly horizontal, as in the latter position.
    All I've done is get a shim of transparent plastic off a sheet, and hot glued it above the priming rod. Its height is crucial - too high and it won't improve reliability, but too low and the prime because much tougher and the slide won't return on its own.
    In its current form, my UT3 is now perfectly reliable. Before the fix it misfired/misrotated once every 5-6 primes, but after the fix I haven't had it misrotate a single time in at least 100 shots. With this fix the UT3 because a decent multishot sidearm.

    Review: Buzz Bee Air Max 6


    The AM6 is another one of Buzz Bee's air powered Air Max blasters. Like its other Air Max brethren it's not widely available in Australia, so I'm reviewing the US-release version.
    Like the other Air Max blasters, the AM6 was kindly sent to me by Buzz Bee for review, and as usual their contribution has no effect on the review (besides permitting it to exist).
    Pretty standard Buzz Bee packaging, note the 60ft range claim.
    Out of the box, the AM6 with 6 Extreme darts.
    All loaded up.

    Like its AM brethren, the AM6 has a few more details than previous Buzz Bee blasters, such as the extra bits of orange shell and a few more molded details, however is certainly still nowhere near Nerf's level of detail.
    Like so many Buzz Bee blasters and unlike most Nerf blasters, the AM6's top is very plain and has nothing even remotely resembling or trying to be iron sights.
    The AM6 is an odd sized blaster. It's larger than all sidearms (like the Strongarm), yet unlike larger blasters like the Stryfe and Retal, have no stock or any ability to attach a stock. It's similar in size to the Roughcut, yet doesn't have the same shotgun type feel.
    The length of the pump draw is quite long, at least 8cm. Courtesy of the long pump and the small tank, the AM6 fills up in 2 pumps; from my experience the entire 3rd pump vents through the OPRV.
    I find the AM6 pump the most comfortable of all the Air Max blasters, I just feel that it has the best length and shape.
    I also find the AM6 handle quite comfortable, though it's not the largest, and the gap near the bottom may cause some issues if you have larger hands.
    The AM6, like the AM10, has a two stage trigger. The first half (as pictured above) rotates the turret...
    ...and the second half fires. Note that the trigger doesn't depress fully into the handle, in contrast to the AM10's trigger. I personally find the AM6's trigger superior to the AM10's.
    Overall I find the AM6 to be ergonomically superior to the AM10, it has a superior pump, handle, trigger and also a better weight balance being shorter.
    The AM6's turret rotates counter clockwise from the user's perspective, which is in contrast to Nerf's Hammershot/Sweet Revenge, Strongarm and all of their derivative blasters and basically all of their more recent revolvers. This means that a right hander loading darts into the left side of the turret will have to rotate the turret all the way around to fire the newly loaded dart.
    A full cycle of the AM6's turret. The turret rotation is very crisp on trigger pull, something Buzz Bee has done very well with their turreted blasters.
    Here's the AM6 next to the Sweet Revenge. You can clearly see the huge size difference between the two. The AM6 is not only longer, but it's also higher and significantly wider, making it in my opinion too large to be used as a sidearm, being that it's too large to fit in a reasonably sized holster.

    Performance wise the AM6 is very similar, basically identical to the AM10.
    Range is about 13-15m quite consistently thanks to the highly consistent Extreme darts.
    Accuracy is excellent, mid to longer range shots are still quite close together and hitting a human sized target at near max range is not that difficult.
    Being an air blaster with a manual pump, the AM6's ROF isn't great. 2 pumps are required for maximum power, which gives a ROF of nearly 1 dart per second if you're really fast. Single pumps lose a lot of power, but get you into the 2+dps range.

    Is the AM6 a practical blaster? Well...not really.
    It's too large to fit the traditional sidearm role, which means it has to go up against primary and secondary blasters like the Stryfe.
    Compared to pretty much anything springer or flywheeler (e.g. Stryfe, Retal), the AM6 is significantly slower firing, and typically also has a much lower capacity. Sure the solid range and great accuracy is nice, but the accuracy is highly dependent on using Extreme darts, and range is easily matched by angling other blasters. Sure it's nice to be able to hit superior flat ranges with great accuracy, but clip system blasters can just fire about 3 darts at an angle and achieve a similar effect.
    If you're doing just target shooting then the AM6 is a pretty solid choice. Like the other AM blasters, the AM6 with Extreme darts is so incredibly superior to Elite blasters, to the point where you can hit a target from relatively far away in one or two shots where the Elite blaster may not even hit once with a full load of darts.

    The AM6 is not readily available in Australia. In the US, I believe it retails for something like 10USD, about the same as a Strongarm. For that price, the AM6 is a pretty solid buy, it's relatively cheap and fires really well, however as I stated earlier the AM6 is not a blaster I'd consider war practical. The AM6 is only suitable for goofing around and target practice.

    Power: 6.5/7
    Accuracy: 5/5
    Value for Money: 4/5
    Usability: 4/5
    Rate of Fire: 1.5/5
    Overall: 3.83/5

    Personal Rating: 3/5 - while the range and accuracy are pretty good, it just doesn't have the capacity and ROF to compete with most modern blasters in a stock/superstock setting.

    Game Report 19/7/15 - Rapidstrike Domination, Crossbolt/Longstrike Woes

    I had a game with a few of my friends on the 19th, but we played less games than usual and it was more of a casual type, instead playing a lot of SSB4. I'll still make a few notes on the games and blasters, but this post will be more focused than most on the Rapidstrike, Crossbolt and Longstrike.


    Gamemodes:
    Old: 
    Siege the Fort - a large number of defenders would try to hold off a small group of attackers as long as possible. Attackers operate on one-shot-respawn, immediately spawning from a given point away from the defender's area. Defenders operate on a 3-shot-eliminate, turning into an attacker upon elimination, and are restricted to the defender's area. Typically played with the defenders on a defencible location such as a playground or well covered area.
    Borrowed from BasicNerf.


    New:
    Juggernaut/Killbox - a small number of players ("defenders", this time around we had just one defender) are constantly attacked by a large number of players ("attackers"), and try to hit as many attackers as possible. The defenders are restricted to a given area. The attackers operate on one-shot-respawn, respawning instantly outside of the defenders' area. The defenders take four shots to be eliminated.

    Blasters:
    Regulars:

    Elite Alpha Trooper (spring replaced)- a solid all round blaster with good range, usable accuracy and a reasonable ROF.
    Elite Retaliator (spring replaced) - again slightly more powerful than the EAT, but slower firing and also with an iffier catch and quite a hard prime (most of my friends couldn't use it effectively). An alternative prime (ie bolt action or shotgun grip) is highly recommended.
    N-Strike Longstrike (spring replaced, AR removed) - another relic of a past era, the Longstrike is decently powerful, perhaps competitive with the Crossbolt for range, but was exclusively used by a person trained in the use of actual rifles, so performed perhaps better than expected. It sustained some damage through prolonged and modified use though, as I'll describe below.
    Elite Crossbolt (no arm mod) - uncomfortable and slow firing, but has solid range and great accuracy. Encountered its first real jams, which again I'll describe below.
    Elite Rapidstrike ("RapidPDW" - minimised, rewired, 2S LiPo) - a very effective blaster. While not as powerful as some of the blasters, its comparatively high ROF made it very easy to use effectively, even by the inexperienced.
    Elite Rapidstrike (overhaul - Falcon motors, rewired, 3S LiPo) - once again star of the show, and was extremely effective even when used by inexperienced players, though naturally most devastatingly effective when used by a skilled player. More detailed descriptions of the Rapidstrike's incredible abilities can be found below.


    New:
    None

    We used the same playground that I use for most of the games with my friends. The playground itself has decent cover, but nearby cover consists of a single tree.

    Siege the Fortis a gamemode I like using when there are exactly 5 or 7 players. Any more (or exactly 6) and you can play some proper team games, while any less and you can't really do much. Provided the initial attacker(s) has a decent blaster and is equipped with excess ammo, they can get the first elimination within about 2 minutes, and from there it just becomes easier and easier for the attackers. Since the defenders typically don't carry too much ammo (usually about 2 or 3 clips per defender), they are doomed to lose once the attackers gain any real numbers. The range of most of the blasters makes it quite unsafe to scavenge darts, unless they're at the furthest end of the playground where the defender will have cover from both the playground itself and fellow defenders. Because the attackers rarely fire that far out, preferring to threaten closer defenders, the defenders thus have very little opportunity to scavenge.
    Ideally I would like to give the attackers a little more cover. As is, the playground we normally use has only one piece of cover usable by the attackers outside of the defender's area, that being a single tree. As such the attackers are excessively vulnerable and could very easily be taken out by a covered defender before become a threat or getting to the playground itself (where there is much more cover). My experience is that attackers are rarely hit when so far out due to the defender's ammo situation, the inaccuracy of Nerf blasters and the ease of dodging at those ranges, though it's not uncommon to have the attacker stuck behind the tree.
    I have entertained the thought of giving the first attacker a shield though depending on the player that might reduce their combat effectiveness if not using a one-handable blaster. I have also considered setting up some cardboard or something to give the attackers a few walls of cover, though a careful balance (or rather imbalance) must be maintained to retain the element of Siege that differentiates it from regular TDM.
    I've also entertained the thought of allowing attackers to respawn at multiple locations, so as to add a further element of surprise and danger for the defenders. Although the attackers have a much easier time once they start gaining numbers, since they all still currently spawn at the same place, it's very easy to set up a defensive line against the attackers.

    Juggernaut was a short, fast gamemode in which the Juggernaut would use the overhauled Rapidstrike and 5 18s, and try to take out as many attackers as possible. This gamemode really highlighted how powerful the Rapidstrike was. With the Juggernaut starting wherever he wanted (usually on the top of the playground) and the attackers spawning in the same place as in Siege, the Juggernaut was often able to eliminate the first two attackers with ease, before the attackers could even get in range. It took a little time for the Juggernaut to get used to the Battle Belt I gave them to hold clips (usually getting them taken out in 30 seconds in their first round), but once used to it they could usually switch clips sufficiently quickly, and most Juggernauts were able to eat through all most of their 18 clips..
    For the sake of balance, the attackers were restricted to manual blasters - this gave the Juggernaut still a solid chance to survive if an attacker got up close, as they could simply dump their clip into the attacker before the attacker could get off 4 shots. In a number of situations I was able to get within close range of the Juggernaut and was able to land maybe a hit or two, before getting pummeled by a Rapidstrike burst and having to go back and respawn. Even at range the Rapidstrike was able to put out highly effective bursts, as I saw a lot of attackers getting tagged from beyond 15m, well before they could get off a good single shot. I wouldn't be surprised if the Juggernauts averaged 6 or more hits on attackers per round, possibly upwards of 10 in a good round. This further reinforces my belief that in the superstock level of Nerfing (muzzle velocity cap around 130FPS), the Rapidstrike is the best overall primary blaster. Naturally not everyone is comfortable with a Rapidstrike, I've read a number of people say how they prefer the semi auto of a Stryfe or otherwise, but statistically speaking the Rapidstrike matches or just straight up beats any other blaster in superstock.

    Let's talk about the Longstrike's woes.
    As clearly seen here, the long end of the breech (which I'll call the breech finger, for lack of a better word) has snapped off. This is a problem I noticed several years ago, with some cracks forming around the head of the breech, but I was able to stave off breakage with some epoxy reinforcement. The years of modified use finally took their toll, the OMW spring most likely being the primary culprit.
    As is, the Longstrike is still usable, however I believe that its chances of jamming and dart damage have greatly increased. The finger is a piece that extends over a loaded clip, preventing the top dart from popping out, and allowing smooth loading of the dart into the breech. The loss of the finger means that only the tail of the dart is kept in place by the breech, with the rest of the dart being free to pop upwards and get in the way of the breech. The still-sharp edges of the breech also likely drastically increase the chance of the breech clipping away the back of the dart, though given that it wasn't used much after its breakage, I can't say for sure.
    The forward stroke of the prime takes noticeably more effort than before, as the top dart is no longer kept parallel with the breech, however I haven't yet seen any cases of significant dart damage.
    The Longstrike will likely be permanently retired from active use, being kept probably only for display purposes, or possibly an airblaster reshell.

    Next up, the Crossbolt, which experienced its first dart-chomping jams.
     Here are the remains of a few of the darts that the Crossbolt nommed...
    ...and here's one shard of dart, lodged above the chamber in between the two jam doors. Removing this particular shard required opening of the Crossbolt, while the others could be fished out using sticks and a key.
    I believe the Crossbolt ate up around 4 darts, most of them (as pictured) getting ripped straight in half. I'm not exactly sure why, as I'm not too familiar with the potential jam points of the Crossbolt, however a lot of other people have reported how badly the Crossbolt can tear through darts, especially when modded.
    I'd be much less inclined to lend the Crossbolt to inexperienced players, because clearing Crossbolt jams is an absolute pain, and seem to occur primarily if the Crossbolt is misused. I personally haven't experienced any dart-eating Crossbolt jams, and I used it for a number of short rounds.
    I think I will keep the Crossbolt in active use, primarily because it's very different to most of the blasters that get used, has better accuracy than most of them.

    Review: Buzz Bee Ultra Tek 4/Wizard + Internals (15m)

    Continuing with the Ultra Tek reviews, we have the Ultra Tek 4, or Wizard. My UT4s came in a two-pack, which I believe is standard for the UT4.


    Same standard packaging for Buzz Bee blasters.
    Here's what you get, two UT4s (one light blue, one grey) and 8 UT darts.
    Something to note with the darts included with the UT4, a few of them had excess glue around the head much like Koosh darts. This was found inconsistently with some of the other darts with other blasters and didn't seem to majorly affect performance, though I only tested them in UT blasters.
    All loaded up.

    The UT4 uses the same styling as the UT3, being more sophisticated than previous Buzz Bee blasters but still distinctly Buzz Bee. The feel of the plastic is similarly improved and overall feels better than older Buzz Bee blasters.
    Being that the UT4 has to support a 4-barrel block, it's reasonably wide and rather blocky, certainly more so than the much smoother and more curvy UT3.
    The UT4 is slide primed, just like the UT3. The slide is actually very similar in size to the UT3's, and so is somewhat comfortable, though not tall enough to support a full wraparound grip.
    Oddly enough, the UT4 has a small grip on the front, despite being quite a small blaster.
    It's perhaps a little small to hold particularly comfortably, but more importantly given it's a pistol sized blaster and is slide primed, thegrip is pretty pointless practically. It does look rather cool and certainly shows how Buzz Bee has improved design wise.
    The handle is incredbly small, comparable to a Reflex handle length. Note the lack of trigger guard as with most smaller Buzz Bee blasters.
    My hand can full conceal the handle, and my pinkie barely fits on, if at all.
    The upper knuckle of my thumb also tends to rub against this corner of the shell, which is a little uncomfortable.
    The handle does have grooves cut into it, but they're far too small for my fingers to fit.
    The handle is really all round quite uncomfortable on the UT4, which is a little disappointing since the UT3's is reasonably sized and relatively comfortable, as are most other UT blaster's handles.
    One odd thing I noticed with the UT4s is that the barrels are very inconsistent in width and construction. As clearly obvious in the above pictures, the dart pegs are not aligned quite right, and all poke out in different directions. The barrels are inconsistently tight, so much so that in one particular barrel a particular dart may fit reasonably loosely (suitable for a stock blaster), yet in another may fit extremely tightly (suitable for a higher power blaster). Both of my UT4s have this barrel issue.
    The barrels that are tight tend to be excessively tight, to the point where a dart inserted about 2cm into the barrel will stay in even when shaken. This is not ideal for a stock blaster, which does not usually have the power to propel a dart through the entirety of such a barrel.
    The UT4's barrels loaded up, the darts protrude about the same as the UT3.
    Like the UT3, the UT4 utilises a rotating plunger instead of a Smart AR, and so cycles through each barrel upon each prime.
    Just for this demonstration, the top left (for the user) dart fires first. Because it's not a Smart AR blaster, the UT4 can fire off any of its barrels first even if all are loaded. It all depends on the plunger position.
    Oddly and unlike the UT3, the UT4 cycles clockwise from the users perspective, next firing the top right dart...
    ...then the bottom right dart and finally bottom left.
    Like the UT3, this means that each of the UT4's barrels should perform pretty much identically, ignoring barrel differences. For scavenging purposes, I prefer Smart AR over rotating plunger, but the extra deadspace of the Smart AR is especially noticeable in a chronograph.
    Here's the UT4 next to the UT3, Messenger and 4Victory. The UT4 is pretty much a fatter UT3, and is comparable in size and weight to the MEssenger and 4Vic.
    So how does the UT4 perform with its inconsistently tight and loose barrels?
    The UT4's power is rather lacking. The shots that do leave the barrels and don't just plop out reach about 6-8m ranges, however from the barrels that are too tight, the dart will either just plop out onto the ground in front of you, or not leave the barrel at all. I can confirm that the misfiring is a barrel issue, as I can use any of the UT darts with the looser barrels and get said ranges, but using any darts in the tight barrels results in misfires.
    Accuracy is reasonable thanks to the heavy, solid tipped UT darts rather than the blaster itself. The barrel inconsistencies prevent the darts from all firing perfectly straight, but if you point and fire in a particular direction, assuming it doesn't misifre the UT4 will get a dart in that rough direction with only a little variation.
    ROF is much the same as the UT3, you can fire off all 4 darts in 2 seconds, maybe a little more. It doesn't help that the slide isn't particularly comfortable to hold or that the prime also actuates the plunger rotation.

    The UT4, like the UT3, has major out-of-the-box issues, but unlike the UT3, the UT4's issues may not be easily fixable. Obviously one way of circumventing the issue is to up the power through extra springs, spring spacers, etc. However this makes the already uncomfortable prime quite stiff, and could possibly cause issue with the looser barrels.

    Being that it seems available only in a two-pack, I believe the UT4 will retail for around 10USD per pack, which comes to 5USD per blaster, like the UT3. Had the UT4 been perhaps just a little larger and more comfortable, and actually worked properly, I would make the UT4 a highly recommended buy, but as is I can't recommend the UT4 because its barrel issues prevent it from performing well or as advertised. I will be looking more into the issue to see if it has any easy fixes, but as is I'd say stick with the UT3 instead and implement my fix for it, or use that 10USD to go and buy the UT8 (review coming soon).

    Power: 2/7
    Accuracy: 4/5
    Value for Money: 3/5
    Usability: 2/5
    Rate of Fire: 2/5
    Overall: 2.49/5

    Personal Rating: 2/5 - it tries too hard to be small, and is so somewhat uncomfortable to use and hold. Additionally, the exceptionally poor range due possibly to the overly tight barrels prevents it from being used without a serious power upgrade, which compromises the ease of prime.

    Like with UT3, many thanks to Buzz Bee for kindly sending the UT4 along with some other UT blasters for me to review, and once more their contribution does not affect the review in any way.

    Let's take a quick look at the UT4's internals.
    The UT4 opens up much the same as the UT3, and when you open it after opening the UT3, you get a sense of deja vu. The UT4 is pretty much identical to the UT3 internally.
    The pieces are almost exactly the same, down to possibly the catch design even, and possibly the priming rod too. A difference here between the UT4 and UT3 is that the UT4's priming rod does not bend upwards, so has no issue in changing barrels.

    The plunger/barrel seal is also almost the same as the UT3, with the obvious difference of them being switched around so that the UT4 will cycle through its 4 barrels.

    More Motor Mods: Banshee'd Rapid Red, Bladed Rapidstrike

    Couple more motor mods I've done. Now that all of these are done, I can keep working on my Bullpup Rapidstrike.
    The Rapid Red is using Banshee 130s (with the intension of using Meishels, which as far as I can tell perform pretty much the same), sort of in a tribute to Meishel. Has standard rewire and uses a LiPo.
    The RR uses the same 2S 800mAh 40C as my E.Rayven and RapidPDW, so I went ahead and bought a second one of the same LiPo. Conveniently at the time I ordered my third batch of LiPos of this 2S and the new 2S for my Blade RS all the LiPos I ordered were on sale.
    The LiPo is a little tight fit in the cleared out battery bay so it takes a little shuffling to get the LiPo and the wires to fit in properly. When done properly it fits cleanly though.
    One rather important mod I made to mine, a dart stop. It stops the top dart from popping out, and also pushes the top dart back in if it's popped out slightly. I've done a slightly modified version on my Stryfe and E.Rayven, which instead have the dart stop attached to the jam door.

    The Rapid Red has seen use already at Melbourne HvZ, before implementing the dart stop, and performed brilliantly. It was smooth, sleek, light and very easy to use, nabbing me a lot of nice tags. The only issue I had with it was a dart popping up too high causing a jam and getting me nommed.
    Performance wise the Rapid Red is reasonably accurate and quite powerful, probably as expected. The foam residue is yet to fully build up so there's still a little room to improve.
    For me the Rapid Red is just superior in trigger pull and overall feel to a stockless Stryfe, though in fairness the Rapid Red's unusually small handle is a little annoying.
    I'd run the Rapid Red if I wanted to run a full Rebelle loadout, or if I wanted to run light and fast.

    Previously my Rapidstrike was running a triplet of Falcons, which performed very well. ROF of around 9dps, firepower beyond most of the blasters I've used, and very fast rev-up faster than anything I'd seen before. However I wanted to use the Falcons for my Bullpup Rapidstrike (for which the 3S fits perfectly), I'd obtained a whole bunch of cheap Blade 180s and the Rapidstrike is the most appropriate blaster for Blades, given it needs the torque even more than semi autos. Alongside switching the Falcons for Blades though,
    the RS needs a few extra alterations.
    Here's the motors in question, Blade 180s, more technically known as Mabuchi FK180-SH 3240s. I was able to obtain about 10 of them for 6AUD each including shipping, 3 of them going to a friend.
    Note that these Blades cannot be inserted straight into a blaster, due to the extra stuff all over the motors. There are a number of capacitors and a few wires that need to be desoldered, which is not a difficult task, but is a little annoying. However the part that presents the most issue is the pinion, a small gear that is fit very tightly onto the axle of the motor. It can't easily be brute forced off, so to be easily removed without specialised tools, the pinion must first heated up so it expands and loosens, at which point it can be removed easily. I used my soldering iron since it was already set up, and pulled the pinions off using a combination of a small flat head screwdriver and a set of pliers.

    Here's the 2S LiPo I chose to run my Bladed Rapidstrike, a 2200mAh 40C. It's probably overkill even for 3 Blades, considering their stall current at 7.4V is ~22A each, but I wanted to have some excess in case some even better and more current hungry motor showed up. Though realistically you won't get any noticeable improvement over 2S Blades using the stock cage and flies from a single stage flywheeler.
    Even with this significantly larger LiPo, it fits easily inside the Rapidstrike's cleaned out battery bay.

    Being that the Blade 180 motors are a little longer than 130 motors (the motor size of stock Nerf motors), a few shell modifications are required. On top of cutting holes for the motors to fit, I also had to get some motor covers.
    Here's the hole I cut for the pusher. I based it off of a 19mm hole, then shaved out with a dremel. I didn't bother cleaning it up because it's going to be obscured by the motor cover anyway.
    Here's my motor holes for the flywheel motors. Again, didn't bother cleaning it up since it's gonna be covered by motor covers.
    Since my Rapidstrike was rewired for Falcons already, all I needed to do electrically with the circuit was desolder the Falcons and solder on the Blades. So here's the Rapidstrike with the motor covers mounted. I used a set of BSUK printed motor covers, bought via BlasterTech (mini review to come soon). I like the orange highlight of the motor cover, but the shade is not the same as Nerf orange. The blue pusher motor cover blends in fairly well, though the blue is not the same as RS blue, and it cuts through the orange stripe as well.
    When I first tried out Falcons in a Rapidstrike, I was amazed at the spin up time and ROF. With the Blades, the feeling is similar but somewhat diluted coming from Falcons to Blades, instead of Tamiyas and stock to Falcons. Blade spin up time is ridiculously fast, so fast that in the time that a stock blaster revs up, you can rev up a Bladed RS and empty half (if not all) of an 18 clip. They sound like they have a similar maximum RPM to Falcons, while spinning up faster, which agrees with this motor database maintained by some NIC members. ROF of the Bladed RS sounds similar to when it was Falconed, verified by an upcoming short video.
    Running the Bladed RS on a 3S is crazy, the flywheels reach earsplitting aircraft takeoff volume, and the pusher takes off at insane speeds and goes runaway. I probably won't be running the RS on 3S since the FPS gain is minimal and the ROF becomes uncontrollable.
    I'm very happy with how the Bladed RS turned out, and will hopefully be getting some action with it at the upcoming MHvZ event on the 8th of August.

    Review: Nerf Zombie Strike Doublestrike (grey trigger Aus)

    The Doublestrike is one of Zombie Strike's more unique/better looking releases, seemingly being a shrunken down version of the highly acclaimed Hammershot, sporting an awesome Derringer style design. Can it live up to the Hammershot's acclaim?


    The box is pretty standard open style Zombie Strike, with a couple of paper ties and the neat hand-sketched-like images on the back, as with all other ZS.
    What you get out of the box, just the Doublestrike and two darts.
    The Doublestrike is quite a compact and good looking blaster, sporting a Derringer style look, the ZS-style faux tape around the handle and the hammer prime from the Hammershot.
    The Doublestrike (as its name implies) is a two shot blaster, using a Smart AR block to switch between the two. This allows it to not have to faff around with for instance rotation mechs, which would have greatly increased the Doublestrike's bulk.
    The Doublestrike has a single measly tac rail on top. Pretty useless really.
    Here's the handle and trigger. Note the two curves in front of the trigger. They fit my fingers quite nicely, but given the Doublestrike is a pistol sized/sidearm blaster, you're probably not going to be holding the Doublestrike with your off hand under the barrel, if at all.
    The Doublestrike has a sufficiently large handle, and could have been a pretty comfortable one, if not for the hook at the bottom. The hook prevents your pinkie from fitting onto the handle, forcing your fingers to squish up in the small gap, which is rather uncomfortable.
    The Doublestrike is hammer primed like the Hammershot, using what appears to be simply a scaled down hammer and curve from the hammershot. I find the hammer quite easy to reach and pull with my thump, though that could be from experience using Sweet Revenges so much.
    Here's the hammer in primed position, pretty much the same as the Hammershot. I find that you have to take your hand off the handle to get the hammer into this position easily and comfortably, but coming from dual wielding Sweet Revenges, I'm used to the hand motions required for single-handing hammer blasters.
    However the Doublestrike has a problem not present in the Hammershot design. As seen here, the hammer can actuall travel a couple of millimetres below the catch point, resulting in a big problem, as demonstrated perfectly by this Blasterlabs GIF.
    As clearly shown, if the Doublestrike is overprimed and released, it may spit out the top dart, resulting in a halved effective ammo capacity of just 1, at which point you might as well just use a standard single shot blaster. This issue appears to be present only in orange trigger models, and possibly only early orange trigger models, as my grey trigger model has not experienced this issue even with deliberate overpriming.
    I believe the overprime also contributes to another known issue, which was Doublestrike catch destruction. Again this is an issue that is only documented for early orange trigger models, and is due to the catch being part of the trigger piece (like the Hammershot), but due to the size of the Doublestrike it is very small. I believe that the overpriming causes the hammer to whack into the catch with a lot of force, which over time weakens and eventually breaks the catch. I only know of this occuring to early orange trigger models, so it's possible that grey trigger and late orange trigger models have been reinforced or have been altered to avoid the dart spitting and catch breaking issues.
     Here's the Doublestrike with just the bottom dart loaded.

    Here's the Doublestrike next to its hammer prime brethren, the Sweet Revenge. If I had a Hammershot on hand I would have pictured that instead. Note the hammer areas, particularly the shape of the hammers and the length of the hammer draw.


    While I didn't manage to hold the blasters perfectly aligned, this picture is still a good comparison. The Doublestrike's hammer area is closer to the handle than the Sweet Revenges, and is also a little shorter.
    Both hammers in primed position. While it could be just due to perspective, from these pictures the Doublestrike appears to have a thicker, more hooked hammer. I personally find the Doublestrike hammer easier to prime as I find it easier to grab with my thumb.
    Amusingly the Doublestrike fits in the Sweet Revenge's holster if you slide it into the tac rail slot, though naturally it's very loose so really not worth doing.
    So how does the Doublestrike perform then, can it live up to the Hammershot's legacy? Sadly, no.
    Range is rather poor, on par with lower end N-Strike instead of Elite. The Doublestrike will typically hit 8-9m ranges, with some darts diving into the ground at <7m and some soaring to potentially 11+m.
    Accuracy is also fairly poor, like all other Elite-era Nerf blasters partly due to the terrible aerodynamics and balance of the Elite style dart. Nevertheless, at the 8-9m doorway accuracy test I could only get about 20% of darts through the door way, the rest either diving or swerving away.
    ROF is pretty hard to measure, being that it's how long it takes you to draw the hammer, and you only have two shots. I'd say that single handed you could prime in a little under a second, though again with only two shots ROF is hard to measure.

    Is the Doublestrike worth a look?
    Well aesthetically it's awesome, no denying that. So if you're looking for a good looking Derringer-like piece to paint up that can also fire, then the Doublestrike is certainly an option.
    If you're looking for a fun blaster to fool around with then the Doublestrike certainly is an option, it offers hammer priming in a compact, awesome looking form. However it is also outperformed by most Nerf blasters currently on the market, and has an unusually high price. So your money may be better spent on a cheaper blaster (such as a basic Strongarm or Triad), or spend a little more for a much bigger and better blaster (such as a Stryfe if you can find it, or perhaps a Cycloneshock, which people seem to love).
    If you're looking for a sidearm/backup blaster, then the Doublestrike is an option, however as I determined in my Doublestrike-Triad comparison, the Triad is almost totally superior at that role.

    The Doublestrike retails for an unusually high 15AUD from the usually cheap Kmart, where Strongarms are 10AUD, Triads are 8AUD and the Flipfury/Cycloneshock/Stryfe are 25AUD. Considering that you can get Triads for half the price, I would give the Doublestrike a miss unless you're dead set on getting one. And if you are dead set on getting one, you should probably wait for a sale or get one second hand. Though rare, I have seen Doublestrikes drop to 10AUD, which makes them a little more reasonable but still quite overpriced. I personally regret buying the Doublestrike for 15AUD, it really isn't worth that much and doesn't perform to standard.

    Pros: Looks awesome, hammer action on a compact blaster
    Cons: Pretty much everything else - poor performance, uncomfortable, expensive


    Power: 3/7
    Accuracy: 1.5/5
    Value for Money: 2/5
    Usability: 3/5
    Rate of Fire: 1.5/5
    Overall: 2.03/5

    Personal Rating: 2/5 - while it looks awesome and is fun to use, the handle is uncomfortable and performance is terrible. Couple that with an obnoxiously high 15AUD pricetag and the Doublestrike is a don't buy from me. Get a Hammershot instead.

    Review: Buzz Bee Ultra Tek 8/Champion + Internals (15m)

    Buzz Bee's Ultra Tek line doesn't just sport increased ranges. With the larger Ultra Tek blasters, Buzz Bee has gotten into the business of interchangeable clip fed blasters, one of Nerf's major draws and advantages over most of its competitors. In this post we look at the smallest of Buzz Bee's models, the entry level UT8/Champion.


    The UT8 has the same minimalist packaging as all the smaller UT blasters. Pretty ordinary stuff except for two noteworthy sentences - "Clip fed dart blasting!" (using the same term "clip" that Nerf uses) and "all Ultra Tek clips are interchangeable" (in contrast with previous clip/mag fed blasters which often had unique clips/mags and mechanisms, and also hinting at how Nerf-like their new clip system is).

    Out of the box. Nothing unusual.
    All loaded up.

    Let's take a quick look at Buzz Bee's new 8 dart clip.
    While clearly inspired by Nerf's clip system, the 8 dart clip has its own Buzz Bee style that clearly distinguishes it.
    Next to Nerf's 6 dart clip. Note that the important bits such as the dart follower and retention slot are basically the same, while unimportant aesthetic features are rather different.
    Note that the 8 dart clip lacks any translucent/transparent side or any slits to see how many darts are loaded, however due to the thinness of the clip and the contrast of the dart colours you can often see how many are loaded anyway.
    UT darts, though a little shorter than Elites, fit fine in all the Nerf clips I tested, and feed fine in the Retaliator I tested. However they may have issues with Nerf made flywheelers due to their slightly shorter length, but I haven't yet tested them from flywheelers.

    Elite darts fit and feed just fine in the 8 dart clip.

    Now Buzz Bee getting in on the interchangeable clip/mag action is already a great step for them, as it greatly improves their blasters' practical use. However Buzz Bee has another few tricks up their sleeves, one being that their 8 dart clip fits and works in most Nerf blasters.
     Naturally due to their slightly different design it does't fit perfectly in all blasters, notably of the ones I tried, the clip fits very, very tightly in the Rapidstrike and Elite Rayven.

    Here's a slightly closer look at the UT8. While the design is clearly Buzz Bee style, it's clear how Nerf has inspired Buzz Bee's improved design. The UT8 is a cleaner, better looking and more practically designed blaster than many previous Buzz Bee blasters.
    Down the muzzle. Hey that dart tooth and breech design looks familiar doesn't it?
    Pullling the trigger retracts the dart tooth as well as firing the blaster. Note the AR in the breech, seemingly similar in style to older Nerf ARs.
    The handle of the UT8 isn't the biggest, however I personally find it very comfortable. Certainly the most comfortable of all the UT blasters I've held.
    The priming slide of the UT8 is rather small, however its bulbous shape is quite easy to grab and actuate. Naturally pump action is still preferred, but this slide is quite nice to use. The draw of the priming slide is slightly shorter than that of a Nerf clip system blaster. As such, even when the bolt is closed, if there is no clip loaded then a small portion of the breech or loaded dart is open to underneath.

    A look at the magwell of the UT8. In typical Buzz Bee fashion it's a less sophisticated version of Nerf's, being a little smaller and thinner. This doesn't affect usage much, but it is something to note if your blasters normally get bashed around a lot.
    Note also how the UT8 lacks any sort of dart receiver in front of the breech.
    With the breech open. Note the blue part on the left, which applies friction to the breech when the breech is in a forward position.

    Here's a closer look at the clip release, which is a really odd piece. Where most of Nerf's clip releases are pull backwards or push inwards, the UT8's (and the other UT blasters for that matter) is a push upwards. It's very awkward to actuate with your trigger hand since you have to reach out with your middle finger and push a small button upwards. Even with your off hand it's a little awkward to actuate, but if you grip the loaded clip and push upwards with your thumb, you can get the clip out fairly easily.
    However the magwell is quite loose on the loaded clip, so if you release the clip while holding the blaster upright, the clip will probably just drop straight out.

    Using the UT8 is simple, the same as any Nerf clip system blaster.
    To insert the clip as well as prime the blaster, you have to pull the slide back fully.
    Then of course insert the clip if not already inserted. It's an easy, smooth motion with the only friction coming from the clip lock. No clip based locks here, unlike Nerf blasters.
    Then of course to load the next dart and close the breech, push the slide forward, and pull the trigger to fire. The trigger pull is pretty standard, short and fairly crisp.

    It's all well and good for Buzz Bee to have gotten in on the clip/mag action, but this is their masterstroke:

    The UT8 (as with all other UT clip system blasters) use and fit Nerf clips/drums perfectly. This is excellent as it means that you don't have to construct an entirely new ecosystem to support the UT clip system blasters, unlike for instance Vortex or BoomCo.
    Here's the UT8 next to a Retaliator. While it is a little longer, it's also a little thinner and seemingly lighter (have not confirmed with a scale). The two are very much comparable, being that both are compact near pistol sized slide primed clip system blasters.
    Just one last thing before performance, much like some of Nerf's clip system blasters I found that the UT8 liked to clip away at the back of the darts, stripping away small chunks of foam. While not particularly frequent, it was easily noticeable and may affect performance.
    So how does the UT8 perform? Does it keep up with Nerf's clip system things?
    Unfortunately, the Aus-spec one doesn't. Ranges from the UT8 average 9-10m, with very few outliers. So it's competitive with higher end N-Strike and the weaker Elite blasters, but not with the higher end Elites like the Retaliator.
    Accuracy though is pretty good. Naturally thanks to the heavier, denser UT dart, the UT8 is capable of pretty accurate shots, with very few clipping the usual door frame at 8-9m range. Easily superior to pretty much all Elite blasters. Do note that it's not quite as good as say Buzz Bee's Air Max blasters, which were ridiculously and amazingly accurate.
    ROF is comparable to a Retaliator, 2-3dps is possible with a good priming action. This is helped greatly by what I believe is an excellent slide design.

    The UT8 fills the role of an entry level compact clip system blaster, much like the Stryfe or a bare Retaliator, but being a Buzz Bee blaster, is significantly cheaper than any Nerf offering. In the US the UT8 (Champion there) retails for 10USD - about the same as a Strongarm, incredibly cheap for a clip system blaster.
    While it doesn't have the tacticool of Nerf's clip system things, it does its job fairly well. Sure the Aus-spec UT8 doesn't have that great a range, but the US-spec Champion performs much like any ordinary Elite blaster, and regardless the UT8 is very easy to upgrade for more power.
    If you're on a tight budget but want to get in on the clip system action, then the UT8 is a solid choice. For what it would cost to get a Stryfe, you could get a UT8/Champion as well as a spare 18 clip, a bunch of darts or even a second UT8/Champion. Alternatively you could spend that extra money on an upgrade spring to bring the UT8/Champion on par with or beyond Elite-spec performance.
    Either way the UT8 is a decent blaster for a very low price, so I'd definitely recommend picking up one.

    Pros: Cheap, cross compatible with Nerf's clip system, easily moddable, did I mention cheap?
    Cons: Not as tacticool as Nerf's clip system, poor stock range (UT8 only)

    Power: 3.5/7
    Accuracy: 4.5/5
    Value for Money: 5/5
    Usability: 4.5/5
    Rate of Fire: 3.5/5
    Overall: 4/5

    Personal Rating: 4/5 - while it lacks the tacticool and sophistication of Nerf's offerings, the UT8 is a very solid and incredibly cheap entry level clip system blaster, and also has a lot of mod potential.

    Let's look at the internals of the UT8.
    To get the UT8 open, first you have to remove the muzzle piece. Mine had very little glue on it so was easily brute forced off, but you may have to cut the shell or something if yours is properly glued.
    Without the muzzle piece, you can get a closer look at the breech and dart tooth.

    Once the muzzle is off, you simply have to remove all the screws from the slide (which comes off easily) and the body.
     Here's the UT8 all open.
     Here's the odd clip release, a very basic design that works reasonably well.
    A closer look at the dart tooth, breech and the top blue piece that applies a small downwards force to the breech for a friction lock.
    This black box contains a couple of locks, such as locking the trigger if the slide is not fully forward, and locking the plunger tube/breech once primed. Note that that particular lock is released upon trigger pull, rather than the return of the plunger as with Nerf blasters.
    A closer look at the rear of the blaster. Note the basic catch design and the plunger rod guide.
    A closer look at the plunger tube in particular. Note that the slide attaches directly to the plunger tube.
    The plunger tube is of a decent size, probably enough to get the UT8 hitting superstock velocities (100+fps).
    The plunger tube is directly attached to the breech, and comes out easily. Note also the very standard plunger rod and head.
    Down the plunger tube, a look at the back of the AR mechanism. Very Longshot-like.
    A closer look at the catch slot on the plunger rod. It's a fairly robust design but may need reinforcing if you're going to throw really strong springs in there.

    The UT8 is great for modding. Removal of the AR significantly boosts performance, and additional/replacement springs are very easy to fit in. All I did was throw in a spare spring of mine (felt like a stock spring from something else) and immediately got significantly improved power while still maintaining ease of use. With a proper upgrade spring I have no doubt that you could hit superstock velocities from the UT8.

    Comparison: Nerf Zombie Strike Slingfire vs Buzz Bee Ultra Rapid Tek

    Now that Buzz Bee's jumped into the clip blaster market, I can finally start doing some cross-company clip blaster comparison. To start off with, let's compare the two lever action entries, the ZS Slingfire and the Ultra Rapid Tek/Sentinel. Like with all other comparisons, I'll be comparing the Australia release blasters that I have, which in this case are the grey trigger black breech Slingfire, and the 15m range claim Ultra Rapid Tek.


    Aesthetics: The Slingfire, being a ZS blaster, has a post-apocalyptic style, with features like the faux type around the grip and the front, and the wood grain stock, with the crudely done ZS logo. The URT has a modernised/scifi style, with cleaner lines and a mainly white colour scheme. I personally prefer the URT, being more of a modern/scifi fan, but each to their own. I will note however that the URT has a lot more detail than previous Buzz Bee blasters (see for instance the faux rivets and raised plastic), but the Slingfire still has the edge, being a Nerf blaster.
    Accessories: The Slingfire includes a 6 dart clip and 6 ZS darts, while the URT includes an 8 dart clip and 8 UT darts.
    The URT wins this round.
    Range/Power: The grey trigger Slingfire achieves about 10-11m ranges held at true flat, using darts of Elite type. It's comparable to the higher end N-Strike blasters, and is probably one of the weaker Elite blasters.
    The 15m URT gets ranges of about 9-10m at true flat, probably comparable to mid-higher end N-Strike blasters.
    The Slingfire wins this round, barely.
    Accuracy: The Slingfire, being that it uses Elite style darts, is not particularly accurate. A lot of shots like to veer, whether into the ground, upwards or to the sides, although a few shots will fly relatively straight. A common theme with Elite-era blasters, the Elite dart really ruins accuracy.
    The URT uses Ultra Tek darts, which are heavier than Elite darts and so are more stable and consistent. As such, most shots will fly relatively straight and very few deviate significantly.
    As such, the URT wins this round by virtue of its ammo. If the URT was given Elite darts, I believe that both the Range and Accuracy rounds would be draws.
    Usability: The Slingfire uses a complicated gear priming system, so that you can only pull the lever back once it has been pushed to the fully forward position. The main issue here is that the fully forward position for the lever is unusually far out, and so first time users will likely inadvertently lock up the Slingfire from not pushing the lever forward far enough. With practice however, this is a non-issue. The other issue for the Slingfire is that the clip release is rather awkward, being that you have to pull the clip release backwards with the same hand that you're removing the clip with. Again with practice this is less of an issue, but still rather annoying considering the concept art that had the Stryfe-style clip release, which would have been far superior.
    Obviously one special feature of the Slingfire is that it was specifically designed for trick shots, and so the balance of it when trick shotting (flick and spin priming) is excellent.
    Overall the Slingfire is reasonably comfortable and easy to use, especially with practice. While I would have liked a slightly longer stock and fore-end, and dislike the flexibility of the lever, the overall ergonomics of the Slingfire are reasonably good.
    The URT has less locks compared to the Slingfire, and the lever has a significantly shorter prime distance, which I find to be more natural. Additionally, the fore-end is larger and more comfortable to grip. However, the URT's lever is made of metal and is thinner than the Slingfire's, and so cuts into your hand more than the Slingfire, especially so with stronger springs or trick priming. The URT is not designed for trick shots, and so is much more cumbersome and unbalanced for such. The URT's stock is also too short to be comfortably or properly shouldered.
    Neither blaster jams often, though my Slingfire is a black breeched one which is allegedly more reliable than the original release green breech.
    I personally feel that the Slingfire has the edge in this round as its main issues disappear with a little practice, however the URT's ergonomic issues cannot be eliminated without modding. As such I'm giving this round to the Slingfire.
    Rate of Fire: Both being lever action blasters, both the Slingfire and URT can reliably get about 1dps, possibly a little more, however they'll never be as fast as pump actions or the automatics naturally. The Slingfire is slowed down slightly by its awkwardly long prime, while the URT is slowed down by the somewhat uncomfortable lever.
    This round is an obvious draw.
    Capacity: The Slingfire comes with a 6 dart clip while the URT comes with an 8 dart clip.
    Naturally the URT wins this round.
    Value for Money: The Slingfire originally retailed for 25USD/40-50AUD, however in Australia outside of unusual clearance sales, I've seen the Slingfire drop to about 30AUD. The Ultra Rapid Tek/Sentinel has not yet retailed in Australia, however I believe its retail is likely to be around 15USD/25-30AUD. Considering that the two blasters perform very similarly, with the Slingfire being a little more comfortable but the URT having superior accuracy, I'd have to give the round to the URT.

    The Slingfire has won 2 rounds, with the Ultra Rapid Tek/Sentinel winning 4. Thus I declare Buzz Bee's Ultra Rapid Tek/Sentinel to be the superior blaster. However this comparison was pretty close, with the URT winning out through its slightly larger clip. If you disregard the larger clip and give both blasters the same ammo, the comparison boils down to the Slingfire's slightly better ergonomics versus the URT's lower price, and their different aesthetics and designs.

    Review: Buzz Bee Ultra Rapid Tek/Sentinel (15m Aus) + Internals

    The next entry in Buzz Bee's Ultra Tek line, the Sentinel/Rapid Tek (URT) is a lever action rifle type blaster, also using Buzz Bee's new clip system. How does it stack up against Nerf's line of rifle sized blasters?


    The URT box, standard basic open style Buzz Bee fare. Nerf's started to get in on the open box action too for some larger blasters.
    Out of box, the URT, 8 UT darts and an 8 dart clip.

     All loaded up.


    The URT is a pretty neat looking blaster, it's quite distinct from the mostly grey UT blasters with its clean mostly white paintscheme. I rather like it actually, it feels quite scifi to me despite being lever action.
    One part I really like about the URT is the barrel and fore end. I think it looks really cool, and the fore end is quite nice to grip, if perhaps a tad short.
    The URT has a single sling point on the front, which is a little awkward when there's no sling point further back.

    Down the barrel, the faux barrel seems a little wider than most Nerf faux barrel though that could be just because of the lack of rifling.
    The URT is a lever action blaster, much like the ZS Slingfire and its predecessor, the Buzz Bee Rapid Fire Rifle. Unlike the Slingfire (and like the RFR), the URT has a solid metal lever rather than a flexible plastic one. While it is far more rigid and robust, it is also not as well shaped and so is rather uncomfortable to hold and use as the metal cuts into your hand.  The handle itself is not terribly uncomfortable, but the comfortable part of it is not the full length of the handle.
    The metal lever coupled with the improved and weightier plastic feel and the overall detail make the URT look and feel much more refined and sophisticated than many of Buzz Bee's previous blasters, though Nerf is still ahead in that respect.

    This is an example of the shell detail that was not on older Buzz Bee blasters. Note quite Nerf's level of intricate detail, but getting closer. Good job Buzz Bee on that.
    Note also how short the stock is. Like the Slingfire, the URT's handle continues into the stock, but unlike the Slingfire, the URT's stock is ridiculously and pretty much unusably short, making it impossible to shoulder. As such priming the URT can be harder than the Slingfire, especially with upgraded springs, because you can't brace it against your shoulder.
    The URT's magwell is larger than the UT8/Champion's, and better envelops the loaded clip, as is better shown in the next shot. It has the same awkward clip release as the Champion, a small round button that needs to be pushed up to release. It's not the best magwell and clip release design (I find Nerf's flywheeler magwells to be quite well designed in general), but it certainly could have been worse (*cough* Slingfire *cough*).
    Where the UT8/Champion had the ridge around Nerf clips sticking out significantly, the ridge is flush with the URT's magwell.
    Operating the URT is as standard for any manual clip system blaster. First is to pull the lever down to prime the blaster and open the breech...
    ...like so. Note that the lever stops when vertical, unlike the Slingfire whose lever travels a little further before stopping. It should be noted that the URT has a very different balance to the Slingfire. Where the Slingfire was seemingly specifically designed for trick shots (hence the lever stopping in a position ideal for spin priming), the URT is more for regular lever action use and as such has very poor balance when trick shotting, but feels more natural to prime than the Slingfire.
    Next is to insert a clip if not already loaded (or remove the clip if its empty)...
    ...and then of course return the lever to chamber the dart.
    Finishing of course with pulling the trigger to fire.

    A few comparison pics between the Slingfire and URT/Sentinel. Note that they are quite similar in length, however the URT has a longer barrel and fore end, where the Slingfire has a longer and larger handle and stock.
    These pictures very well demonstrate the difference between the Slingfire's and URT's prime distance. The Slingfire's lever rests very near to its centre of gravity, so as to allow for the most comfortable and efficient flip/spin prime. The URT's is more natural and slightly shorter, making it that little bit better for newbie use. When I first used the Slingfire I made a lot of short primes because of how awkwardly long the full prime is.
    This picture best demonstrates the difference in handle and stock lengths, as well as levers. The Slingfire's plastic lever is thinner and shorter, however is more comfortable. Likewise the Slingfire's handle and stock are more comfortable than the URT's. In contrast, the URT's lever is made of solid metal, and is so far more rigid and robust than the Slingfires. I've seen Slingfire levers flex with even light use, but the URT's is practically impossible to bend.

    Now performance, being an Ultra Tek blaster the URT is meant to compete with Nerf's Elite line. How does it fare?
    Range is very similar to that of the UT8, about 9-10m flat ranges with UT darts quite consistently. Not the best, but not horrible. It's still relatively consistently beaten by Elites though, even Aus spec grey trigger ones.
    Accuracy, like the UT8, is pretty good, thanks again to the heavier and more stable Ultra Tek dart. Hits on human sized targets at 8-9m are fairly easy.
    ROF is not great, ironically I find it to be slower than the UT8. Because the URT is lever action, the prime action is longer and more awkward than a more traditional pump action (which would have been very nice), and also slower than the UT8's quite good slide. Given the discomfort of the hard metal lever, I can achieve only about 1-1.5dps, much like a Slingfire.

    The Ultra Rapid Tek is not yet in Australia, though I believe it will be coming soon if the major retailers are sufficiently impressed by Buzz Bee's newest offerings. I don't know what the retail price of the Sentinel is in the US, but I believe it would be around 15USD based on what I know of their previous blasters and pricings. 15USD would translate to roughly 20-30AUD depending on retailer. 15USD for the Sentinel/URT is a pretty solid deal considering for only 5USD less you get a Strongarm, and 5USD more enters you into the realm of Nerf's clip system blasters. It's a decent blaster that looks pretty cool and is quite fun to use, but of course has some ergonomic issues and a slightly disappointing range which prevent it from being a straight up must buy.

    The best description I've heard of the URT is as follows: It does what the Slingfire did wrong right (metal lever, no gears), but does what the Slingfire did right wrong (poor handle, stock and lever ergonomics).

    Is the Ultra Rapid Tek/Sentinel worth your interest and money? Well possibly.
    If you're looking for a lever action blaster, then your two choices are this or the Slingfire, and my previous comparison on the URT vs Slingfire should answer any questions you have about that particular situation (and if not, feel free to leave a comment of course).
    If you're looking for just a fun blaster then the URT is certainly an option. Lever action is always fun and the URT looks pretty cool, but of course is bolstered by the fact that the URT is significantly cheaper than its Nerf competitor, the Slingfire. Nevertheless, in this category never forget the cheap but still fun blasters like the Strongarm and Triad.
    If you're looking for a budget entry level clip system blaster, then the URT is an option as it's a relatively cheap rifle-sized blaster. However, I'd also recommend looking at the UT8/Champion as I personally find that to be practically superior, being more compact and more comfortable to hold and use, as well as being 5 USD cheaper.
    If you're a fan of lever action I'd certainly look at picking one up, but for practical use I'd say the UT8 is probably better all round.

    Pros: metal lever, no gears, nice fore-end, easily moddable plunger system
    Cons: poor overall ergonomics - handle, stock and lever

    Power: 4/7
    Accuracy: 4.5/5
    Usability: 3.5/5
    Rate of Fire: 2.5/5
    Value for Money: 4/5
    Overall: 3.47/5

    Personal Rating: 3.5/5 - a fun and cool looking blaster, however the stock is far too short to be usable and coming from the Slingfire, the metal lever is rather uncomfortable to use, especially with spring upgrades.
    The UT8/Champion is probably an all round more practical blaster.

    Now lets take a look at the internals. As already well established, the ZS Slingfire relies on gears to achieve the desired lever position for spin priming, so what's the URT/Sentinel like?
    There are several plastic sections you have to remove before
    Before opening the blaster, first you must remove this blue panel on the right side of the magwell, which is easily done with a screwdriver poking into the inside of the magwell. This exposes two more screw ports.
    This piece on the rear of the stock must be removed, but can be done easily once all screws are removed by simply pulling the two shell pieces apart.
    This piece also needs to be removed, but again is most easily done once all screws are removed using a flathead screwdriver to pry the piece off.
     Here's the overall internals, and a few closer up shots.
    Overall very similar to the UT8/Champion, obviously set up for lever action. Note the lack of gears.
    The plunger tube and rod, like the UT8/Champion it's a surprisingly large and so could provide some pretty decent power. UT dart there for scale.
    Down the plunger tube, you can sort of see the AR piece but this shot isn't very good.
    The metal lever alone weighs over 100g, being solid metal.
    On top is a stock grey trigger Elite CS springer spring (from a Retal or EAT), and on the bottom is the URT (15m Aus) spring. The URT's spring is clearly longer and has far more coils, however radius and wire thickness size the two are very similar, so replacement springs for the Retal/EAT have a reasonable chance of working with the URT/Sentinel, and likely the other clip system springers of the Ultra Tek line.

    Game Report 8/8/15 - MHvZ

    Another game at Melbourne HvZ. More pictures (not taken by me) can be found here


    Gamemodes:
    Again, every game has a zombie element so I'll go through those here.
    Zombies tag humans with their hands onto any body part, blaster, tactical gear, etc, turning the human into a zombie. If a human hits a zombie with a dart, the zombie is stunned for 25 seconds. A human can also stun a zombie with melee, but only a direct hit to the back.
    There are 3 standard zombie upgrades/mutations/perks: 
    Infector - zombie(s) get to use foam swords, pool noodles, etc. Tags with said foam melee weapons on humans count as regular tags. Said melee weapons can also be used to block darts.
    Tank - zombie(s) get to use shields, which block darts. The shields cannot be used to tag humans, presumably as a precaution against shieldbashing which could certainly cause injury.
    Husk - zombie gets to use a Titan firing rockets. The rocket counts as a regular zombie tag. There is usually only one Titan and one rocket on the field at any time. Other zombies can pick up and return the rocket to the Husk.
    Zombie upgrades can be stacked in most games, so for instance a player could take both a pool noodle and a shield.

    Old:
    Survival - Standard HvZ gametype, humans try to survive for a given amount of time (or until the last human falls). Zombies are given access to upgrades at various times, for instance Infectors at 5 minutes, Tanks at 10 minutes and Husk at 13 minutes.
    Three Squares (made up name)- The three zombie upgrades of Infector, Tank and Husk are placed in the centre of three spread out squares, about 2-3m wide. Zombies can pick up the upgrades if they touch the upgrades in the middle of the squares. If a zombie is stunned within a square, they must move outside of the square before counting down their stun. The humans try to survive as long as possible (I believe there could have been a time limit, not sure). In this particular round, zombies were only allowed one upgrade at any one time.
    Blind Bomber - One human is designated as the Blind Bomber and is blinded (in our case with blacked out safety goggles). They cannot be zombified, and so are invincible. They are given a "bomb" (just a timer), which has two time settings - in our case 3 minutes and 5 minutes. The objective for the humans is to get the bomb to the first location, "assemble" the bomb for 3 minutes, move the bomb to the second location and "detonate" the bomb for 5 minutes. If the bomb survives the 5 minute timer, it "detonates", eliminating/curing all zombies and thus giving the humans the win. However the Blind Bomber is the only human able to touch and move the bomb. If zombies tag the Blind Bomber, they must drop the bomb for two seconds, and then can pick it up again. Zombies can move the bomb, and if they get the bomb outside of the play area before the bomb "detonates", the zombies win.
    6 Round Sweep(non team) - Each player is only allowed to carry 6 darts with any number of blasters and clips or a single melee weapon (with no blasters or clips) into the play area (darts are left on the ground from previous rounds). In the middle of the play area is a collector, who collects the darts from each person. The person who delivers the most darts to the collector wins. Each player has 3 lives, with each hit from a dart taking one life and requiring a respawn at any tree. A melee hit depletes all lives. Once a player is out of lives, they become a zombie and drop all their darts. A single zombie tag immediately turns humans into zombies, regardless of life count. Players are safe while depositing darts, but only during the time that they're depositing darts (and maybe a second or two to pick up their blaster again).

    New:
    Zombie King - A small number of humans would attempt to destroy the zombie king, who is protected by a large number of zombies. Standard zombie stuns apply, and zombies start off with all upgrades if so desired. The king cannot run and has no upgrades, but takes 15 hits to eliminate (and doesn't get stunned) and can still tag humans. Unlike other HvZs, a zombie tag on a human causes them to lose a life, and they must go and respawn. Once a human is out of lives (starting with 4) they are eliminated. The humans are also working against a time limit, which was set at 15 minutes.

    Blasters:
    Since there were a lot of different blasters there, I've generalised them and only listed down the ones that I saw as significant or noteworthy.
    Regulars:
    Rebelle Sweet Revenges - My standard modded dual wield pistols. After emptying all my clips for my Rapidstrike or a jam of some kind (or for pistol rounds), they were extremely effective for scavenge-based survival, and held off a number of zombies very well.
    Pump Action Elite Retaliator (various internal kits, often fully tac-ed up) - Saw a lot of these in actiononce again. They are very comfortable and extremely smooth to use, and seem to be quite accurate and fairly powerful, however against multiple zombies the user would have very little room for error, as a single miss would likely get the human tagged by one of the zombies. Retals were the favoured blaster for longer ranged potshots thanks to their above average accuracy and were quite solid all round.
    Elite Rapidstrike (various motors, LiPos)- The highest ROF blaster present, the Rapidstrike was excellent for overwhelming zombies and point defence, since the high ROF made them practically impossible to dodge. It was also good for Zombie King, since the Rapidstrike could dump its entire 18 clip into the king within 2 seconds, resulting in an almost instant elimination and a human victory.
    I used my Blade'd Rapidstrike as my primary for the whole event, and it worked extremely well. The ability to fire almost instantly allowed me to get a few crucial stuns that helped save humans (and myself), and the ROF was very useful for ensuring hits on fast moving zombies and tanks. The only issues I ran into were running out of ammo (which is expected in HvZ) and ammo-related jams, which once realised were quickly eliminated by being a little more picky about not using certain dart types.
    Rebelle Rapid Red (Banshee motors, 2S LiPo) - I didn't use it, it was loaned to another player, who came back to me with very positive feedback. They described it as very powerful, quite accurate, and very easy to use. The main trigger was also described as very smooth. I watched a little of him using it (and was a target of it a little in Zombie King), and it did indeed appear very effective.
    N-Strike Raider (unknown mods) - the most significant thing the Raiders did was jam. "Oh so you really need to take out this zombie? Let me jam right now and get you nommed," is basically the most accurate description of how the Raider performed. Highly unrecommended, I would rather run a single Sweet Revenge than a Raider.

    New:
    Mega Rotofury (added Magnus spring, rebarreled for Elite-sized darts, stock attachment point and stock) - even with the relatively low spring load of stock + stock Magnus, it packed a huge punch. It completely outclassed just about everything else there range wise, and was let down more by the inaccurate and unstable ammo used. The stock also made it extremely comfortable to handle, as the Rotofury is pretty hefty. Nerf seriously, a blaster this big and you don't give it a proper stock? For intimidation and longer ranged engagements, the Rotofury was excellent, especially with the ability to reload on the fly.
    Ultra Tek 8/Champion (added spring) - wasn't used by me, rather it was used by some other players, who had some praise for it. The incredibly comfortable handle was a big plus point brought up, as well as its ease of use thanks to the well designed slide. Power wise the UT8 wasn't quite up to par with the other main things like the Retals, but it held its own well enough especially compared to the Raiders.

    We played in the same area as previously, a large triangular grassed area with a couple of trees and a central tambarked area with some particularly large trees.
    Player count peaked probably around 20-25, close to the lunch break time of 2:30. Interestingly, many of the "regular" players were absent this time around, and we had a lot of new players who had never been to HvZ, and some who didn't even have blasters.

    Survival was the standard HvZ gametype and worked well as usual. In the very first Survival, I went through all of the clips I had for my Rapidstrike, and so subsequently dumped the Rapidstrike and switched to Sweet Revenges. I was in fact able to survive on my own just scavenging with the SRs so long that the admin decided to end the game so as to allow the playing of other games.
    This seems somewhat counterintuitive, considering that at the end of the game the zombies vastly outnumber the remaining humans. The core of this situation occurs exactly because this is at the end of the game. At that point, a number of the zombies who had done the main running earlier in the game will now be tired and will likely not participate in the chase significantly. Likewise recently turned zombies may be too tired from running from their now-comrades to participate in the chase, leaving a small fraction of the horde for the final chase. Considering the limitations of the human body, I doubt this can be changed significantly.

    After the first Survival round, the humans were given a bit of a boost, in the form of a couple of grenades (usually Nerf Mini Howlers or similar), which can stun tanks even with a shield hit and of course can be picked up and thrown repeatedly. This allows select humans to deal with tanks very easily even in one-on-one, though the grenade's power is often used so as to not have to flank a threatening tank if there are other nearby zombies.
    In the second Survival round at the end of the day, once tanks came onto the field the humans began to split up so as to not present one large target. However this plan seemed to backfire, as the smaller groups of humans were much easier prey for the zombies, especially tanks. The humans fell much faster in this round than the first round. While I would agree that a well cooperating smaller group of humans would probably outlast a larger incohesive group, the smaller groups didn't work together too well either, and the tank was usually able to get at least one human, or at least distract them long enough for another zombie to get the tag.

    Three Squares is a way of making the zombie upgrades objectives rather than just timed events. As such, early combat is clustered around the squares, usually the one with the least human defenders. However Three Squares this time around started with a little twist: instead of the husk missiles being with the Titan in the husk square, the two missiles would be held by humans, and the missiles would only be usable by the husk once the humans had dropped the missiles (which occures from it touching the ground or the human holding it getting tagged). This made the husk square largely a non-target early on, so the humans spent little effort defending it.
    The majority of the humans defended the tank shields, by far the most dangerous upgrade as it lets zombies take down humans one-on-one very easily (assuming they don't have grenades). The infector upgrades, while very useful for the zombies, do not increase a zombie's one-on-one chance against a human too significantly, unless that human is running melee. I joined the smaller group defending the infector swords, and we were able to hold them off for a reasonable time, though naturally eventually they started to get through, and so got the infector upgrades necessary to assault the tank square. My group hung back to ward off any flanking zombies, however as HvZ always goes the zombies were able to creep close enough to the shields to eventually grab them in one of their many charges, effectively turning the game into another round of Survival. Since the humans were quite tightly clumped in defending the tank square, if any zombies got through they would usually end up with several tags instead of just one.
    Compared to the last event's Three Squares, this time around felt more balanced and competitive and the Hand of Freedom in the previous game greatly reduced the safety of the squares, and the flag bearer actually didn't do much especially with the Hand in play. I didn't miss the flag bearer too much, if at all, because the humans were able to defend just as effectively without them, and honestly a group of humans standing behind the square had much the same effect as the flag bearer standing within the square. It's possible that the competitivity came from superior human tactics as they were able to protect the upgrades for quite a while before eventually losing ground.

    Blind Bomber had a few alterations made to it, and overall I feel that it went much better than the Blind Bomber rounds last event. The addition of the grenades into the game made it much harder to tanks to creep through to the bomber during the timed sections, which greatly reduced what I felt was a big flaw in the previous event's rounds. A slight change was implemented to the grenades, in that after each throw the grenade must be tapped on the bomber to be used again. The second timed event was staged in the middle of the tambark area, and when stunned zombies would have to leave the tambark area first.
    This time around Blind Bomber was very competitive and worked out much better for the humans, with the bomb making it to the second location. The humans much more successfully defended the bomber in the first segments of the journey, with the tanks being held off much more effectively thanks to the grenades (and probably improved tactics as well).
    As the bomber was escorted towards the second location, humans started to get lost in significant numbers to tanks and other zombies, resulting in the final stand consisting of only a small group of 8 or so humans. Due to the zombies having to leave the tambark when stunned, the humans got a fairly large breathing space and had ample time to reload between each charge. However in the chaos of the final stand, the furthest out humans started to get picked off by zombies, eventually resulting in the bomb being stolen by a zombie and taken out of the play area only around 10 seconds before it would have detonated.
    I think the Blind Bomber balance with the grenades and tambark semi-safe zone is excellent, and would happily play a few more rounds of it as is.

    6 Round Sweep is a pretty basic mid-event sweep to make dart sweeping a little more fun and competitive. Besides just picking up darts, you have to watch for fellow scavengers also looking for as many darts as possible, and later in the game zombies (though they don't normally show up until several minutes in). Seeing as its primary purpose is to collect most of the darts on the field and its secondary purpose is a gamemode, there's not much for me to say about its game dynamics.

    Zombie King was the new gamemode introduced this event, and I think it's quite interesting. It reverses the roles of the two sides, with the humans now being the attackers and the zombies being a little more defensive. Since the zombies far outnumber the humans, and zombies get access to all upgrades, usually one of the tanks and a few infectors would stay with the king, while the rest try to deplete or stall out the humans. Since the humans are running on a time limit and have limited lives, they have to run very offensively to be able to break through the zombie lines and get at the king. So as to prevent spawn-camping, the humans had a safe zone of the central tambark area from which they also respawned.
    For most of the game, the humans were having a fair bit of trouble. They were largely unable to get close enough to the king to start getting hits, and also lost a lot of their lives. Much of this was due to the king moving back and forth quite far away from the tambark, and the consistent pressure and numbers of the horde also reducing the chance of any flanking maneuvers working. The sheer number of zombies was too much for anything but the entire human force to push through, and even then any tanks were quite a threat if the humans were close together. I feel like the king's constant movement was a a factor in the humans not being able to get close enough, as he generally stayed in areas far behind the bulk of the horde, and was constantly moving behind areas where humans were just recently tagged. As such and also thanks to the chaos of the game, it was harder for the humans to pinpoint the king at any one time.
    However late in the game, with the humans low on lives and the king untouched, the admin implemented a restriction for the king, forcing him to stay near a specific tree. While this contributed somewhat to his demise, I feel that a change in zombie tactics was the ultimate reason that the king fell.
    When the humans grouped up and rallied for another offensive, the zombies spread out quite wide around the tambark area, and as such were very easily picked off by the combined firepower of the humans. Tanks were still a threat, but teamwork, firepower and grenades were enough to take care of them. With most of the horde stunned or otherwise distracted, a few of the humans were able to rush straight to the king, eliminate his royal guard tank, and dump clips into him with Rapidstrikes, thus immediately ending the game in the humans' favour.
    Had the king retained his ability to move about the battlefield, I think he would have survived a little longer, but it wouldn't have changed the game's result. Since he can only walk he can't straight outrun the humans, and without any upgrades is largely non-threatening and must rely on his minions, especially tanks, for defence. Before the king was restricted in movement, the horde was split in a roughly 2:1 ratio of offensive and defensive zombies respectively, and the offensive zombies tended towards relatively large groups, making them difficult for the humans to completely stun. Even if a human was able to get past the main horde, the defensive zombies were usually enough in number to take the human down before they got too close to the king, or at least hold them off until horde reinforcements arrived. However after the king's tree restriction, the horde split into more of a (3-4):1 ratio, leaving very few zombies on defensive, and the spread out of the main horde made the zombies very vulnerable as a whole, resulting in the aforementioned situation of the zombies getting annihilated.
    Zombie King is a fairly decent game that's different from the regular HvZ games, had it not been for the very poor zombie tactics at the end I think it would have ended much more competitively.

    This event was pretty fun, I'd say a little more fun than the previous round as I had a better understanding of what was going on, and the Blind Bomber and Three Squares games ran much more competitively, which always makes games more enjoyable.

    Game Report 23/5/15

    Another game with Equalz Dee Foam Arms.


    Gamemodes:
    Old: 
    None


    New:
    HvZ - Humans try to survive against the zombie horde, and sometimes additional forces. Humans were limited in blasters and ammo, and got upgrades as they survived. Zombies also usually got upgrades as humans got upgrades for balance. Double tap rules were implemented for zombies - a first hit would stun the zombie and cause them to crouch for 3-5 seconds. A second hit during that stunned time would eliminate them. Bleed out rules were implemented for humans - if they are tagged they are stunned and crouch for 15-30 seconds. If a teammate touches their shoulder for 5 seconds before the time is up, the stunned human returns to play. If the time runs out, the human either is eliminated or becomes a zombie, depending on exact gamemode.
    Zombie upgrades include vests (Mega and Vortex aren't insta-elims), swords (extra reach) and Pocket Howlers (ranged throw attack).
    - Squad HvZv1.1 - a small group of humans would try to defend an objective (an ammo box) against a larger group of zombies. Unlike the previous squad HvZ, the zombies do not respawn. If the humans eliminate all zombies, they win. If all humans are eliminated or a zombie touches the objective (ammo box), the zombies win.
    - Supply Drop HvZ - similar to Recall HvZ as described in the previous game report, with some changes. Initially there may or may not be zombies depending on player count. Alongside zombies, the humans also have to fight scavengers, essentially a second mod-run human team. Instead of having one single safe point filled with ammo and blasters, supplies are "dropped" in certain locations by scavengers/mods, and their location is relayed to the humans via walkie talkie, which is kept with the humans. To receive extra blasters and ammo, the humans must eliminate all scavengers, who as the game progresses get more and more powerful blasters. To make matters worse for the humans, they are not safe from zombies while collecting their newly acquired gear, and furthermore they usually acquire only a little bit of ammo and a single blaster for the whole group.
    Humans who are eliminated become zombies, although at mod's discretion they may join the scavengers instead if the scavs are not threatening enough to the humans.
    Rush - conceptually a little similar to Siege the Fort, but functionally very different. It's basically Rush from Battlefield, except with just one objective instead of multiple sets. In Rush the defenders are defending an objective from attackers, who try to touch the objective. Defenders have infinite lives and respawn at fellow defenders or behind the objective, after a 5 second delay after elimination. Attackers are larger in number, respawn at a given location well away from the objective, and have a set amount of lives. If the attackers touch the objective, they win immediately. If all attackers run out of lives, the defenders win. Defenders are typically loaded up with larger Vortex and Mega blasters, while attackers get dart firing pistols.
    Both sides receive a few additional pieces, in the form of a few shields, swords and other such gear.


    Blasters:
    Regulars:
    Rebelle Sweet Revenges (modded) - my standard modded dual wield pistols. Due to blaster restrictions and classes they didn't get as much action, but they were still extremely effective.
    Elite Roughcut - performed as usual, they were especially effective for double-tapping zombies.
    Elite Strongarm - performed as usual.
    Elite Alpha Trooper (OMW 5kg spring, AR removed) - insanely overpowered compared to the stock and near stock stuff that was there, was instantly relegated to show-off only duty.
    ZS Hammershots - same usual, solid all round pistols that worked great with dual wielding.
    Rebelle Secret Shot - despite its apparent impracticality, I won every Squad HvZ round I played when I used the SS. It also worked well enough for Supply Drop, being that I actually spent less time in combat and spent more time just carrying blasters. People just loved how fabulous it was, and it'll probably become a staple just for that.
    Mega Thunderbow - fairly large, bulky and all round silly as usual, with its main advantages being ROF (surprisingly good once you get some practice), range (better than most other stock blasters) and the extra abilities of Mega darts, typically being an instant elimination, bypassing double tap.
    ZS Flipfury - as before, basically a Strongarm with a second cylinder. Worked just as a Strongarm does, except with the extra capacity which is always helpful.
    Elite Stryfe -rev up time was quite slow as it was stock, so often I would rev it up for too short a time resulting in a pathetic shot. Additionally the Stryfe would often jam or plop out the Elite knock-offs that were in the dart mix, resulting in pretty much guaranteed elimination. Nevertheless, the high capacity and superior rate of fire it had was a big advantage if used correctly.

    New:
    Vortex Praxis - saw a little use in Rush alongside the Revonix. As standard for Vortex, superior range was its big selling point and gave it a significant advantage over most of the stock blasters. However the low velocity of Vortex discs meant that even at close range dodging the discs was not difficult.
    Vortex Vigilon - this thing saw almost no use, however in the Supply Drop HvZ it was used in, it constantly jammed up with knock-off discs so it wasn't useful in any way.
    Vortex Revonix 360- the only entirely new blaster to see any significant use. Alongside the Praxis, it only saw use in Rush, so my assessment of it will not be the best. Nevertheless, against a larger number of lesser armed opponents it was able to put out a very effective spray of discs, and the reload-on-the-fly feature was also quite helpful to keep topped up in lulls in combat. The Vortex range as usual was good for keeping the attackers back and out of effective range. As with the Praxis though, dodging the discs was fairly easy even at close range.


    We played in 3 distinct areas. The first was around a house, so primarily close quarters with a fair bit of cover. We played Rush in this area as it's too small to play anything else. The second was an oval, used for Squad HvZ, with no cover. The third was a local school, used for Supply Drop HvZ. It had reasonable cover in some areas, and had enough twists and turns to keep you on your guard.


    Rush was played with 2 defenders and 3 attackers. It was reasonably balanced in the sense that the attackers lost half to two thirds of their lives, but managed to win. Unbalanced would be if the attackers got annihilated or lost very few lives in winning. The biggest problem with this gamemode was the choke point, just before the area the objective was in. It was practically impossible to hit any of the defenders without luck, as they were able to either duck completely behind cover or just use a shield to block. This stalemate was only broken through luck, not through any skill or tactics.
    I personally dislike any gamemode or area that forces narrow choke point combat, especially when the teams are unbalanced blaster wise, as it reduces combat to just a spray/potshot/luck fest, giving the team with the higher capacity/higher ROF blasters the advantage.
    I would have preferred a play area that had cover, but was fairly open so the numerically superior attackers could try to flank or otherwise outmaneuver the defenders, reducing the proliferation of luck-based combat and emphasising more tactical play.
    That's part of the reason I like playing around playgrounds - you get generally fairly open areas but still get some good cover, making tactical play more important to break stalemates.


    After Rush, one more person arrived so we switched over to Squad HvZ on the oval, with 4 zombies and 2 humans.
    For this particular Squad HvZ, there were 5 human classes in play for some semblence of balance:
    • Dual Hammershots, with minimal spare ammo
    • Strongarm with lots of spare ammo and two small arm shields (that block all zombie attacks)
    • Stryfe with a single set of 18 jungle clips (no spare ammo)
    • Thunderbow with spare megas
    • Secret Shot with no spare ammo (Veteran mode)
    The dual Hammershots were all round solid and effective, as expected. There's not really much more I could say about them considering I usually dual wield Sweet Revenges.
    The Strongarm was pretty much never used, because although the shields did help to block zombie attacks, a Strongarm on its own offered few advantages and as it required two-hand priming, also hindered the use of the arm shields.
    The Stryfe was very effective, however did have some jamming issues as mentioned earlier. Those jams did get me eliminated a few times, however once the knock-offs were culled from the clips the Stryfe performed admirably, effectively taking down several zombies with ease, with the only threat being zombies throwing Pocket Howlers. Zombies would be very afraid of approaching the Stryfe knowing they would get a face full of foam.
    The Thunderbow had the advantage of insta-elimination against zombies where everything else had to double-tap. Its longer range was also helpful for keeping the horde at bay, however the low capacity often got its user nommed by zombies if they didn't keep it topped up. The vest zombie was the only zombie that the Thunderbow didn't insta-elim, requiring standard double-tap, and so the vest zombie was very effective for draining the Thunderbow's ammo.
    The Secret Shot was there primarily to balance any human who was simply too good, however ironically in both rounds I used it in, the humans won without casualty. I was always paired with a Stryfe-wielding human though, so they usually put in the main hits and attack the zombies, and I would be there to finish off zombies and protect the objective. This worked very well as the Secret Shot had enough ammo to finish off two zombies and double tap a third if necessary.

    By far the most threatening zombies were the ranged ones, as they were the only ones who were still a threat at range. All other zombies could be easily taken down and eliminated, as was the case if the humans were feeling aggressive enough. However the ranged zombies scored very few hits, probably due to poor throwing ability, so becoming regular zombies until they picked their Pocket Howler up again.
    Besides the threat of ranged zombies, tunnel vision and running out of ammo were by far the biggest enemies of the humans. Running out of ammo naturally would get a human eliminated, with their partner or the objective falling shortly after. Most humans made sure to keep their ammo topped up so that was rarely a problem. Tunnel vision however was a problem that occurred frequently and caused a lot of humans to lose. Normally what would happen is the two humans would focus on 3 of the 4 zombies (an engagement heavily favouring the humans), but forget about the 4th zombie who would run up from behind and either tag a human or two, or take down the objective, resulting in a quick and humiliating human defeat.

    Squad HvZ was a good way to get people moving (primarily as zombies), and also promote teamwork, as the zombies had little chance if they acted alone, and the humans had little chance if they didn't cover each other. A group of cooperating zombies versus a pair of cooperating humans would make for a pretty good game, though naturally that didn't quite happen in these games.
    As the play area wasn't restricted to a small space, we didn't get the same issues as last time, however one problem was that if there was just one zombie left, they would just get chased away by a human. That could easily be fixed by implementing a timer or a zombie concede condition.
    Squad HvZ was what we played most as it was easy to set up, worked well, and easy to pack up.


    Lastly we played a round of Supply Drop HvZ. As we still only had 6 people we started off with one scavenger and 5 humans. This was perhaps a mistake, as for the first few supply drops we could casually walk up to the scavenger, eliminate him and receive our reward. This caused the mod to force one of us to become the first zombie, after which point the game really picked up. The constant threat of the zombie meant that the human group either had to keep moving or be prepared to stand and fight in an open area. In Supply Drop HvZ, if a zombie is eliminated they can immediately respawn out of sight of the humans, naturally meaning that the zombie would respawn behind trees or other obstacles as close to the humans as possible.
    Having to fight the scavenger as well meant the humans had to effectively split into two groups - one to hold off the zombie and one to take out the scavenger. This tactic also worked well for picking up ammo just after a firefight and receiving and loading up the reward from every supply drop. Since the supply drop itself offered no protection from the zombie, the humans would always be in combat with the zombie.
    Near the end of the game the human group tried to lose the zombie in the winding passages of the school (outside of buildings of course) and it worked for the most part, we didn't sight the zombie again until the final supply drop was radioed to us. The humans were eventually able to hold off the zombie long enough to receive the final supply drop and win.

    One of the problems with the current iteration of Supply Drop is that there is no incentive to get rid of humans from the group, having more humans is pretty much entirely beneficial. As such, the humans willingly work together to fight all threats, making it very difficult for the zombie or scavenger to do any damage thanks to the bleed out mechanic. One proposed change is to make the supply drops more like Recall HvZ from last time, in which rewards are given out as humans are lost to the horde. Another is to make ammo very scarce, thus making fallen humans a valuable source of ammo. Nevertheless, the problem of humans being too valuable to sacrifice is one that needs to be solved for Supply Drop.
    Supply Drop also benefits from having a larger player base so there can be an OZ, more scavengers and all round more danger to the humans. As it was, one zombie was easy to deal with and one scavenger was easily outgunned in a straight firefight, and at the start of the game there was no sense of urgency or threat as there were no OZs.
    An awkward situation we ran into was the humans running into the scavenger before he got into position for the supply drop. Due to the size of the play area, we then knew roughly where the scav and supply drop would be. This would likely be avoided with slightly better organisation and a larger play area.
    Also due to the size of the play area, the humans ended up just walking in circles waiting for the next supply drop. This would also likely be avoided with a larger play area.

    With better organisation, more players and a larger play area Supply Drop could become quite a fun gamemode, though it would take a lot more effort to set up than Recall HvZ since the supply drops need to be put in certain locations at certain times, rather than everything being stashed in one location.


    I personally feel that the previous school was a better play area, it felt larger and all round seemed to have better terrain. Runner HvZ would probably have worked quite well in this school, there were multiple paths between the two open ends of the school, and I think we had enough players to pull it off nicely.
    I personally didn't enjoy Rush too much, primarily due to the narrow choke point turning the game into a luck-fest. Had it been played in a more open covered area I would have probably enjoyed it more.
    Squad HvZ was significantly improved over its previous iteration, both humans and zombies won multiple games and there was a bigger teamwork aspect.
    Supply Drop HvZ wasn't too well balanced, though as mentioned earlier that's probably due to a small player count. With a larger player count like the one we had in Recall HvZ last time it would probably be better, with combat being a little more of a challenge.

    Review: Mazofactory MOLLE Single Mag Pouch (HSM1)

    MazoFactory is a new Melbourne based tactical gear manufacturer, who currently is focusing on clip/mag pouches and holsters. Though not officially launched yet, they are currently making some items for sale, and products are still in development so prices may change in the future. I purchased a pair of "High Speed (Modular) Mag Single" (HSM1) Pouches just in time for use in MHvZ.


    The MF Single Mag Pouch is a fairly standard design, a pouch designed for use with the MOLLE/PALS mounting system, and so has PALS webbing on the front and back and a pair of straps on the back.
    The mag pouch is made of a Cordura material, like that of the BSUK tactical gear.
    The mag pouch uses a fairly standard shock cord for holding in clips, with a large tab at the top for easy removal.
    Looking into the pouch itself, note that it retains its rectangular shape without a clip loaded, and doesn't squash flat as easily or naturally as some others might.
    Here's the pouch with an 18 clip.
    The mag pouch is designed primarily for 12 and 18 dart clips, however will fit 10 and 15 dart banana clips. 6 dart clips will fit fully inside the pouch as well, which makes retrieving them a little difficult.
    A sort of look into the pouch with the clip in, there's a small amount of wiggle room but with the retention cord over the top of the clip it's irrelevant.
    Note that the clips can also be inserted and store upside down. Compared to having the darts exposed, this position has the advantage of being able to pull out the clip and load it in with one smooth action, as well as protecting the darts from being knocked out of position or getting affected by the elements. However the disadvantage of this position is not being able to top up your clips easily, and there is a slight chance of the top dart getting caught against (for instance) the side of the pouch when removing it. It's mostly personal preference.
    12 dart clips also fit and are exposed enough to pull out easily, however the cord is too long to retain the clip as it is by default set up for 18 clips. Thus some cord shortening is needed as such:
    which retains the clip just as tightly as the full length cord retaining an 18 clip. Naturally you can adjust the cord for even shorter clips or clips between the length of the 12 and 18 (such as the 15 dart bananas) as needed.
    MazoFactory recommends tucking the excess elastic band into the front PALS webbing to keep it out of the way.
    The mag pouch attaches via a MOLLE/PALS webbing system, and on the back has two straps and two of its own rows of PALS for maximum retention.
    The straps are secured back to the pouch at the bottom simply by two small flaps of velcro.

    To attach the mag pouch, line up the two straps with the PALS webbing at the desired location on whatever gear you're attaching it to, and slide them through all the way.
    Then pull the straps up and thread them through the pouch's first row of PALS webbing.

    The pouch is now only partly secured. The lower end of the pouch is not secured at all so if you run the pouch as is it'll flop around much more than ideal.
    So get the straps again and repeat the process of alternately threading them through the PALS webbing on the gear you're attaching it to and the PALS webbing on the back of the pouch itself.

    Eventually you'll have used up all of the PALS webbing available in that column, and the pouch will be fully secured. Finish by securing the straps back to the pouch using the velcro flaps at the bottom.
    Due to the size of the pouch you can use up to 3 PALS rows on the gear you're attaching it to.
    Here's an example of a pouch mounting with a clip stored.

    Removing the pouch is a simple matter of first detaching the velcro flaps, then brute forcing the pouch upwards. Some persuasion of the straps may be required.

    Slowly but surely the straps will retract through the PALS webbing, eventually allowing you to pull the pouch straight out of the PALS webbing on the gear it's attached to. It's not easy to do in combat as it requires a lot of force applied for an extended period, and is practically impossible to do with a clip inside, so the mag pouch is very unlikely to come off during combat unless you've attached it incorrectly.

    By using one row of the mag pouch's own webbing, you can make the mag pouch fit onto belts if needed, however it'll be quite loose so it's not recommended.
    The single mag pouches will also stack on top of one another very neatly.

    I bought two single mag pouches in red to match my Battle Belt. Above is how I currently have them attached, on my right side one row lower than the BB's natural clip holders.
    The standard mag pouch would of course be in full black.

    My pair of mag pouches first saw use in the recent MHvZ event, and served admirably where I was easily able to remove the stored clips and load them, and insert and secure the now-emptied clip. Especially compared to the Battle Belt which has more of a pocket design, inserting the now emptied clips was much easier thanks to the MF mag pouch's box design. The motions felt very easy and fairly natural, and the pouch was extremely secure and felt like it was part of the Battle Belt.
    The tab is very nice to grab and pull or even just flick away with a deliberate action, but due to fitting on the small ridge at the top of 12/18 clips is not easy to accidentally pull off, though I haven't tried actions like going prone or combat rolls.
    Overall the MF Single Mag Pouch is a very well made product. The stitching is of pretty good quality, as is the overall quality of the materials and construction. The PALS straps in particular I quite like as they're easy to insert as well as remove (with the right technique), and aren't likely to break any time soon. Compared to the Battle Belt, I like how the mag pouches retain their shape when not loaded and so don't change shape when loaded with a clip, though that applies to most mag pouches anyway.
    A single mag pouch costs 25AUD each currently (HSM2 double mag pouches are currently 40AUD, and HSM3 triples are currently 60AUD). It's certainly not something that you'd buy on impulse like a blaster, since quite a significant financial investment is required to produce a usable rig. However it is a very high quality piece that is very secure, quite tough and does its job very well.
    If you're looking for a high quality MOLLE/PALS mountable mag pouch specifically designed for Nerf clips then look no further than the Mazofactory Mag Pouches. Mazofactory products are handmade right here in Melbourne, so for me and other Melbourne based Nerfers, it's also rather convenient to pick them up at major Melbourne based events.
    I do intend to get a couple more, as well as a pair of proper drop leg holsters for my Sweet Revenges. Check out Mazofactory's FB page for more pics of their products and prototypes.

    Review: Buzz Bee Range Master

    The Range Master is the largest blaster in Buzz Bee's Air Max line, although it has been around for several years in a grey colour scheme instead of the new blue. Nerf has released several sniper-style blasters and none of them have really lived up to expectation, so how does the Range Master stack up?

    As usual for Buzz Bee, an open style box even for one of their biggest blasters. It shows everything the RM comes with, as well as standard 60 feet range claim and "3 feet long!" (much like Nerf's snipers) to really emphasise the sniper part.
    Back of the box, as standard for Buzz Bee.
    All the bits you get out of the package.
    The base blaster, barrel extension, scope, bipod and 10 Extreme darts.

    Let's look at the base blaster, as usual.

    Immediately obvious, as with most other Buzz Bee blasters, the RM lacks the intricate shell details and prints that most Nerf blasters have. Note that outside of the stickers and orange parts, the RM has no colour besides blue, as with so many other Buzz Bee blasters.
    Where Nerf blasters often have their instructions in raised plastic, the RM just has a sticker.
    Besides also lacking much shell detail, the RM is also quite thin.
    The underside. Note the small hole in the grip like area, and the large section further forward. These both contribute to the bipod's functionality, which we'll look at next.

    The bipod is nothing special, it just has two legs on angled swivels, and two clips to slot into place on the RM. Here it is with the legs folded.
    And here with the legs deployed.
    Here it is on the RM, deployed. The legs are tapered so that when placed on the ground the feet of the bipod are flat, and the stock of the RM rests on the ground.
    Attaching it is simple, simply line up the clips with the slots and push in. Removing is just a matter of pressing down both clip release buttons and pulling down.
    Here's the bipod folded up. Note that the small nubs on the bipod legs pop into the small slot in the RM's body that was shown earlier.
    The grooves in the bipod are meant to for a grip pattern, however I personally found that particular grip position to be rather awkward, and the grip pattern isn't very comfortable for me.
    I personally prefer to grip the RM around the bipod mount, but personal preferences so that won't affect ratings.
    Also note that the bipod can be attached backwards, but the legs don't click into place, and when deployed the RM doesn't mount a flat surface properly.

    The Range Master wouldn't really be a sniper blaster without a pointless long barrel. Let's take a quick look at it.
    As immediately obvious, the RM's barrel is a screw-on attachment, removeable at will. It's extremely wide, and also fairly long.
    Unlike Nerf's faux barrels, the RM's faux barrel is smoothbore, and is extremely wide.
    Here's the barrel next to a dart. The barrel is possibly 3 times wider than the dart, making the barrel's effects on dart flight minimal, though that's purely anecdotal evidence, I haven't actually measured muzzle velocity and accuracy with and without the barrel.
    Here's a close up of the thread on the barrel and inside the RM's muzzle. They screw together quite well, being tight enough to not slip off but loose enough to remove will minimal effort

    Naturally, no sniper blaster would be complete without a scope.
    It's pretty standard toy scope fare, pure plastic, nothing precisely machined or calibrated.
    It attaches to the RM using a system similar to Nerf's tac rail system. It's a friction based system like Nerf's, so it's easily removed and attached but for light use probably won't fall off.
    Through the scope, it has a fairly basic but neat crosshair design. No magnification of course.
    The scope mounts pretty easily on the small tac rail on top of the RM. It's a small, specially designed tac rail that I haven't seen on any other Buzz Bee blasters.
    Note the width difference between the RM's tac rail (left) and a Nerf tac rail (right), on a Stryfe.
    Nerf attachments do fit on the tac rail, but not particularly well. It's quite tight, though can be brute forced off easily.
    The RM scope is too loose to stay on Nerf tac rails.

    Let's assemble the RM together and look at its firing mechanism, which is a very unusual one.
    The RM is close to 1m long, much like Nerf's Longshot and Longstrike. It doesn't have the same modern styling that the Longshot and Longstrike have that make them so great for aesthetic mods. Instead like many of Buzz Bee's other products the RM has a much more distinct toy look and feel to it.

    If you play first person shooters with bolt action rifles, you'll probably be at least somewhat familiar with their cycling action, but let's run through it anyway.
    Here's the bolt handle in its resting position.
    Firstly you pull the bolt handle up to horizontal.
    Then pull the bolt handle all the way back. This exposes the breech and the chamber...
    ...into which you insert the dart.
    Closing the bolt is as simple as just pushing the bolt handle forward, and flipping the handle down to lock the bolt in place. You could fire it with the handle up, but you risk the bolt opening slightly during firing, which will cause the dart tooth (like that of Nerf's clip system blasters) to come up slightly, blocking the dart.

    Now if this were a normal springer blaster, you would just close the bolt and fire. If you do that with the RM, you'll just get maybe a weak puff and no result. The Range Master is an air powered blaster, requiring you to pull the bolt back and forth a further 4-5 times to fill up the air tank. Less pumps will fire, but naturally at the cost of some power.


    From my casual use I'd say the RM is fairly easy to load and pump up, though under pressure (ie in Nerf games) you might end up accidentally dropping out a few darts, or having the stock slip off your shoulder, as it is smooth and insufficiently concave. Even without pressure I've had the stock slip off my shoulder from pumping up.
    Much like the Hammershot/Sweet Revenge and the Slingfire, the Range Master is just extremely fun to prime. Only one other blaster I can think of has this style of bolt action, and that's another Buzz Bee blaster (the Hunter) that's a springer, and is horribly undersized.
    When folded up, the bipod covers a grip area and acts as a grip. When deployed, you get access to the built in grip just under the bolt handle. Due to the RM being quite a thin blaster, and also due to the grip being very close to the handle and trigger, I personally find it quite uncomfortable to hold in this position.
    Holding it in this position also potentially causes your pinky to hit the bolt handle, though only if you're right handed (which most people are).
    I personally find it more comfortable and more natural to hold the RM just in front of the bipod mount. Though not designed to be a grip, it's main advantage is that it's further away from the handle.
    I personally would have preferred if the grip was further forward, with the bipod  also further forward just under the barrel.
    Beyond the lack of a well placed front grip, the Range Master has a few more ergonomic issues. One thing that will vary between people is that I personally find the shoulder stock quite short, and so a little uncomfortable. For younger persons (especially children/young teenagers) the shoulder stock is probably a reasonable length.
    Besides that though, the RM has a bit of a handle issue relating to the trigger guard. As you can see in the above picture the trigger guard is quite large. This makes the handle a little uncomfortable to hold, as to reach and use the trigger comfortably you often have to push your fingers right up to the trigger guard, which I find extremely uncomfortable, and even slightly painful over long periods of time. This could have been solved with a smaller trigger guard, or possibly no trigger guard at all.

    All these ergonomic issues force me to dock a few points from the usability rating.
    Now performance. Most of Nerf's sniper-style blasters don't perform like they look (which is a shame), so how about the Range Master?
    Range is quite good at full power, getting to 14-15m quite easily with the Extreme darts. The Range Master is very, very consistent, with range variance being a metre at most. Naturally pumping it up less than maximum results in lower ranges.
    Accuracy is very impressive. Using the included scope and aiming at a target around 9m I can nail a 30cmx30cm square with Extreme darts every single time ignoring duds. Hitting a (stationary) human sized target at 14-15m would be fairly easy, especially compared to most Nerf blasters.
    Rate of fire is horrible, naturally. Besides being a single shot, you also have to pump the Range Master 5-6 times for maximum range. One shot every five seconds is probably optimistic.

    As far as I'm aware the Range Master does not have a general Aussie release. In the US, it appears to retail for around 20USD, the same price as a full price Stryfe, and 10USD cheaper than the retail price of the Longshot and Longstrike when they were still available. Buzz Bee blasters are typically cheaper than Nerf counterparts, and the Range Master is yet another example of that.
    For a funsies or target practice blaster, the Range Master is a pretty solid choice. It's very fun to use with its relatively unique bolt action mechanism, and has the range and accuracy to make it a great target practice blaster. For actual Nerf war usage though, I'd recommend against using the RM at all. While its range is competitive with Elite blasters and its accuracy is impressive, the accuracy is entirely dependent on the Extreme darts (which are rather uncommon), and the very slow reload process means you'd probably be better off firing multiple less accurate shots, probably using one of Nerf's clip system blasters.

    I've personally enjoyed using the Range Master just for target blasting and actuating the bolt, but if you're a Nerf practicalist you'll probably want to give it a miss.

    Power: 6.5/7
    Accuracy: 5/5
    Value for Money: 4/5
    Usability: 3/5
    Rate of Fire: 0.5/5
    Overall: 3.53/5

    Personal Rating: 4/5 - the accuracy and power is pretty good, so it's really fun to fire at targets. The bolt action is also really fun since none of Nerf's blasters have this style of bolt.

    As with the other Buzz Bee Extreme Air Max blasters, the Range Master was sent to me by Buzz Bee for review. I thank them for the kind gesture, however as with all other reviews their contribution does not affect the review in any way.

    Review: Buzz Bee Air Max/Baron + Internals (EU)

    Along with their new clip compatible Ultra Tek line, Buzz Bee has also released a new Air Max line compatible with Nerf's Mega line. The smallest offering in the new Air Max line is the Air Max/Baron. I received the one called the Air Max specifically, supposedly meant for European retail.
    Once again, many thanks to Buzz Bee Toys for sending the new Air Max blasters over for review, as without their contribution I would not be able to obtain them otherwise. Note that their contribution does not affect the review in any way.
    Standard small blaster packaging, a single piece of cardboard with a few cable ties.
    Out of the box, just the AM/Baron and two new Air Max/XL Distance darts.

    Let's take a look at the new Air Max darts. Like with the Ultra Tek darts, the blasters in countries with stricter laws get flat tipped darts, while the full power North American ones (called XL Distance darts) have suction cups.
    The AM dart is a little bit shorter than Nerf's mega, primarily in the tip which is a thin flat plate where Nerf's is a full whistler tip.
    A better look at the tips together, Buzz Bee's one is just a solid piece while Nerf's whistler tip is hollow and compresses on impact.
    Foam wise the darts are very similar in both dimension and feel.

    Here's the AM dart next to a UT dart. Note how the tips are very, very similar.
    Unlike Nerf's Mega and Elite dart, it's almost impossible to fit a UT dart within the AM dart's hole.
    Interestingly with my two AM darts one was noticeably thicker than the other, and seemed to get better ranges.


    The AM/Baron is a very simply designed, lacking some of the more intricate details found on some of the Ultra Tek blasters.

    Weirdly, the handle is quite small for the AM/Baron, despite the blaster itself being scaled up from regular dart blasters. I find it rather uncomfortable.
    Here's a comparison of the AM/Baron's handle against the UT3/Star's handle. Note how the AM/Baron's handle seems to be a scaled down version despite the rest of the blaster being scaled up.

    The AM/Baron is a slide primed blaster like most other Ultra Tek and new Air Max blasters. It's slide is fairly wide but not not particularly tall, so in my opinion is not particularly comfortable or easy to grip. Certainly not as good as the UT8/Champion's, which in my opinion is one of the best slides out there.
    The prime stroke on the AM/Baron is very long for such a small blaster, and coupled with a surprisingly strong spring the AM/Baron is actually not very easy to prime. I could certainly see young children having trouble priming it

    The AM/Baron is a two shot blaster, and at the front has these two rather chunky barrels with ARs.
    And here's the two barrels loaded.
    Like the other multishot UT blasters, the AM/Baron uses a rotating plunger to switch between barrels. Naturally being a two shot blaster it just switches between top and bottom alternately.
    Here's the AM/Baron next to some other blasters. You will notice that though it's not particularly tall, it is very long, almost as long as the much larger and more expensive Magnus.
    So how does the Air Max stack up against Nerf's established line of Mega blasters?
    Range is pretty solid even for this small blaster, with the AM darts I'm getting around 11-13m ranges very consistently. Switching to Nerf's Mega darts yields ranges up to 15m and beyond, depending on what the darts feel like as they're wildly inconsistent and inaccurate, as we know them to be.
    Accuracy using the AM darts is also pretty impressive. The darts fly very straight and end up with a spread no more than 0.5m even at full range. Naturally switching to Nerf Mega darts makes accuracy go out the window.
    Rate of fire is not very good seeing as the prime is quite long and stiff, but pretty hard to measure (and fairly pointless) for a two shot blaster. Both darts within a second is probably what can be achieved consistently and relatively easily.

    The Air Max/Baron retails in the US for a measly 5USD, which is a fantastic deal.
    As a Mega blaster it's competitive with the Magnus for power and cheaper than a Bigshock while also having one more shot than the Bigshock. As a blaster overall it packs a lot of power and mod potential for a ridiculously low price, as well as being quite fun to use even in stock form. Overall I'd highly recommend picking up one (or a couple), whether you want it for Mega blasting, modding it into a mean dart blaster or even just for fun.

    Pros: Incredibly cheap, performs competitively well, great accuracy, simplistic internal design allows for very easy modding
    Cons: Overall ergonomics are not great - small handle, stiff, long prime stroke, awkwardly long length

    Power: 7/7
    Accuracy: 5/5
    Usability: 4/5
    Rate of Fire: 2/5
    Value for Money: 5/5
    Overall: 4.2/5

    Personal Rating: 4.5/5 - a really cheap Mega firing blaster that can compete with the Magnus and has pretty good mod and integration potential, the only things bugging me are how small the handle is and how long it is overall.

    Once again, many thanks to Buzz Bee Toys for sending the Air Max to me for review, it's a fantastic blaster.

    Now for the AM/Baron's simple internals.
    First up, remove the two screws in the slide and remove the slide. Once the two screws are out it should pop apart easily.
     Before removing the screws, pry this orange piece off. A flathead screwdriver or a fingernail should do fine.
    Once the screws are out, the shell comes apart easily and you're greeted with this.
    Trigger and catch mechanism. The catch looks a little weak to me, though I'm not qualified to quantitatively say so.
    Priming and rotation mechanism.
    To achieve the switching between barrels, the plunger tube has 5 separate holes and a foam seal, which rotates about every prime to alternate between barrels.
    The plunger system exploded out. The spring is pretty strong for a stock blaster, comparable to or possibly even stronger than the newest style Nitefinder spring.
    Note that the plunger and barrel block don't actually click together or anything, it's just a friction fit.
    The plunger tube has a diameter of 3.3cm, certainly quite a large plunger for a blaster this small.
    The AM/Baron has a draw of around 7cm, which is very long.
    Considering the size and draw of the plunger tube, I have no doubt that provided the catch holds up to stronger springs, you could get a lot of power out of the AM/Baron. Even better, because the barrel switching uses a rotating plunger tube, there's no need to keep the ARs in, so you can just rip them straight out and straight up rebarrel for regular darts no problem.

    Review: Buzz Bee Air Max 3/Boss (15m Aus)

    Buzz Bee's mid-sized Mega blaster is the Air Max 3/Boss, a 3-shot slide action large pistol seemingly as a direct competitor to Nerf's Magnus, but with one key advantage: having a Mega clip.
    Like with all the previous Air Max and Ultra Tek blasters, many thanks to Buzz Bee for kindly sending the AM3/Boss to me for review, and like with all of those reviews, their contribution will not affect the review in any way.

    Standard Buzz Bee style box. I'm honestly getting a little tired of untying those cable ties, I much prefer being able to just slice through the paper ties Nerf uses.
     A warning/instruction sticker on the clip. Note that the blaster pictured is actually the UT8/Champion.
    Out of the box, you get the AM3/Boss, a 3 AM/XL (Mega) dart clip and 3 AM/XL darts. For the US releases you'll get the suction tipped XL darts, for elsewhere the flat headed AM darts.

    Let's take a quick look at the 3 AM/XL dart clip.

    Buzz Bee's 3 clip is very square, and being that I'd never really seen a Mega sized clip before, its size was quite a surprise to me.
    Next to a regular dart six clip, despite the half capacity it's the same height and due to using Mega sized darts is about 50% wider.
    Here's the clip loaded up. Note how unlike regular dart clips the feed lips pretty much entirely obscure the top loaded dart.
    Naturally Nerf's Megas fit and feed just fine.
    Interestingly the clip has two grooves in the back. The smaller rectangular one is of course the standard clip retention groove into which the clip release inserts, but I have no idea why the other one is there.


    Unlike the UT blasters, the URT/Sentinel in particular, the AM3/Boss is a little lacking in intricate details. It comes off as a little basic compared to them, though still an improvement on some of Buzz Bee's older offerings. The plastic does feel a little better and less creaky than Buzz Bee's older blasters.
    The muzzle piece is a rather odd round piece unlike most regular cylindrical muzzle pieces. That combined with the blaster's overall bulk makes the AM3/Boss fit quite well as a sci-fi style blaster.
    The AM3/Boss is reasonably wide, but the main width is in the slide, the body itself is not exceptionally wide.
    The AM3/Boss has sort of iron sights, but as with most other iron sights on Nerf blasters they're too small to actually use and of course aren't zeroed.
    The AM3/Boss has this orange button like protrusion on both sides, but it does nothing.

    The handle is reasonably sized and reasonably comfortable, no real complaints there.
    What I do have to complain about though is that my trigger finger tends to drag along the top of the trigger area, and there is a small protrusion right in between the top of the handle and the trigger, which my trigger finger always scrapes along.

    The AM3/Boss is a 3 shot blaster, so is a direct competitor to Nerf's Magnus. However the AM3/Boss has a key advantage over the Magnus, being that it has a 3 dart detachable clip, and thus has a magwell that accepts Mega sized clips.
    Like with the UT blasters, the clip release is a cylindrical button behind the magwell that is pushed up to release.
    Down the magwell, like the UT blasters the breech system is slightly simplified compared to Nerf's clip system things.

    The AM3/Boss is a slide primed blaster similar to the Magnus, and has quite a long priming stroke. The prime is smooth and easy, no problems there.


    For me the slide is quite comfortable to grip. It's sufficiently long and tall, and quite wide making for a good amount of grip area.
    Using the AM3/Boss is the same as the Magnus, and basically every other springer clip system blaster. First up, open the breech by pulling the slide all the way back.
    Once the breech is open, clips can be inserted/removed/replaced.
    However the clip release is unfortunately rather difficult to reach with your main hand unless you have exceptionally long fingers. Pictured above is me barely reaching the clip release with the middle finger, and having to mostly release the handle to reach it.
    The instructions picture this method, holding the underside of the blaster with your main hand to hold down the clip release.
    I prefer this method, grasping the clip with my offhand and using my pinkie to depress the clip release, as it lets me keep my main hand on the handle.
    One slight issue with releasing clips is that you can't just tap the clip release and drop the clip, as the clip release will catch onto the second groove on the clip, getting it stuck in the position pictured above. As such you have to hold the clip release down longer than with most other blasters, which given its slightly awkward position is not ideal.
    Finally close the breech by moving the slide forward and it should lock into position and unlock the trigger. Pull the trigger to fire naturally.
    The AM3/Boss next to a few other blasters. It's a little taller than the Magnus but is otherwise quite comparable. Compared to the Sweet Revenge it's significantly taller and bulkier, though not much longer.

    So how does the Air Max 3 perform? Does it compete with Nerf's Mega line?
    Ranges are reasonable, about 11m flat extremely consistently using the flat tipped AM darts. Switch to Nerf's Megas gives a significant range improvement, comparable to a Magnus, though consistency goes out the window, since some will drop short and some will soar really far.
    Accuracy is pretty impressive, the flat tipped AM darts fly extremely straight. Even with bouncing I was having all the darts I fired land within a circle about 0.5m wide.
    Rate of fire is decent, though not fantastic. The AM3/Boss is quite easy to prime, but without slam-fire and with such a long priming stroke it certainly won't be winning any ROF contests. About 2 darts per second is about what I can get.

    The Air Max 3 is not currently widely available in Australia yet, but is available at Mr Toys Toyworld for 25AUD (for the purpose of rating I will be ignoring that price, as it's an independent smaller retailer). The RRP in the US is 10USD, which is absolute bargain, considering that's about the same as a Strongarm. Nerf's competitor, the Magnus, retails for about 15USD (though naturally on sale it'll drop down). While twice the price compared to the smaller Air Max/Baron, the AM3/Boss performs similarly well, is much more comfortable overall and as a general use blaster is much more practical due to its clip system.

    If you're at all into the Mega line, the AM3/Boss is highly recommended. It's a cheap, effective and reliable clip system Mega blaster, something Nerf has failed thus far to do.
    If you're purely into practical use, then the AM3/Boss is possibly a decent sidearm, though I'd personally only use it for such if Megas are treated specially (e.g. instant-eliminate a double-tap zombie) as for sidearm duty I personally would prefer the one-handability, greater capacity and smaller size of the Sweet Revenge. While the clip allows for easy reloading provided you have more preloaded clips, reloading on the run is not as easy and so for scavenging/reloading on the run the Magnus is superior.
    For just having fun, the AM3/Boss is a pretty good choice. It's very cheap, performs well and is really fun to use. An advantage it has over regular blasters like the Strongarm is that it fires Mega sized darts, which add a novelty factor not present with regular dart blasters. If you get yours from North America you also get the suction tipped XL dart, and sticking suction darts to flat surfaces is always fun.
    I'd certainly recommend picking it up if you have a little spare cash and space.

    Power: 7/7
    Accuracy: 5/5
    Usability: 4.5/5
    Rate of Fire: 3/5
    Value for Money: 5/5
    Overall: 4.5/5

    Personal Rating: 4.5/5 - it performs pretty well and feels awesome to use. I also find it quite comfortable (besides the trigger finger issue), and the low price of 10USD doesn't hurt either.
    Viewing all 346 articles
    Browse latest View live