Quantcast
Channel: Outback Nerf
Viewing all 346 articles
Browse latest View live

Announcing: BlasterHub!

$
0
0
BlasterHub is a new Nerf site that brings together some (and in the future, hopefully most) Nerf bloggers around, founded by the senior designer of the insanely successful BlasterLabs.
I was invited to participate as an author, which I accepted. I will be posting on both blogs, but slightly differently. New reviews and major game reports will be posted roughly simultaneously, while older reviews will be added to BlasterHub as I have time. Major mods will be posted on both as well, however minor mods and alterations will likely only be posted here, as will minor game reports and other minor posts. My posts on BlasterHub will be a little different to those here on Outback Nerf, but content wise they'll be pretty much the same.

Elite Rayven now works!

$
0
0
My Elite Rayven has gone through a lot, taking several motor swaps and battery changes, as well as dozens more openings to fix (or at least attempt to) various issues. Most recently the issue has been a lack of power and consistency, seemingly due to an alignment issue. This all occured after installing Banshee 130 motors, so I never got to witness the E.Ray at full power.

Careful analysis of the clip-flywheel cage-faux barrel positions suggested that the flywheel cage and barrel should be shifted slightly towards the left side, which was done with small cardboard shivs:

 
While they did help to centre the darts better on the flywheels and faux barrel, there was an awful lot of squibbing (darts hitting the side of the faux barrel) occuring. After maybe a dozen attempts at fixing it, I gave up and sent the E.Ray to languish in rack duty. After re-opening it today, I found that the cage was actually pointing very slightly to the left side, which I hadn't noticed before. This naturally caused the darts to be propelled directly into the wall of the faux barrel. I fixed this by adding an extra shiv piece to the rearmost screw port, propping that side up slightly.
This finally (seemingly) aligned the flywheel cage properly, after some test fires I was getting a lot more power much more consistently, with no squibs or misfires.
So after many failures and a lot of pain and disappointment, my E.Ray is finally (hopefully) fit for combat! I hope to be able to give it a proper test soon(ish), and will hopefully also be replacing the Banshees with FK180SH-3240s, assuming I can get a motor cover.

Review: Nerf Rebelle Rapid Red (20m Aus grey trigger)

$
0
0
The Stryfe is one of the most popular Elite blasters, so it's no surprise that Nerf has remade it in a number of different forms. Perhaps the most unusual one is the Rapid Red, a Rebelle version.
 
 Front and back of the box.
All the stuff included.


The Rapid Red is distinctly a Stryfe-based blaster with the style of Rebelle - it has the same layout and design as the Stryfe, but has the smooth lines and colour scheme of Rebelle. I personally quite like it, though the grey trigger does look pretty bad.
Looking at the front. Note the battery tray door. Also note that the muzzle is a regular one and does not accept barrel extensions.
Looking down the top of the RR. Note the curves and the relative symmetry of the shell, in contrast with the Stryfe's one-sidedness.
Unlike the Stryfe, the RR holds its 4 AA batteries in the fore end instead of on the side. This allows the RR to be relatively symmetrical, as well as have a reasonably comfortable fore-end. I far prefer the RR fore-end to that of the Stryfe.

A look at the handle and trigger/switch positions. The RR handle is angled more extremely than the Stryfes, and its triggers are further away from the clip release.
My hand on the RR handle. The handle is quite small, my hand barely fits on it and the sling loop gap is noticeable and annoying. I can still reach the clip release with my middle finger reasonably, but the bulging curved trigger guard does get in the way.
The trigger is pretty smooth, and the accel trigger is also fairly good. I like the Rapid Red triggers the most of all the flywheelers I've tried.
The Rapid Red lacks the faulty dart sensor that the Stryfe has. This gives it inherently superior reliability to a completely stock Stryfe, though realistically ripping that piece out is the first thing you do with a Stryfe.

The Rapid Red comes with a special 12 dart clip, unique not just because it's the only Rebelle clip so far. It has a unique lower clip design, with an angled bottom and smooth shell, and obviously a unique colour scheme. Functionally it performs just as well as an Elite 12 clip.
Dimension wise the Rebelle 12 clip is mostly the same as the Elite 12 clip, besides obviously the angled bottom making the Rebelle clip marginally longer.
The Rebelle clip also bulges out slightly, but not majorly.
The Rebelle clip matches the RR jam door pretty well colour wise.

Besides directly matching the jam door, the Rebelle clip fits well with the overall Rapid Red colour scheme, ignoring the grey trigger. The overall RR design is that of a large pistol/SMG style blaster, and it works decently well. I personally would prefer having a stock, especially considering the handle angle, but that is partly personal preference.

Here's the Rapid Red next to the Stryfe. The RR is overall bulkier in every aspect besides the handle, and the Stryfe's side mounted battery tray. This is also another good comparison of styles, the Rapid Red is smooth and curved, while the Stryfe is sharper and more tacticool.
A better look at the how the symmetries and bulk of the blasters compare. 

Finally for performance.
Unfortunately a grey trigger Rapid Red is no better than a GT Stryfe, ranges of about 9m flat are slightly optimistic.
Accuracy is decent, but not great. Even with the lack of power the darts like to not fly straight. At the usual 8ish metre away doorway I can get a majority of darts through without issue, but still a significant minority hit the frame.
Rate of fire is about the same as is normal for the Stryfe platform, though hampered slightly by the odd trigger guard. 5dps is not a problem, and higher can be achieved with the right technique, though such high ROFs are generally not usably effective.

The Rapid Red used to be available at BigW for 39AUD, down to 29AUD on sale, which is when I bought mine. I've only ever seen one shipment of them, they suddenly appeared for that one sale, then disappeared afterwards. 39AUD is pretty steep for effectively a Stryfe with a 12 clip, since Stryfes were regularly 25AUD at Kmart. 29AUD is much more reasonable, on par with the regular price of an EAT when that was around.
The RR serves much the same role as an attachment-less Stryfe, a semi auto flywheeler pistol. It's quite effective (assuming you're not using a stock grey trigger one) for all round combat, not as accurate as most springers but generally faster firing. When properly modded the flywheel spin-up time becomes pretty much negligible, removing one of the major drawbacks of stock flywheelers. I take an overhauled RR as a backup primary at MHvZ, and likely other Melbourne Nerf events I'll hopefully get around to attending.
For its regular retail price, the Rapid Red is a buy only if you absolutely love how it looks, because 39AUD is too high for what it is. On sale the Rapid Red is a decent buy, not as good value as some other blasters, but it can be made into a very effective blaster. I've heard of some clearance sales in the US taking them down to 10USD and less - for those prices it's a definite buy, <15USD is an absolute steal.

Pros: Nice fore-end, doesn't have the Stryfe's terrible dart sensor, awesome clip, relative symmetry compared to Stryfe
Cons: Somewhat small handle, has the same awful grey trigger performance as the Stryfe and Demo, lacks barrel and stock attachment points

Power: 3/7
Accuracy: 3.5/5
Rate of Fire: 4.5/5
Usability: 3.5/5
Value for Money: 3/5
Overall: 3.33/5

Personal Rating: 3.5/5 - with the exception of the slightly small handle, I like the look and feel of the RR, especially the fore end. I love the clip too. I do wish it was cheaper though. I also miss a stock, I like to shoulder clip system blasters.

A link to the review I posted on BlasterHub: link

Review: Buzz Bee Air Max Tyrant (80ft US) + Internals

$
0
0
Buzz Bee's Mega competitor, the Air Max line, has a massive flagship blaster in the form of the Tyrant. It embodies much of what people wanted in the Mega line, a large clip (mag) fed pump action blaster that was reliable and powerful. Has Buzz Bee achieved that?
Like with the other Buzz Bee Megas, many thanks to Buzz Bee Toys for sending the Tyrant to me for review. As usual, note that their contribution will not affect the review in any way.


When the Tyrant arrived I was surprised just how big the box and the blaster were. Having not owned or seen a Centurion clip, I had no idea just how big the Mega-sized clips were.
All the things in the box, minus one dart that I lost. Note that since my Tyrant is a US model, it came with suction tipped darts and has an 80ft range claim.


The Tyrant is a gargantuan blaster considering it doesn't have a stock, or underbarrel pump action. Unfortunately, for all that bulk the Tyrant has very little detail in its shell. It's quite plain and fairly boring. A stock would have been very much appreciated (much like the Rotofury). Without a stock for balance, the Tyrant is very front heavy and rather awkward to handle.
Here's the Tyrant next to my Elite Rayven, you can see the significant bulk of the Tyrant.
Looking down the muzzle, you can see that the breech does not mate with any piece like Nerf's clip systems, rather the breech is just left floating forward.

The Tyrant has a small orange fore-end piece, which works ok as a foregrip. It's quite narrow so not particularly comfortable, but does at least form a place to grip.


The Tyrant's handle is quite well designed, I find it quite comfortable. Notably however, it does not feel quite in scale with the rest of the blaster as it is regular sized, while the rest of the blaster is massive.

The slide is an odd rectangular slab of plastic on the top. It's not very sophisticated or well designed, but is sufficiently grippable to operate easily.
Given the size and bulk of the Tyrant though, an underbarrel prime would have been much preferred. Having to balance it with one hand on the handle at the back, and the other hand on top is pretty awkward.


As you'd expect from a blaster that uses Mega clips, the Tyrant's magwell is pretty big. Like Buzz Bee's other clip system blasters, the clip release is a cylindrical vertical bottom behind the magwell. In the Tyrant's case particularly, the clip release button position is pretty awkward, as will be shown just below.
A look into the magwell, no locks or anything here.
Here's an image that serves well as a size comparison, my hand holding the 12 dart mega clip, which is loaded in the Tyrant. My hand can't get anywhere near wrapping around the clip to reach for the clip release from a regular clip gripping position.
Instead I'm forced to shift my main hand to grip the underside of the Tyrant and actuate the clip release. The clip release is too far away from the handle to actuate otherwise.

The priming/cycling sequence of the Tyrant is the same as most clip system blasters. First is to pull the slide back, which primes the blaster and opens the breech.
Next is to insert/replace the clip.
Finally to ready the blaster for firing, the slide is pushed forward, which chambers a dart in the breech.
Finally of course pulling the trigger to fire. Like with most blasters, the trigger is locked unless the slide is fully forward, and once a dart is chambered, the slide is locked forward until the trigger is pulled.
I was experiencing issues on the forward stroke of the slide. Like with most other springer clip system blasters, the Tyrant has a dart tooth to push the dart fully into the breech. However once the dart was fully chambered, the dart tooth was still up, and required unusual force to push it down. Normally the dart tooth will begin to retract as the dart is almost fully chambered, allowing for a seamless chambering and slide stroke. This severely reduced ROF as I had to make sure each forward stroke was strong and deliberate.

The Tyrant also has an odd issue where the clip can feel like it is inserted, but is not quite fully in. This is because the clip has a notch above the standard locking notch. This also can cause the clip to get stuck upon removal if the clip release is not held long enough. This is circumvented simply by holding the clip release down for the entire insertion/removal process.

Here's a shot of the 12 dart mega clip next to a Rebelle 12 dart clip. It's pretty darn big, length wise it's comparable to an 18 dart clip.

Finally for performance.
Range wise the US-spec Tyrant is pretty good. From my testing, with the suction tipped XL darts I was getting about 15-18m (50-60ft) ranges flat. The 80ft range claim is certainly achievable at an angle.
Accuracy, rather surprisingly, is not great. I found that the suction tipped darts tended to be less accurate than the regular flat tipped darts, sometimes floating or veering where the flat tipped ones pretty much always fired straight. It's still better than using Nerf Mega darts, but not quite perfect.
Rate of fire could be decent, if not for the dart tooth issue. I found that about 1 dart per second was about the best you could do while not getting it stuck up. With a few fixes, I'm able to get 2 darts per second pretty easily.

The Tyrant is the highest capacity Mega blaster currently available. Nerf's closest competitor, the Rotofury only holds 10 darts. The Tyrant holds 12, and with spare clips also reloads very quickly. Simply put, the Tyrant is the best primary Mega blaster around. It gets sufficient ranges, has a usable ROF (moreso when fixed), has the highest capacity and can also reload fast with spare clips. Obviously the Tyrant is not something you'd normally use to compete with modified Rapidstrikes, Retaliators, etc.

The Tyrant currently retails for 20USD, which considering what it brings is a darn good price. None of Nerf's Megas get anywhere near the value or abilities of the Tyrant, which singlehandedly puts to shame much of Nerf's Mega line. It isn't as sophisticated as some of Nerf's offerings, but for sheer blasting ability it tops Nerf's blasters. If you are at all interested in Mega blasting, the Tyrant is something you should get. Even if you aren't into Mega blasting, if the Tyrant is available locally I'd say you should definitely consider it. While not the most practical or comfortable (or good looking for that matter) blaster, it is one of the best (if not the best) Mega blasters available.

Pros: Pretty powerful, massive capacity, low price
Cons: Awkward to handle (especially due to lack of stock), massive, poorly detailed, dart tooth issues hinder ROF

Power: 7/7
Accuracy: 3.5/5
Rate of Fire: 2.5/5
Usability: 3/5
Value for Money: 5/5
Overall: 3.8/5

Personal Rating: 4/5 - once you get around the dart tooth issue, the awkward ergonomics is the only thing really detracting from what could be a really good blaster.

Again, many thanks to Buzz Bee for sending the Tyrant to me for review, and again their contribution will not affect the review in any way.

A link to the review I posted on BlasterHub: link

Now for the internals. Like a lot of Buzz Bee's other offerings, the Tyrant's internals are fairly simple.

First the slide needs to be taken off.
Once the slide and all the screws are out, the Tyrant can be pried open.
  \

The internals are not especially interesting, they're not too different from some of Buzz Bee's other offerings.
Here's the plunger system exploded. Note how the breech is separate from the plunger tube, akin to Nerf's Elite clip system springers.
 
The plunger tube is 2.9cm in diameter and has a draw of around 11cm, which gives a pretty substantial air displacement. As an estimate, it is probably about twice the length of an Elite clip system springer's plunger tube. The Tyrant has some serious power potential if its internals can hold up, that plunger tube is massive.

This is a slight alteration I did to the dart tooth piece, a shim that would make the dart tooth retract slightly earlier. It's been smoothened, so the forward slide stroke is now far smoother, and there are no chambering issues.
I also added a small spacer for a little spring precompression.
The alterations in the reassembled Tyrant internals. The spacer didn't seem to make much difference, but the dart tooth fix made operation much smoother and easier.

Review: MGLW Hammershot Holster

$
0
0
Some time back I was contacted by Merchant Green Leather Works, offering to send a review sample of one of their products. I chose a Hammershot holster since my Sweet Revenges already have holsters, and some of my friends use Hammershots.
Many thanks to MGLW for sending this holster to me for review. As with all other reviews in such circumstances, their contribution will not bias the review.


This holster is very different to the sort of holsters (and tactical gear) I normally look at. Unlike my cordura Sweet Revenge holsters, this holster is made from a single piece of leather (as the business' name would suggest).
This particular holster is in the "fox brown" colour, with "hammered lines" tooling. I don't know the first thing about leather machining, but to me the machining on this holster looks pretty darn good.
Though the holster relies primarily on friction fit, there is a retention tab at the bottom that stops the muzzle of the Hammershot going any further.
A look into the pocket of the holster.
The holster has a solid belt loop at the top, which is large enough for regular belts and has quite a good friction fit.

This holster has a single leg strap at the bottom, which is not found on holsters for smaller blasters. Since this leather is relatively stiff, small holsters don't flap about much, hence leg straps are not totally necessary. The Hammershot is large enough to requisite a leg strap though. It blends in relatively well with the rest of the holster.

Naturally without a retention strap, the friction/tightness of the holster is vital to making the holster usable. Up until this point, the holster is pretty loose, however beyond this point the friction of the holster becomes noticeable.

At this point, the friction goes from noticeable to quite significant, and requires a reasonable amount of force to keep going.

Further still and the holster becomes even tighter, requiring a pretty serious amount of force to get the rest of the way. At this point the Hammershot is held in well enough by friction, and is not likely to fall out without some extreme movements.

Hammershot all the way in. The tightness of the holster is more than enough to keep the Hammershot holstered properly in just about all regular situations. However, I personally feel that the holster is perhaps a little too tight, as inserting the Hammershot into the holster requires quite a bit of force, much more so than my thumb-break strap Sweet Revenge holsters. The amount of force required tends to shift the holster quite a lot, shifting the position of the leg strap a fair bit (or maybe I've just been wearing leg straps wrong the whole time).
Leaving the Hammershot holstered for a long time (ie several days) does loosen the holster up nicely, but it still does require a fair bit of force to insert and draw.
A look at the bottom of the holster with the Hammershot in. Naturally the muzzle retention tab has been designed to allow for darts to be retained in the blaster without issue.
 

So here's the Hammershot holstered. It fits well, there's enough leather and friction to easily keep the Hammershot in place, while not completely obscuring the Hammershot itself.
Like with most pouch-style holsters, the holster bulges out slightly when the Hammershot is in. This isn't much of an issue as the leather retains its shape quite well, and is already shaped for the Hammershot's body.
A look from the bottom, the Hammershot is mostly exposed from underneath.

The holster has ample space for the hammer, and allows for the Hammershot to be holstered both primed and unprimed.


This picture sort of shows the grooves that are cut into the holster by the Hammershot being in it for an extended period of time. The presence of the grooves demonstrates how tightly the holster fits the Hammershot.
One small issue I've come across is these metal pins not being completely obscured by the leather, and scraping along the side of the Hammershot as evidenced by this scrape:
This was simple to fix, just get a set of pliers and push the edges down until they are submerged under the leather. It's something to watch about if you are concerned about the paintjob on your blaster.


Here's the Hammershot holster on me. It works quite well, it doesn't shift about much and sits in quite a good spot. The leg strap is easily long enough to fit my leg, although MGLW will adjust the strap length to your needs anyway. I find that with a lot of movement the leg strap does tend to shift downwards, though I'm not sure whether this is due to the leg strap or me just not wearing leg straps properly.

 
Here's me reaching for and drawing/inserting the Hammershot. It's in a good position to draw/insert, low enough to be comfortable, but not so low that it significantly impedes movement. The only possible issue here is the tightness of the holster. While this is fine for drawing, holstering the Hammershot does take quite a lot of force, which I find does tend to shift the leg strap downwards a fair bit. Obviously leaving the Hammershot holstered for extended periods of time to loosen it up does help, but it is still quite tight.


The Hammershot holster is available at the Etsy store for 55USD + shipping. In the current financial climate, this translates to around 80AUD + shipping, which is possibly the most expensive Hammershot holster I've come across. What you're paying for is a complete leather product, that (as far as I can tell) is well machined and tough, as well as having some choice over colour and the machining detail. While it works perfectly fine as a holster, the reason for such a high price is the leather. From my very brief research on leather holsters, 55USD is not actually notably expensive.
Naturally being leather, extra care may be required to keep the holster in good condition, more so than the fabric of regular tactical gear. 
I'd say that whether you should buy this particular holster hinges a lot on whether you want the leather or not. The leather bumps up the price but does give the holster a lot more character, and quite a good look if you're using it for cosplay. Since I'm more of a tacticool/practicool guy, I personally probably wouldn't buy a leather holster, but as with all tactical gear, it's all about personal preference. If you are looking for a leather Hammershot holster (or other leather goods for that matter), MGLW is certainly worth a look.

2015 Nerf Roundup

$
0
0
As we come to the end of another year, let's take a look back at what 2015 brought us.
Nerf has released around 30 new (or variant) blasters among 10ish sublines, on top of 3 promotional Star Wars blasters.
Buzz Bee released a number of new blasters, but more importantly unveiled the Ultra Tek line, an Elite competitor, and a new Air Max line, a Mega competitor.
BoomCo released 8 new blasters, on top of securing a Halo license including another 5 new blasters.
Star Wars
2015 saw the release of Star Wars Episode VII: The Force Awakens, and with it came three promotional blasters.
The Chewbacca Bowcaster is obviously based on Chewie's Bowcaster, and is a simple single shot stringer akin to the Rebelle Diamondista. There's really not much to say about it, like the other Star Wars blasters the Star Wars tax has inflated its price to obnoxious levels (~45AUD) and is not worth looking at.
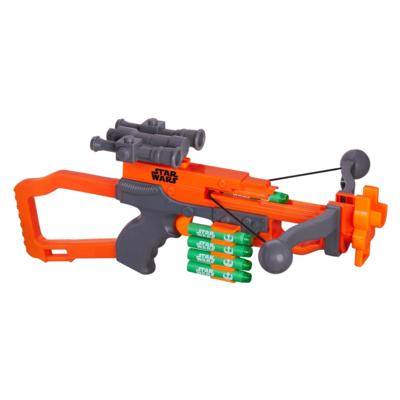
The First Order Stormtrooper Deluxe Blaster is based on the FO Stormtrooper's primary weapon, the F-11D. It's a pump action clip system blaster based on the Elite Rampage, though is noticeably shorter and includes different accessories. The Star Wars tax has pushed its price up pretty high to ~80AUD, but with the scarcity of the Rampage and the exclusivity of the Elite Alpha Trooper, the Deluxe Blaster has become one of the only pump action blasters that are readily available. Given that its internals are Rampage-like, the Deluxe Blaster can be upgraded competitively with the Rampage, though in stock form it is a bit weak compared to orange trigger Elites.

The First Order Stormtrooper Blaster is based on the SE-44C, the sidearm of the FO Stormtroopers. It's a simple single shot pistol that has had its price push way up to ~20AUD, but is still usable. Given its price, it's probably better to just pick up something cheaper like a Jolt or Firestrike.

Doomlands 2169
Doomlands is a new series for Nerf, a line based on a post-apocalyptic future in 2169. It is exclusive to Target in Australia and the US. The paintscheme is an orange/black/clear, with the clear sections being a notable feature. Doomlands launched with 2 blasters, and has at least one more planned for 2016.
The Lawbringer is a 12 dart hammer primed rifle, taking the Hammershot's popular hammer action to the extreme with over double the capacity. Though plagued by below average ranges, a high price of 60AUD and imperfect ergonomics, the effectiveness of a 12 dart hammer blaster cannot be denied. A popular mod is to chop off the barrel and stock, turning the Lawbringer into effectively a 12 dart Hammershot.
The Lawbringer is a 6 shot pump action revolver, best compared to a Guardian Crossbow crossed with a Roughcut.. It is notable for its unusually large and long cylinder and having slam fire, but otherwise has little practical value. A high price of ~25USD doesn't help its case either.

N-Strike
N-Strike saw a bit of a resurgence in the form of some goofy and generally gimmicky blasters, which is a bit of a disappointment since Elite was meant to replace N-Strike and standardise all range claims. These blasters were all unworthy of the Elite title, being that they sported poor ranges. Most of the blasters looked pretty uninspired and uncreative, they feel like filler blasters to me.
The DoubleDown is a basic two barrel pullback blaster that uses Smart ARs to switch barrels. Besides having an unusually large plunger tube (ideal for modification), the DoubleDown is unremarkable. Its price of 10USD is not the best, but considering how boring the blaster itself is, the price is probably not a concern anyway.
The Sharpfire is probably the most interesting of this year's N-Strike releases, it's a single shot pistol carbine that can be disassembled into a core pistol. The Sharpfire also packs decent mod potential, but in stock form is unremarkable. It's perhaps one of the better looking N-Strike blasters this year, and at 15USD is not overpriced.
The Slingstrike is string powered slingshot. I don't think anything else needs to be said. A price of ~15AUD makes the Slingstrike a total nope.
The N-Strike Snapfire, not to be confused with the similarly named Snapfire 8, is a basic Jolt-like single shot. It has a fair amount of mod potential, but is very plain looking and doesn't match up to the Firestrike. A price of 5USD is decent, but it just looks so boring and uninspired.

The Thunderblast is a pump-to-fire missile launcher, using the same mechanism and missiles as the Elite Demolisher from last year. At price of 35AUD, it's pretty expensive and is not really worth the money. Especially for those of you with access to Buzz Bee Blastzookas, Blastzookas are far superior and are much more worth the money.

Modulus
The N-Strike Modulus series is a line focused on attachments and modularity. It brings with it on top of a first core blaster 4 Upgrade Kits, containing various attachments and extras. The stand-alone attachment kits are a very welcome addition to the line-up, though the blaster itself is rather mundane. None of the Upgrade Kits are necessary purchases of course, and their desirability will be mainly based on personal preference for tacticool. Unfortunately, the Modulus colour scheme is different to the Elite colour schemes, so not all attachments will match all blasters, though you can get away with Modulus attachments on Elite blasters for the most part. 2016 will see the release of at least 2 more Modulus blasters, with presumably even more attachment kits. Nerf supposedly has big plans for the Modulus line, hopefully those plans are better than what we've seen so far.
The Modulus core blaster is a blaster set with a bunch of attachments, not unlike the original N-Strike Recon. Each of the attachments is new, or at least different from any familiars. The foregrip is a new design, the barrel extension accepts further barrel extensions, the stock holds a spare clip and the scope is a new design. The blaster itself is just a bulked up Stryfe. On top of the high price of ~70AUD, criticism has also been aimed at the relative uselessness of the attachments and the exceptionally poor handle on the Modulus, among other flaws. While the Stryfe is still available, the Modulus is probably skippable unless you really like the look of the blaster.
The Flip Clip kit is a simple kit that has 2 slightly altered 12 dart clips, 24 Modulus (white and orange Elite) darts and 2 Flip Clip connectors. The Flip Clip connectors only connect to the special 12 dart clips included as above, requiring the addition of small nubs on the sides of each clip. This kit is a decent way to stock up on clips, 12 darts clips are fairly popular and the Flip Clip connectors might be useful for more casual players.
The Long Range kit includes everything necessary to pretend snipe, a large scope, barrel extension and a bipod. Obviously none of them are actually practical, but the attachments look good at least. The scope and bipod fit especially well on a Whiteout Longstrike.
The Stealth Ops kit includes a red dot sight, a folding grip and a short barrel extension. The RDS is similar to the older Pinpoint Sight design, and like its predecessor is mainly for looks than anything else. The folding grip can fold to horizontal, but is otherwise just another foregrip. The barrel extension is a very short piece not dissimilar to the Spectre's suppressor style barrel extension. The SO kit fits especially well on an orange Stryfe.
The Strike and Defend includes a shield and a stock. The shield is a basic transparent flip-up design. The stock contains a Jolt-like blaster, for which the barrel protrudes just over the top. On certain blasters, the stock blaster can actually fire over the blaster it is attached to, otherwise can be detached and used as a standalone blaster. Naturally the stock can just be used as a stock, as it is quite sturdy.

Elite
The Elite line got very few new releases this year. In fairness the past few years have seen a lot of new lines and blasters of all kinds. The Elite line had 2 new releases, and a re-colour/re-release. No doubt Elite will be sticking around for at least a few more years as it is a pretty integral line for Nerf, serving the same role as N-Strike did before Elite came around.
Of note though is Buzz Bee's Ultra Tek line, which directly competes with Nerf's Elite line. The Ultra Tek line sports Elite-competitive range claims, as well as a cross compatible clip system.
The Crossbolt is a proper new release, a clip fed bullpup stringer. The stringer part allows it quite good stock performance, and obnoxiously easy power modification, though beyond a certain point it slices darts in half instead of firing them. Unfortunately, the Crossbolt has horrendously poor ergonomics: a painful thumbhole, a pathetically, unusably short stock, and an extremely awkward top slide prime. Pump action and a usable stock would have made the Crossbolt quite a darn good blaster, but as is it's only decent. Its price of ~40AUD is not terrible, but it is a little high.
Ah, the Elite Alpha Trooper. Ever since the original EAT release became scarce, people have been calling for a re-release of a fan favourite. Nerf obliged, pairing the awesome EAT with some worthless 6 clips, and the awfully flimsy Spectre stock. Even worse, this EAT re-release is a Kohl's exclusive in the US, resulting in a hilariously high price of 45USD (don't worry, Kohl's is known for their overpricing and often have very large discounts, taking the EAT into a reasonable price range). Unfortunately we have yet to see this re-release in Australia, though my wallet is thankful for that.
The Splitstrike is a novel blaster, it's a blaster that splits into two symmetrical halves, each being a single shot blaster with two Smart AR barrels. One side is blue with white accents, the other white with blue accents, and both combinations can be found. Performance is as standard, but the biggest issue is the high price of 30AUD, making the Splitstrike rather poor value.

Mega
The Mega series saw 3 new blasters added to its lineup, all of which are actually quite good. Though it is getting at least one new release next year, far more important to Mega is Buzz Bee's excellent new Air Max line, which brings the Mega clip system back in a big way.
The Bigshock is basically the Mega line's Jolt variant. Though not as powerful as most other Mega blasters, it's relatively cheap at 10USD (though as a TRU exclusive in Aus, enjoys an inflated price of 20AUD) and does its job well enough. A fairly large plunger tube allows for some surprisingly good mod potential, but even without modification packs enough of a punch to fire a Mega dart a fair distance.
The Cycloneshock is a 6-shot slide primed revolver, and is extremely popular and highly acclaimed. It's big, bulky, badass and pretty powerful. Though not particularly cheap at 25AUD, it's quite a good blaster and is a lot of fun.
The Rotofury is the Cycloneshock's big brother, a 10-shot pump action revolver that almost looks more like a grenade launcher. Like the Cycloneshock, it's big, bulky, badass and powerful, though the lack of a stock is an irritating omission. Its price of 39AUD is somewhat reasonable considering its impressive size, and it actually works as a Mega primary, on top of being a ton of fun.

Rebelle
Rebelle actually received a whole bunch of new blasters, I count no less than 12 this year. These fell into two sublines, the Charmed subline and the Secrets and Spies subline. Rebelle has been quite a commercial success, so no doubt it will flourish in the next few years.
Secrets and Spies:
The 4Victory is in a way a minimised Sweet Revenge: it's a compact 4-shot hammer pistol that uses Smart ARs instead of a cylinder and is much lighter for it. It also comes with its own ambidextrous holster, which while it is pretty cheap, is nice. Like the Sweet Revenge, the 4Victory is quite a solid blaster and is pretty good at sidearm duty. A lowish price of 19AUD is quite decent considering it includes its own holster.
The Arrow Revolution Bow takes the previous Rebelle bow, the Agent Bow, to the absolute extreme, with a 6 arrow rotating quiver. Besides that quiver, it's basically the same as the Agent Bow, using the same elastic drawstring. The Agent Bow wasn't a great bow and neither is the Arrow Revolution, but at very least it is different, and at least shares ammo with the Agent Bow. A quite high price of ~50-60AUD doesn't help it's case though.
The Codebreaker Crossbow is an interesting blaster, it's an 8 dart pump action stringer revolver. Ergonomically it's far superior to the Crossbolt, though is perhaps practically rather flawed. Its design requires practically perfect darts to reliably fire, and if the loaded dart is even slightly too squishy or squashed, it will fail to fire completely. As such it's rather poor for scavenging, and its low capacity also makes it poor for primary duty. A price of 40AUD just makes things a little worse.
The Courage Crossbow is a compact crossbow designed to fire Rebelle Arrows. I haven't seen any in Australia, though judging by its retail price of 20USD, I can't imagine it being too popular. Based on what the other bows have provided, I can't imagine it performing too well either.
The Fearless Fire is like an extreme Stockade/Barricade. It's a 20 dart semi auto flywheel revolver. It performs much the same as any other flywheeler, except is more fit for scavenging/loading on the fly duty thanks to its 20 dart cylinder. The use of a cylinder does limit its ROF somewhat. It does have quite a high price of 35USD though, which may be off-putting.
The Mini Mischief is a Jolt-based flip-out blaster that unfolds from a rectangular box. A price of 10USD means it's probably not worth getting over a Jolt for practical purposes, but the flipping action could be enjoyable.
The Secret Shot is a 4 shot Smart AR pump action blaster that folds up into a purse. It's pretty impractical, 4 shots is very small and the Secret Shot is not especially powerful. Its handles are pretty small, which is immediately noticeable upon simply seeing it. Its price of 25AUD does help somewhat, as it is one of the cheaper blasters you can get. The flip-out action of the Secret Shot is extremely fun though, and could be worth getting just for that.
The Slingback is a Rebelle'd Slingstrike, a string powered slingshot. 10USD of garbage.
The Strongheart is effectively a Hearbreaker Bow with a 4 barrel Smart AR block. It's 4 times more practical than a Heartbreaker, which really doesn't mean much. A relatively low price of 25AUD does help its case, but that's really all it has going for it. The Strongheart is not really noteworthy, except for being a pull-and-release blaster.

Charmed:
The Charmed subline is a new subseries with another different aesthetic, with the main gimmick being collectible charms.
The Dauntless is effectively a retooled Messenger, it's a single shot with 3 Smart AR barrels. Perhaps the most interesting change is the new handle, which is far and away superior to the Messenger's awful skeleton grip. A price of 15USD is the same as the Messenger, so choosing between the two is a matter of personal preference.
The Everfierce is effectively a retooled Strongheart, with its barrels in a vertical line rather than a block. I really honestly can't find anything to say about it, the extreme level of retooling/rereleasing older blasters is starting to bore me. Its increased price of 25USD doesn't help its case though.
The Fair Fortune Crossbow is in a way a minimised Codebreaker, it's a 6 shot revolver crossbow. The design is novel, the cylinder is mostly internally contained with few loading spots. If it's anything like the Codebreaker, it'll have potential but will really, really hate non-perfect darts. Its price of 20USD is probably a little high.

Zombie Strike
Zombie Strike received only two new blasters this year, both of which are quite similar. It's getting at least one new release next year, and will probably still be hanging around for a few more years.
The Flipfury was the first release, and is effectively a dual cylinder Strongarm. Pretty good for scavenging gamemodes, though perhaps too large to be a sidearm. It is perhaps also a little expensive at ~25AUD, but a capacity of 12 darts in a pistolish form is pretty good, and it packs the same performance as a Strongarm.
The Doominator takes the Flipfury to the extreme, with 4 6 dart cylinders and pump action. Unfortunately, the Doominator is plagued by various issues, particularly an especially poor stock range. Even when modified, it packs a lower than average range. A high price of ~50AUD means the Doominator is probably something to be left on the shelf, as cool as it looks.
Rival
Easily the most interesting of Nerf's 2015 releases, the Rival line fires foam balls instead of darts, and claims 100FPS muzzle velocities, which they actually do achieve! Sadly they're not coming to Australia as they're too powerful, but no doubt we'll be seeing more Rival blasters in the future.
The Apollo is a hook-primed mag fed blaster. It accepts mags through the handle like a real steel pistol, however has a massive rear end that really stops it from being a proper sidearm. Though it suffers from jamming issues that are rather difficult to clear (Nerf is making an alteration to future batches that will have a jam clear button), it's an effective entry level Rival blaster and does achieve the 100FPS muzzle velocity claims. The price of 25USD is quite high, but that is the price of a higher level of performance and a new ammo ecosystem.
The Zues is a semi-auto flywheeler that accepts mags into its back, which is a rather unusual design. Like the Apollo, the Zues does pack quite a punch and does achieve the 100FPS muzzle veloctiy claims, however the Zues' claim to fame comes from its mod potential. Powering it with a 3s LiPo will shove muzzle velocity up to 120FPS and will better support rapid fire. More importantly however, it can be easily converted from semi- into full-auto, going through a 12 ball mag in about half a second. Hook that up to a large hopper, an extended ball mag or even a backpack and you have a powerful blaster capable of some ridiculous ~20 balls per second suppressive fire. It is pretty darn expensive at 50USD and the stock mag release is perhaps a little awkward, but nothing can match its modified ROF and suppressive fire ability.

Nerf this year had some pretty good releases, but also a number of questionable and poor releases. Since us in Aus aren't getting Rival, 2015 was not a great year for us from Nerf.

Buzz Bee
Buzz Bee released some real cool stuff this year. First up is their Ultra Tek line, which most notably is headed by a budget clip system, which is cross compatible with Nerf's clip system.


These are the first of Buzz Bee's clip system blasters. Starting at the top right, going clockwise, we have the Ultra Tek 8/Champion, Ultra Master Tek/Snipe, Ultra Rapid Tek/Sentinel and Ultra Tek Brute. Though perhaps not as sophisticated as Nerf's clip system offerings, all of them are very solid blasters, and are also significantly cheaper - the UMT/Snipe and UT Brute are a measly 20USD, while the UT8/Champion is a measly 10USD and the URT/Sentinel is no more than 15USD. All of these blasters perform competitively with the Elite line, so if Buzz Bee keeps this up they could seriously challenge Nerf.

Buzz Bee also released a new Air Max line this year, which fire Mega sized darts. Again, the new Air Max line is cross compatible with Nerf's Mega line, but this time, Buzz Bee's releases quite possibly outshine Nerf's Megas.


On the left, we have the Air Max Baron, a simple two shot Mega pistol. It cycles with a rotating plunger tube so alternates top/bottom barrels, but packs quite a punch and is a measly 5USD.
On the right, we have the Air Max Boss, a 3-shot Mega blaster much like the Magnus. Unlike the Magnus though, the Boss is a clip system Mega blaster, and comes with a 3 dart Mega clip. Incredibly, the Boss is 10USD, 5 less than the Magnus. It packs the same punch as all the Megas as well.

Last but most certainly not least, we have the Air Max Tyrant, a Mega blaster that has a 12 dart Mega clip. It packs the same impressive firepower as the Megas, but the 12 dart Mega clip is the showpiece. For a mere 20USD, Buzz Bee has a blaster that has more capacity than any Nerf Mega blaster so far. Even better, Buzz Bee's clip system Air Max blasters are perfectly reliable and usable, in contrast with Nerf's one attempt and colossal failure in the Centurion. Though the Tyrant is rather awkward and very bulky, there's no question that Buzz Bee's new Air Max line is really quite incredible.


2015 has been a fantastic year for Buzz Bee, though they're still far behind in aesthetics and craftmanship, their new blasters are competitive, effective, and fantastic value. We've also just gotten news that Buzz Bee has secured a license for The Walking Dead blasters, which sound like they have some serious potential.

BoomCo
BoomCo suddenly appeared out of nowhere last year, and has grown quite well in 2015. Among other things are its new 90USD flagship, the Colossal Blitz:
The Colossal Blitz is BoomCo's flagship, a monster that packs two 36 dart drums for a total capacity of 72 darts. It also packs a ROF of around 6 darts per second, and matches the Elite line for range. Couple that with the inherent superior accuracy of BoomCo darts, and you have a damn good blaster, possibly the best stock blaster. Sure it's pretty heavy and bulky, and ridiculously expensive, but no stock blaster can match the whole package of the Colossal Blitz. I've yet to see it in Australia, BoomCo really hasn't done too well down here.

Also of note is BoomCo securing a Halo license, allowing them to produce Halo-ish blasters.


While most of them are just reshells of older blasters, there's no doubt that this could produce some really, really awesome blasters. The two single shot pistols of the Plasma Pistol and M6 (~20AUD) are very nice reshells of the Farshot. Simple but powerful, and easily moddable for some pretty good power.
The Covenant Carbine and SMG (~30AUD) are reshells of the Dynamag, a basic slide action clip fed blaster. They're also relatively simple, but effective, and also have various changes that solve issues with the early release Dynamags (later release Dynamags also have these fixes).
The Needler (~45AUD?) is a Twisted Spinner with a trigger, but more importantly it has light up dart holders on the top which turn off as darts are fired. Unfortunately it doesn't reload darts from the top into its cylinder but nevertheless it looks pretty and has some functionality.

I'm not really into BoomCo just yet, they're relatively expensive down here in Australia and not very common. Furthermore, the new ammo system puts me off a little, and unlike in the US, we don't normally get ridiculous clearance prices that would make building a BoomCo system far more viable. We also don't get much of the BoomCo line down here either, which is annoying.


2015 has not really been a great year for Nerf (at least for us Aussies), rather it has been an incredible year for its biggest competitors, Buzz Bee and BoomCo. With all three brands making some pretty big developments, 2016 promises to be a pretty competitive year.

In non-Nerf news, we have the release of Star Wars Episode VII: The Force Awakens, which brought with it a whole tonne of new Star Wars merchandise and toys. TFA is on track to become possibly the highest grossing movie, but the sales from merchandise and toys will probably eclipse that.
Star Wars Battlefront was also released, but was disappointingly shallow and money grabbing, in typical EA fashion. It's also hilariously broken, in typical DICE fashion.

Review: Star Wars First Order Stormtrooper Deluxe Blaster

$
0
0

I'm a massive Star Wars fan, so you could probably imagine my excitement when a cool looking, clip system, pump action Star Wars Nerf blaster was revealed. A practical Star Wars blaster? Count me in! Let's just hope it performs to standard.
Since the blaster's full name is quite a mouthful, I'll be referring to it as just the Stormtrooper Deluxe Blaster, or even just the Deluxe Blaster.

 
Note the 65ft/20m range claim despite the orange trigger. There is no grey trigger version, this one blaster is the same one sold throughout the world, regardless of whether they get orange or grey triggers.

Before looking at the blaster itself, let's just take a quick look at the F-11D, the standard issue blaster rifle of the First Order Stormtroopers and the weapon on which the Deluxe Blaster is based.
Captain Phasma sports a chromed F-11D, but this picture is important more because it clearly shows the stock attached.
Credit goes to Wookipedia for these images.

The darts included are slightly special. They're still Elite darts, but are red (obviously), and have transparent heads. Additionally, half of them are printed with First Order symbols, and the Star Wars and Nerf logos, all in black.

Let's look at the main blaster first.
 
The main blaster is a pretty good looking piece, it packs enough grey to look serious, but enough white and orange to be distinctly a toy.
The barrel shround is a pretty good looking piece, a grey shroud with orange ridges, and some holes along the bottom.
Down the front.
A close up of the right side.

The Deluxe Blaster has a single quite long tac rail on top, pretty standard.
It also accepts all standard stocks on the back, although note that the stock attachment point is rather far back.
Here's the Stormtrooper Deluxe Blaster with an EPPS, 6 dart clip and Lightningstorm stock. Naturally being a Nerf blaster, it accepts Nerf attachments no problem. Though it won't colour match with most of them, it will match with Modulus attachments relatively well, ignoring the vomit green.


In an attempt to replicate the F-11D having its clip load from the side, the Deluxe Blaster uses the design of the Rampage as a basis around which to design a pump action clip system blaster with the magwell on the left. The F-11D has its clip on the right, however having the Deluxe Blaster's magwell on the right would require further modification of the design, and would also make it more awkward for right handers to use (who are the majority of the population). I think keeping the magwell on the left was a good decision, though being a right-hander, I am biased towards having it ideal for me.
The magwell does bulge out a fair bit even without a clip, and is actually a separate piece in the box. When removed from the box, the first thing to do before the blaster can be used is to attach the magwell piece, otherwise the blaster will not prime.
Looking into the magwell, fairly standard. If you've seen a Raider or Rampage before, this will be nothing new.

The jam door is on the right side, opposite the magwell. It opens quite a decent aperture, though I usually clear jams through the magwell anyway.


The handle, though a little too square at the front, is reasonably comfortable and decently shaped. My hand easily fits on it and is relatively comfortable.
The only issue with the handle is this one sharp ridge just below the trigger, it does cut into your finger a little.

The pump grip is slightly angled downwards, which I think is a really good shape. There's ample room for your off hand to grip, while the slight angle allows easier application of backward force for the priming stroke. It's very comfortable to grip and prime, even in slam-fire.

The firing cycle of the Stormtrooper Deluxe Blaster is the same as any other springer clip system blaster.
First the pump must be pulled back to open the breech.
A clip can then be replaced/inserted.
When primed, this vent will turn from black to red, and when fired, it turns back from red to black.
Finally push the pump forward to chamber a dart, and pull the trigger to fire. Because the Deluxe Blaster has slam-fire, you can hold down the trigger and just rapidly pump for a higher rate of fire. Unlike the very jam prone Raider, the Deluxe Blaster is pretty reliable. I've slam-fired it several times at full speed emptying whole clips with no issue.

The clip is a white 12 dart clip, but is nothing much different. The only main difference is that its right side (as pictured) is opaque, while Elite 12 clips have a transparent right side. Also of note is that my one seems to load 13 darts in no problem.


The scope is a pretty basic piece, it's just a small grey tube of plastic.
It doesn't even have lenses, just a small notch at the front.
Here's the scope next to an N-Strike Tactical Scope to show just how small it is.


The stock is also a basic piece, unfortunately having no special features.
It's also ridiculously short, shorter than even the Retal stock.
However its lack of length is partly mitigated by the design of the Deluxe Blaster, whose stock attachment point is further back than usual. As such the Deluxe Blaster's stock is slightly longer than a regular blaster (e.g. EAT) with Retal stock.

Here's the stock on an EAT, it's ridiculously, hilariously and pretty much unusably short.


Here's the Stormtrooper Deluxe Blaster next to an EAT. Thanks to having its magwell on the side, it can be shorter than an otherwise equivalently sized EAT. Note how close the pump gets to the trigger on the Deluxe compared to the EAT. Besides that, they're functionally very similar.
A closer look at how the stock attachment point positions compare. With the handles lined up, the Deluxe Blaster's stock point is a good 4cm or so further back, which helps compensate for the short length of the stock.


All together, the full Stormtrooper Deluxe Blaster. It's a pretty good looking package, and reasonably faithful to the source material. Though there are some obvious flaws (e.g. overall size, magwell on the wrong side, colour scheme), most of them can be excused for the sake of being a firing toy. If you're looking for a perfect replica of the F-11D, you're probably better off making it yourself, but as is the Deluxe Blaster is a good approximation of the F-11D while still being distinctly toyish.
Looking down the top, note how much the 12 clip and magwell stick out the side.

Finally for performance.

Range wise the Deluxe Blaster is decent by Aussie standards, it achieves 11-12m true flat ranges on average. Not exceptional, but it is on the upper end of the blasters we get. Since the same blaster is released in all regions, for those of you with orange triggers, the Deluxe Blaster will be weaker than most of your blasters.
Accuracy is reasonable, being slightly better than average. Firing at my usual doorway at ~8m range, almost all darts fly through without issue, though they still tend to spread out. Standard Elite dart veering can also occur.
Rate of Fire is pretty good, like with other pump action slam fire clip system blasters I can get 5-6 darts per second. The only blasters beating this are air powered full autos, overhauled Rapidstrikes and flywheeler semi autos with battery upgrades.

Since the Stormtrooper Deluxe Blaster is basically just a retooled Rampage, it performs much the same function. It's a pretty solid all round pump action blaster. It's relatively easy to use, sufficiently powerful (compared to grey trigger blasters), acceptably accurate and relatively fast firing. It might be a little small for your own personal preference, but for a stock out-of-box pump action blaster it's pretty good.

Unfortunately for the Deluxe Blaster, it retails for an obnoxiously high price. The lowest non-sale price you can find it for is 70AUD at BigW. The next cheapest is 80AUD at ToysRUs, then 90AUD at Myer. Despite how good a blaster it is (and looks), I cannot recommend the Deluxe Blaster for its retail price. The maximum I would pay is about 60AUD (which is what I paid for mine), and ignoring Star Wars branding I expect it would have retailed at no more than 50AUD. Unless you're a die hard Star Wars fan, I'd say either wait for a substantial discount or try and find a Rampage/EAT instead.

Pros: Decently powerful and accurate, slam-fire is smooth allowing for fairly high ROF, reliable, looks awesome and is reasonably faithful to the F-11D, very short for good close quarters maneuverability
Cons: Obnoxiously high price, stock is short, even more so on other blasters, side magwell can be somewhat awkward, perhaps a little too small and could have benefitted from being larger for comfort

Power: 5.5/7
Accuracy: 4/5
Rate of Fire: 4.5/5
Usability: 4/5
Value for Money: 2.5/5
Overall: 3.79/5

Personal Rating: 4.5/5 - I love Star Wars, and having a Star Wars blaster that is also quite usable and practical is fantastic. Even better, it packs the same modability as the Rampage, which is a solid superstock blaster.

A link to the review I posted on BlasterHub: link

Review: BoomCo Rapid Madness (13m Aus)

$
0
0
I should really have done this 8 months ago. Back when BoomCo was first released, their flagship blaster was the Rapid Madness. It had many promising features, such as a 20 dart harmonica clip and a pump, indicative of an air powered system (which had disappeared from Nerf's line up years ago). This naturally drew many comparison to Nerf's Magstrike, a very similar blaster. Could the Rapid Madness start BoomCo's challenging of Nerf?

 
Out of the box, you get 30 BoomCo darts, a 20 dart Harmonica Clip, two targets and the RM itself with shield. Note from the box, the 45ft/13m range claim, which is pretty low by today's standards.
The darts are rather nicely packed alternately into trays of ten, necessited due to the dart heads being slightly wider than the body.

Let's take a quick look at the 20 dart BoomCo clip.
 
The 20 clip is quite a compact block of staggered barrels in complete blue. The white arrow shows which way the clip should be inserted into the blaster.
A top-down look shows the dart pegs better. No air restrictors here.
A look at the back shows the intricacy required with having a harmonica style clip.
Thanks to the staggered arrangement of the barrels and the thinness of BoomCo darts compared to Nerf darts, the 20 dart BoomCo clip is extremely short, shorter than a 10 dart banana clip. It is nearly twice as wide naturally, but the short length is especially helpful for easier storage.


The BoomCo aesthetic is quite distinct from any of Nerf's series. It is comparable to N-Strike/Elite in its sharpness, but also has its own futuristic style and colour scheme.


The Rapid Madness has 3 tac rails: two on top and one on the bottom of the thumbhole stock.
The top rails are ideal for mounting shields or a Railstinger, but the thumbhole stock one is a very odd place, and doesn't have a locking nub.
Nerf attachments will fit on BoomCo rails, albeit very tightly.


The RM's handle is quite a rectangular piece, and has holes cut into it. Despite this, the smoothness of the lines around the holes prevent the holes from presenting any major issue. The sharpness of the handle is a bit of an issue for me, though this is perhaps magnified by the weight of the blaster. I've handled worse handles, though this one may take a bit of getting used to.

The pump is an interesting angled design, half way between a vertical grip pump and a conventional pump. It is surprisingly comfortable, though I'm not a fan of it. One of the problems I have with it is that the pump is free to rotate around, so is hard to get a sturdy grip with. Additionally, as the pump is dual-action (meaning air is drawn in on both the forward and backward strokes), this pump grip is not particularly comfortable for the forward strokes.
I find that adopting a somewhat unusual grip as pictured above makes forward strokes much easier and more comfortable, though it is an even more awkward grip.

The pump stroke is ridiculously long, at around 24.5cm. This along with the dual action allows the pump to draw in massive amounts of air, certainly far more than most pump-up Nerf blasters. With some slight modification, the Rapid Madness can be pumped 25-30 times, which holds enough air for 40 darts. This easily eclipses Nerf's pump-up air blasters, like the Magstrike which needs minimum 15 pumps for just 10 darts.
A quick look at the stock plate, notice the screw. The screw can be used to adjust the OPRV, which alters how much air the bladder will hold. Removing the screw entirely will maximise the air capacity without having to open up the blaster.

Though the Rapid Madness at first appears to be quite a large blaster, much of its length comes from its largely pointless barrel. Remove the barrel and the RM becomes about the length of a Rayven. It is still significantly bulky, especially around the clipwell, and quite heavy.


The BoomCo's clipwell is vastly different to those in Nerf and Buzz Bee blasters, being that BoomCo "clips" are harmonica style clips, while Nerf and Buzz Bee "clips" are in fact magazines. As such, the RM requires a slot through the entire blaster to allow the clip to advance through.
Note the grey button on the left side of the magwell, this button will come in important later.


Here's the 20 dart clip loaded. Full clips are loaded in the left side, while empty clips are removed out the right side. The clip will only fit one way, so no issues with accidentally inserting it the wrong way.
Despite its large capacity, the 20 dart clip doesn't protrude out the side all that much, less than a 12 dart clip in a sideloader like a Rampage.


Since the Rapid Madness is a full-auto blaster, provided it still has air and darts, it will fire when the trigger is pulled, and will continue firing if the trigger is held down.


Here's a clip about half way through the clipwell.
And finally a clip ready to be removed. The clip will not eject itself, it must be manually removed. The clip can be ejected without pulling it out if you insert a new clip.
Once a clip is emptied, the aforementioned grey button must be pressed to reset the mechanism, allowing for a fresh clip to be inserted to continue firing, provided the bladder still has air.Inserting a fresh clip without pushing the button will reset the mechanism anyway, but I find that it loses more air this way than pressing the button.


The shield is a key feature of the first wave of BoomCo darts, with the front being lined with the same material as the BoomCo targets. This allows the shield to catch BoomCo darts quite well. Each blasters' shield is different and is designed specifically for that blaster.

The Rapid Madness' shield is a spring loaded flip up design. The release button works fine and the shield reliably springs into position.

The RM shield is designed to fit on the front barrel tac rail and does fit well, though there are big gaps between the shield plates and the barrel.


Having the shield open kind of makes the RM look like a Dilophosaurus. It's quite intimidating, and being the largest of all the BoomCo shields, also the most useful. The shields still aren't that large though, so for clear line of sight and maneuverability it may be worth just leaving them off. The protection offered by these shields is not particularly significant unless you're peeking around corners.

And finally for performance. Does the Rapid Madness hold up to Nerf's new Elite standards?
Range is about 9m average, about on par with a decent N-Strike blaster. Not very good by today's standards, but still usable.
Accuracy is superior to most newer Nerf blasters thanks to the far more stable BoomCo darts. Even with the Rapid Madness' slightly crazy and slightly inaccurate firing mech (darts can be seen being shot not quite straight out of the muzzle), the darts tend to land in a surprisingly tight bunch.
Rate of Fire is the Rapid Madness' party piece, it spews out darts at around 10dps when fully pumped up. Very few blasters can match it for raw dart output.

The Rapid Madness can be used very effectively for close quarters, where its spray is practically undodgeable and its middling range is not an issue. It is also very effective at suppressive fire, where the only way for non-ninja/Jedi to survive its burst is to take cover or get out of range. It can fire potshots surprisingly accurately, however the low range means that you'll have to fire upwards for any decent range, which makes the darts significantly more dodgeable.

The RM retailed for 100AUD on release, which was far too much. The Stampede was 100AUD, and that was sort-of worth the cost partly because of its *3* 18 dart clips (among other extras) [or if you bought the special super pack, 4 18 clips, 2 6 clips and 100 darts]. The RM has nowhere near the amount of stuff the Stampede had, and besides ROF isn't too special a blaster. Sure it's fun and well made, but it's just far too expensive. I bought mine for 50AUD, which is far more reasonable.

Pros: Rate of fire is ridiculous, high capacity clips that are quickly replaceable
Cons: Poor range, ridiculously high price, takes a lot of pumping

Power: 3.5/7
Accuracy: 4/5
Rate of Fire: 5/5
Usability: 3/5
Value for Money: 2.5/5
Overall: 3.47/5

Personal Rating: 3.5/5 - it's a bit heavy, clunky and the range is nothing special, but when it comes to raw dart output, few blasters can compete.

Review: Buzz Bee Ultra Tek Sidewinder (15m)

$
0
0
On top of all the awesome new blasters that Buzz Bee released under the Ultra Tek line, they also touched up an older one, the Sidewinder. How does this older design hold up to Buzz Bee's new clip blasters?
Like with the other Ultra Tek blasters, the Sidewinder was sent to me by Buzz Bee Toys for review. As usual I'd like to thank them for sending it to me, and as usual their contribution will not bias the review in any way.


Pretty standard Buzz Bee box.

 
The Sidewinder is a rather odd, unbalanced design. The handles are at the extremes of the blaster, and there is no stock. This is rather annoying, especially for a pump action design. Aesthetically, it's a little strange, though the handguard and carry handle clearly take from the M4/M16. The Ultra Tek colour scheme does help provide a slightly more serious look, something Buzz Bee has been severely behind in compared to Nerf.
 
The rear handle is an odd piece. It's somewhat small and weirdly shaped, but I still find it reasonably comfortable. It also lines up with the trigger well, speaking of which...

...is completely fake. The Sidewinder is a triggerless design, and fires on pump. This is quite an issue, as I'll elaborate on later.
The pump handle is very similar to the rear handle, thin and somewhat oddly shaped, but again is still normal enough to be reasonably comfortable. I suspect if you have particularly large hands, you'll find the handles to be too small.

The pump stroke is a pretty normal length, nothing out of the ordinary here.

 
There is a small jam door on the left side, which opens up an aperture to access the are just in front of the drum well.
The drum well is just a hollowed out section on the right side. Unlike most Nerf designs that put effort into stylising these sort of functional areas (e.g. cylinder area on a Strongarm), Buzz Bee has just left it completely bare and smooth.
The plunger outlet is very similar to many other Buzz Bee designs, with a ring of foam used to provide a good plunger-to-drum seal.
This orange nub in the middle just applies friction to the drum, making sure it doesn't spin around freely.
This little arm rotates the drum on every pump cycle.
 
There are two drum holders which slot into the side of the Sidewinder to hold the drum in place. They're easily attachable and removable.
These pieces will only insert in one orientation, so no worries about accidentally shoving them in the wrong way.

Let's look at the drum in a bit more detail.
The drum is a giant chunk of plastic with 30 small barrels around it. The centre hole is there for the front drum holder, while the outer slopes
Each barrel is rather short, in typical Buzz Bee fashion.
The back gives a look at the air holes for each barrel, and the rear slot for a drum holder.
Here's the Sidewinder's 30 drum next to a Nerf 35 dart drum. Because the Sidewinder drum requires individual barrels for each dart, it is larger than the higher capacity 35 drum. The consolation here is the ability to reload on the fly easily.
The two drum holders slot into the central holes of the drum. They're a very loose fit, allowing free rotation, while still keeping the drum in place.

Here's a (poor) look down one of the barrels. Note that in place of the traditional Buzz Bee dart peg, there's a weird truncated cone structure. This piece provides a very tight seal on loaded darts - perhaps far too tight.
On the left is a regular Ultra Tek dart, on the right a dart that has been loaded in the Sidewinder. Notice how the right dart's hole has been expanded as a result of being used in the Sidewinder. This is an unfortunate issue, as it is especially bad on narrower darts such as Nerf Elites and Kooshes. The fit on such darts is so tight that a combination of brute force and twisting is required just to load a dart into the barrel. Furthermore, those darts may not even be fully loaded on properly, further brute force is required to ensure that a dart is back as far as possible. If it is not, then the dart will interfere with and completely stop rotation.

So here's a fully loaded drum.
This shot demonstrates the issue with the barrels, because the dart cones are so tight, not all darts were loaded fully and properly into the drum.

Finally here's the drum holders slotted on to a loaded drum.

Here's the loaded drum in place to be attached to the Sidewinder. Note that both drum holders line up perfectly with their associated positions. From here, it's a simple case of pushing downwards to lock in the drum holders...

...like so. The drum is now attached to the Sidewinder, ready to be fired.


So here's the fully loaded and assembled Sidewinder. It's a little odd, the drum pokes out a lot and throws the balance of the blaster off a little. It's a very strange looking piece, part of it is trying to be an M4/M16 while it has a giant orange drum lumped on the side. On the other hand, there are elements of shotgun to it, but again the giant orange drum on the side kind of throws everything off.

The Sidewinder is a pump-to-fire blaster, meaning that all that is necessary to fire is to repeatedly cycle the pump grip.

Pulling the grip back (with significant force) will fire the dart in firing position. The whole system has a surprisingly good seal, which you can feel if you pull the pump back weakly. This good seal gives the Sidewinder a surprising amount of power.

Pushing the pump grip forward past roughly the mid-way point will rotate the next dart into position. The drum rotates counter-clockwise from the user's perspective, so loaded darts get fed in from the top.
To remove the drum and drum holders, simply hold down the two orange buttons on each holder and pull them up. This detaches the drum holders from the blaster.
Once the drum holders are off, you're free to remove the drum to reload freely, or replace with a spare one. Compared to a clip (mag) system, the Sidewinder's drum is a pain to switch out, because of the detaching dart holders. It's made worse when spare drums are only available from buying additional Sidewinders. Overall I'd say that the Sidewinder is not something you'd get for the ease of switching out drums.


Here's the Sidewinder next to an EAT. It's only a little bit longer, however the side mounted drum does throw off balance a fair bit. I do heavily lament the lack of a stock, it would have given the aesthetic a much better balance and would have greatly helped stability.

Finally for performance. Can the Sidewinder keep up with its triggered brethren?
Range is highly variable, dependent on your arm strength, however I have been able to get shots off at and beyond 15m. Obviously I can't guarantee them being completely flat shots, but they're definitely not on a high angle. The good seal helps greatly with ranges, if the seal were bad, ranges would probably be less than 10m.
Accuracy is as you'd expect, terrible. The push-pull firing action completely throws off any stability, and the lack of a stock isn't helpful to its cause either. Unless you risk losing power by using a more stable pump technique, it's extremely difficult to keep the Sidewinder on a particular target.
Rate of fire is thankfully rather good, as this video demonstrates:
Peak ROF is around 5-6dps depending on how fast you can move your arms. At this speed darts just fly in every direction, probably hitting everything except your target.

The Sidewinder best serves a suppressive fire or scavenging role. Its high capacity allows for extended suppressive and covering fire, and its capacity is especially high when compared to non-clip/mag blasters. Though it can feel a little bit clunky to use at first, I find that it is quite reliable and so does work well for constant firing. With its exposed drum, the Sidewinder also works well for scavenging, as you can easily reload it on the move while always being ready to fire. Because of the barrel/dart cone design, it is far more difficult than usual to load darts into the Sidewinder, but again the massive capacity is a huge advantage over other blasters you might consider for scavenging.
It will take a bit of getting used to, since most blasters have a trigger and don't have such an awkward form, but in a bone stock game against non-clip/mag system users, the raw capacity and high ROF provide quite an advantage to exploit.

The Sidewinder retails for 20USD, which like most Buzz Bee blasters makes it quite a good deal. In that price range are blasters like the basic Stryfe pack (which includes barely anything) and the EAT when it was still in stock (which out of box has only 40% of the Sidewinder's capacity). While its performance is rather inconsistent, the ROF and capacity make for quite an impressive dart output. That said, the lack of a trigger and stock makes the Sidewinder far harder to control than a comparable Nerf blaster (e.g. a Rampage), and the dart cone design makes it painfully difficult to load/reload compared to most blasters. Based on how painfully difficult it is to use effectively compared to conventional blasters, I can't properly recommend the Sidewinder. I do think it has a place for clip/magless suppressive fire, but the lack of a trigger is a deal breaker.

Pros: Capacity, max ROF, can get good stock ranges with a good pump
Cons: Accuracy is hilariously poor, blaster is very difficult to keep stable, lack of stock is a big issue with pump-to-fire, can be quite inconsistent, drum is painfully difficult to load up

Power: 6.5/7
Accuracy: 1.5/5
Rate of Fire: 4.5/5
Usability: 1.5/5
Value for Money: 4/5
Overall: 3.23/5

Personal Rating: 2/5 - I personally greatly dislike pump-to-fire blasters, because they're far harder to control than conventional triggered blasters. The poor barrel/dart post design also greatly irritates me.

Again, thanks to Buzz Bee for sending the Sidewinder to me for review.

Adventures in Japan and Malaysia

$
0
0
I just got back from a holiday to Japan and Malaysia. It was fun, we did some skiing, saw some temples and shrines, did a good lot of shopping, the usual stuff. Here's all the stuff I bought:
I'm a massive Star Wars fan, obviously, and Japan has a lot of awesome things that we can't get (for a reasonable price, or at all) in Australia.
Pokemon things! I'm a Pokemon fan too, and in Australia we get basically no Pokemon merch.
Also this awesome maglev model thing that actually floats.
Finally, the Nerf related things. Ironically no Nerf blasters, for various reasons. Japan has a very small Nerf presence, while Malaysia has very high prices. I bought Barons because they're small and fun (and not in Australia), and the Breakflip because besides the Halo stuff, Australia hasn't gotten any of the new waves of BoomCo.
Breakflip review will come soon(ish), but I'll be updating my "Thoughts on 2016 Releases" note (link is on the right side) first. Also because of the emergence of Nerf using an actual clip that they actually call a clip, I'll be updating all posts so that anything in Nerf's clip system (mags that are mislabeled as clips) will have (mag) next to wherever "clip" is used to minimise confusion (though that may just compound confusion). I'll also be editing anything involving Trustfires to not recommend Trustfires and instead recommend IMRs.

Review: BoomCo Breakflip (15m)

$
0
0
The Breakflip is one of the blasters in BoomCo's second wave of blasters, which at least means BoomCo is doing well enough to keep making new blasters (though besides the Halo line, we haven't seen anything new in Australia). The Breakflip generated some early hype from appearing to be a flick-prime clip fed blaster, so let's see if it stands up to that hype.
Front of the box, pretty standard.
Back of the box, again quite standard.

Let's take a quick look at the 8 dart clip included.

It's a very small, compact piece, smaller (though wider) than a Nerf 6 dart clip (mag), which is already quite small. This compactness is inherent to all BoomCo clips and blasters, thanks to the thin BoomCo darts.


The Breakflip is an interesting looking piece, with the front resembling a sawn-off shotgun crossed with a laser cannon. The round structure around which the handle pivots reminds me of an energy core, adding to the sci-fi aspect. The stock Breakflip image has a very light, almost yellowish fluoro green which I didn't like, but in person the green is much more greenish. I personally like the colour scheme and the overall design, besides the slightly odd handle position.
The Breakflip has a single BoomCo tac rail on top, pretty standard.
Down the top of the Breakflip, besides the transition from the cylinder to the barrel it doesn't change much in profile.


The Breakflip isn't pump action, but nevertheless has a nice fore-end grip. It's a decent size and shape, and is in a good position.

The handle is style wise the same as other BoomCo blasters, with the obvious difference of it being at a much flatter angle to facilitate flick-priming. There is one issue with it though...
...that being this front edge. This edge is sharper than ideal, and is particularly noticeable and uncomfortable after a lot of flick-priming. Had it been rounded with a larger radius, this problem would likely not exist. Unlike some Nerf blasters though, the holes in the handle don't present an issue and are hardly noticeable.

The Breakflip accepts clips into its front, just above the fore-end grip.
A look down the front better shows the mechanisms in the clipwell. The top one advances the clip, while the middle is the plunger outlet. The lower piece applies friction to reduce the chance of slipping, while another hidden piece allows firing only if a clip is loaded.

Like all other horizontal clipwell blasters, the Breakflip accepts clips from the left side, and feeds them through to the right. This is convenient for right handers, though may be an issue for left handers. Note that when inserting the included 8 dart clip, two clicks should be heard to put the clip into correct position as above. In this position, when the blaster is primed, the first dart will advance into firing position. The number of clicks will vary depending on the clip, my 20 dart clip only clicks once.


Priming the Breakflip is very simple. Simply bring the handle and body to roughly a right angle, then return the handle to its original position. The downward motion of the handle primes the spring, while the upward motion advances the clip one place.
Note that the handle will not lock after priming - even when primed you can reprime the Breakflip to advance the clip again. This lack of a lock can be an issue, as I'll elaborate on a little later.
Once primed, simply pull the trigger to fire, then repeat. Since the clip is not fully locked into place, it can be removed and replaced at any time, though note that if you switch or move clips at the wrong time, the first action of priming will also advance the clip. You can remove the clip by pulling/pushing it out the right side, or shoving it out with a new clip.
Note also that the Breakflip has slam-fire, though it isn't featured in the instructions. By design, the trigger only interacts with the catch mechanism when the handle is up, and so holding the trigger down and repeatedly priming the Breakflip will repeatedly fire and advance the clip.

There are two distinct priming methods for the Breakflip. The first one, which is the one featured in the instructions, uses a two-handed grip with an action not dissimilar to breaking open a double-barrel shotgun. This motion is quite quick, effective and reliable.
The second, more fun priming method involves flicking the Breakflip with one hand to prime it. Since you're holding the entire handle and the handle is designed to pivot, flick-priming the Breakflip is far easier than flick-priming a Slingfire. The only issue with flick priming is the aforementioned lack of a lock - if proper technique is not used, the Breakflip will often flip itself down again. This appears to be caused when the body of the blaster comes to a sudden stop at the end of the flick-prime, causing it to bounce flip itself back down. Since the downward motion primes the spring, once it is primed, there is nothing resisting the Breakflip from flipping itself except some friction. This can be avoided with some practice and good flipping technique - the technique will likely come to you naturally after some use.


Using the included 8 dart clip, the Breakflip is relatively narrow and very easy to handle. The weight of the 8 dart clip is minor, so has minimal effect on the ease and reliability of flick priming.

Switching to a 20 dart clip however presents a bit of a problem. The Breakflip becomes substantially wider (in fairness, not as wide as a Rampage/Stormtrooper Deluxe Blaster), but more importantly gains a significant amount of forward weight. This makes one-handed flick priming even worse, as the extra forward weight causes the Breakflip to flip itself down more easily. Again, technique is your best friend against this issue, but it is more difficult handling a 20 clip compared to an 8.

Here's the Breakflip next to a Stryfe and Stormtrooper Deluxe Blaster. It's not that large a blaster, probably around Roughcut size (though I haven't seen a Roughcut for a while).
Finally for performance. Note that my model has a range claim of 15m.
Range wise, the Breakflip isn't anything special. It gets around 9-10m. Unlike most Nerf blasters though, the Breakflip is extremely and ridiculously consistent. No darts varied in range more than about 25cm. Which leads nicely into accuracy.
As has been said before, BoomCo darts are far, far more accurate and stable than Nerf's Elite darts, and with the Breakflip this is especially apparent. In my range testing, I had a spread of about a 20cm diameter at full range, which by Nerf standards is ridiculously good. At full range, hitting a human sized target is practically guaranteed, and hitting small targets such as soft drink cans is not difficult with a little practice.
Rate of fire is surprisingly good for a blaster of this style. The combination of slam-fire with a relatively short draw allows the Breakflip to achieve about 4dps with practice, though the technique required is highly impractical. One-handed flipping can reliably achieve just under 2dps, depending on which clip you use.
The Breakflip is a fairly good all-round blaster, ignoring a slight range deficit compared to Elite-spec blasters. It can certainly be used effectively and competitively against similar-spec Nerf blasters. Though you won't get the same stable ROF as you would from a pump action such as an EAT (although the two-handed technique does get close), the exceptional accuracy is a massive advantage over most foam dart blasters. Additionally, its one-handability (with a bit of practice) provides extra versatility, and the exposed clip potentially allows reloading on-the-fly. I think that with a few extra clips and some practice, the Breakflip could be very usable and effective, if not just plain fun.

I purchased my Breakflip from ToysRUs in Malaysia for 108RM - at the time equivalent to 36AUD or 25USD. In Malaysia, Nerf is generally quite expensive in Malaysia, for instance the Strongarm is regularly at around 70RM (23.33AUD or 16.33USD), the Triad is usually at around 36RM (12AUD or 8.40USD) and the Cycloneshock is around 100RM (33.33AUD or 23.33USD). The Buzz Bee Blastzooka retails in TRU for 87RM (29AUD or 20.30USD), while the BoomCo Dynamag retails in TRU for 90RM (30AUD or 21USD). Compared to most blasters in Malaysia then, the Breakflip is actually pretty good value. It presents quite good performance and is relatively easy to pick up and use, but above all is also a ton of fun. Though perhaps not the most practical blaster you can get, and with a few ergonomic and usability issues, it is still quite usable and also quite different.
If you're looking for something a little different that can still be used effectively (especially when it comes to accuracy), or maybe something different that's a heap of fun, the BoomCo Breakflip is certainly something to consider.

Power: 4/7
Accuracy: 5/5
Rate of Fire: 4/5
Usability: 4/5
Value for Money: 4.5/5
Overall: 4.07/5

Personal Rating: 4/5 - it's really nice being able to point at a target and actually hit it, and the flipping action is a lot of fun and surprisingly effective.

A link to the review I posted on BlasterHub: link

MHvZ Game Report 13/2/16 - Traitors, Sledgefires, Pump Action Resurgence

$
0
0
My first MHvZ event of the year. I have a few more pictures in this album.
I tried four different blasters as primaries this time round - my Stormtrooper Deluxe Blaster, my Elite Rayven, my Rapid Red and my Bullpup Rapidstrike.

Gamemodes:
Old:
Survival - Standard HvZ gametype, humans try to survive for a given amount of time (or until the last human falls). Zombies are given access to upgrades at various times, for instance Infectors at 5 minutes, Tanks at 10 minutes and Husk at 13 minutes.
Defence Survival - The three zombie upgrades of Infector, Tank and Husk are placed in the centre of three far apart squares, about 3m wide. Zombies can pick up the upgrades if they touch the upgrades in the middle of the squares. If a zombie is stunned within a square, they must move outside of the square before counting down their stun. The humans try to survive for (in our case) 35 minutes. Zombies are only allowed one upgrade at a time.
6 Round Sweep - Each player is given 6 darts to start with, and may take any number of blasters or a single melee weapon. Humans have 3 respawns at the nearest tree, and go to respawn when they are hit. A melee hit or a zombie tag immediately turns a human into a zombie. Humans try to deposit as many darts to a dart collector as possible and are safe during the depositing, and can no longer deposit darts as a zombie. Once all humans have been turned, the game ends and the winner is the player who deposited the most darts as a human.

New:
Secret VIP (name pending) - There are 3 special players in this game: the VIP, the General and the Traitor. The VIP is a human who the other humans are trying to protect and is restricted to a given area (we used the usual tambark area), while the Traitor is a zombie masquerading as a human. When stunned, zombies must move outside of the VIP's area before counting down their stun. The only person who knows the VIP's identity is the General, while all original zombies know the Traitor's identity. Everyone knows the identity of the General, making them the only guaranteed trustworthy human. The Traitor acts as a human, but can at any point do a single Traitor zombie tag, revealing that they are the Traitor, and thus turn into a regular zombie. Additionally, if a human hits another human, the hit human cannot move for 25 seconds. They may still fire. If the humans protect the VIP for a given period of time (we used 15 minutes), the humans win. If the zombies successfully tag the VIP, the zombies win. Zombie upgrades are unlocked on a timer like Survival, something along the lines of 3 minutes for Infectors, 6 minutes for Tanks and 10 minutes for Husk (I don't think we used those exact numbers).

Zombie rules:
Zombies tag humans with their hands onto any body part, blaster, tactical gear, etc, turning the human into a zombie. If a human hits a zombie with a dart, the zombie is stunned for 25 seconds. A human can also stun a zombie with melee, but only with a direct hit to the back.
There are 3 standard zombie upgrades/mutations/perks: 
Infector - zombie(s) get to use foam swords, pool noodles, etc. Tags with said foam melee weapons on humans count as regular tags. Said melee weapons can also be used to block darts.
Tank - zombie(s) get to use shields, which block darts. The shields cannot be used to tag humans, presumably as a precaution against shieldbashing which could certainly cause injury.
Husk - zombie gets to use a ranged attack, in this case a Titan with a single rocket. A ranged Husk attack counts as a regular tag. Husk ammo can be picked up by any zombie, but can only be used by the Husk naturally.
Zombie upgrades can be stacked in some games, so for instance a player could take both a pool noodle and a shield.
If in play, renades can stun a zombie with a hit to any equipment, including swords and shields, and can be reused at will, though in some gametypes special grenade replenishing rules are in place.

Blasters:
Since there were a lot of different blasters there, I've generalised them and only listed down the ones that I saw as significant or noteworthy, or remember for that matter. Being that I can't be everywhere at once, it's entirely possible I completely missed some blasters.
Regulars:
Rebelle Sweet Revenge (light mods)- my standard dual pistols, didn't see much use today.
Elite Alpha Trooper/Rampage (various springs)- pretty solid all round pump actions, even without spring upgrades. A very effective out-of-box blaster for HvZ. I saw a lot more EATs and Rampages in action than usual, particularly Rampages which have been very rare at MHvZ.
Elite Retaliator (various internal upgrades, pump grips, various tacticool pieces) - one of the usual staples of MHvZ. Not as fast ROF as other popular blasters, but tended to have higher effective ranges. Takes a bit more money to assemble one of these compared to an EAT/Rampage, but the results are usually well worth it.
Elite Stryfe (various motors, LiPos) - another staple of MHvZ, there were a bunch of these in various forms. Very good blasters for HvZ, enough range and ROF to fend off quite a number of zombies if you picked your shots and are well practiced with reloading.
Rebelle Rapid Red (various motors, LiPos) - basically stockless Stryfes, they functioned pretty much the same as their more common Elite brethren and were similarly effective.
Elite Rapidstrike (various motors, LiPos) - as per usual, effectively a Stryfe with a far higher ROF. Excellent at ensuring a hit on a particular zombie, or for overwhelming zombies with raw dart output. Tended to not be too effective at longer range shots, certainly not as effective as a Retal.
ZS Slingfire (upgraded spring)- used by one person in particular who is quite proficient with it. One-handed flick prime makes repeated firing on-the-run easier, but otherwise is not really noteworthy.


New:
Elite Rayven (Banshee motors, 2S LiPo) - worked very well, basically just a Stryfe/Rapid Red with a longer than usual barrel. Seemed to get similar ranges to the Stryfes, which was a relief having not combat tested it since fixing its alignment issues.
ZS Sledgefire (singled, upgrade springs) - these were a very interesting choice. They were very powerful and quite accurate, having an effective range beyond that of the Retals. The single shot meant that the user had to be backed up by other humans or a secondary blaster such as a Stryfe, but the ability to stun a zombie from very far off was very useful at times.
Buzz Bee Sentinel (brass breech, spring upgrade) - this is the same Sentinel featured in MakeTestBattle's Sentinel Brass Breech video, and boy is it powerful. An effective range far beyond Retals, comparable to the Sledgefires, with a ROF comparable to a slightly slow Slingfire made this Sentinel a blaster to fear. The user's aggressive tactics made the most of the long effective range, helping to save a number of humans, as well as stunning a lot of threatening tanks with very precise shots. The relatively slow ROF was an issue in close quarters as well as for making follow-up shots, but this Sentinel was an excellent support blaster for the humans.
Buzz Bee Ultra Rapid Tek (stock) - I acquired this one recently, it's a stock URT that I intend to upgrade a little bit to get it to superstock standard. I used it in the 6 Round Sweep today, and it worked well enough fending off a couple of zombies.
Star Wars Stormtrooper Deluxe Blaster (upgrade spring) - functioned pretty much like an EAT/Rampage, but the biggest bonus was calling recently tagged humans "TRAITORS". I did have trouble maneuvering it with 18 dart clips (mags), as they were extremely long and made it difficult to point left, or run with. The length of the LightningStorm stock was also an issue, in the future I'd use it with a shorter stock. It also seemed to somewhat dislike the FVJs used, seeming to have a few issues with the dart tooth as there was usually a lot of resistance in retracting the dart tooth/fully closing the breech. This left me with a dry fire at some inopportune moments, so I will probably tinker with it a little to make it like FVJs more, and will in the future use it only with 12 dart clips (mags).


We used the same park area as always, a triangleshape with an open field on one end, and a couple of trees on the other. One cluster of trees has tambark, and this tambark area is very useful for designating an area for various gamemodes. It's large enough for people to maneuver around in it safely and easily, but small enough for enemies outside the tambark to still feel like a threat.
Temperature was generally not an issue. Though the Melbourne sun is very harsh, the air temperature was not particularly high, peaking a little below 30C according to BOM. I certainly felt that it wasn't a notably hot day.


Survival HvZ was the first round of the day, and went as expected. I used the Stormtrooper blaster, so when the first human was lost (I believe somewhere between Infectors becoming available and Tanks becoming available), I immediately shouted "TRAITOR" at them. As HvZ always goes, there are minimal losses until the Tanks hit the field, at which point the zombies switch from harassment tactics to full on aggression. Humans then get progressively lost as the zombies and particularly Tanks are able to split up the humans and pick off any stragglers unable to outrun the horde. I survived until the end of the game through constantly moving and running, and was only taken down when the Stormtrooper blaster decided to misfire in close range, leaving me not enough time to reprime for another shot.
6 Round Sweep worked as well as always, with a majority of the darts on the field being picked up and returned. Naturally not all darts are picked up, especially far off darts or darts too close to combat areas, but for the most part more than enough darts are picked up to last the rest of the rounds. It is just a glorified pickup game so it worked well as usual.
We played two rounds of Defence Survival, and they played very differently from each other.
The first was a total massacre and lasted about 15 minutes. With the majority of humans guarding the Tanks square, the zombies were able to get through to the Infectors square with persistence. From there, they were able to push towards and threaten the Tanks square. While the humans were generally able to hold their own, poor communication and coverage resulted in some zombies rushing in unnoticed and wiping out half of the humans. With a sudden massive change in numbers as well as the zombies getting Tanks, the remaining humans fell quickly within a couple of minutes.
The second round went completely differently, and I was one of two humans who survived the entire 35 minutes. Negligence almost cost the humans the Infectors square at the very start, however a quick sprint allowed me to intercept the zombies before they could get the swords/pool noodles. The game then progressed as per normal for Defence Survival, with most early combat being around the Tanks square, which was eventually lost through persistence and slight negligence and distraction. Compared to most other Defence Survival rounds, I believe the humans did better to keep the zombies further away from the Tanks square for longer, thus further delaying the deployment of Tanks. Previously at MHvZ events, I have very rarely seen humans survive the full time limit, usually because late game combat introduces panic, fatigue and poor communication to the remaining humans, usually having them picked off easily by the persistent and ever-growing horde. In this particular round however, I stuck with a group of humans who worked together well and moved as a cohesive group. Together we were able to combat most threats effectively, including tanks. Naturally we slowly lost members through persistent zombie attacks, but we lasted longer than usual for what was a relatively small human group. Infectors and the Husk were of minimal threat to us, and we kept moving to avoid being cornered by Tanks. When the Tanks did get within threatening range however, the humans worked very well to flank them and push them back. Many times I would be able to (with the help of a fellow human) ward off a Tank without firing a single dart - the simple threat getting showered in darts if they chose a target was enough to keep them from charging.

Secret VIP was a really interesting, fun and relatively short new game that was introduced. Beyond being just a standard VIP defence game, the fact that the VIP's identity is hidden to everyone but the General and the presence of the Traitor makes it very difficult to focus a defence on one particular player. Since it's very easy for the Traitor to swoop in on the VIP without warning, simply revealing the VIP to everyone is typically quite a poor idea. The General then has to decide what to do with the knowledge of the VIP's identity. This psychological element of the game adds a really nice element to what would normally be a very ordinary defence game type.
As with regular Survival, the zombies are generally not much of a threat until they get Tank upgrades, but the threat of the Traitor (if they are unrevealed) adds an extra level of pressure in late game, when the humans are usually already outnumbered.
The element of humans being stunned by darts ensures that the Traitor cannot be systematically weeded out, and that the Traitor has more than one method of achieving their goal.
There are all kinds of tactics that the humans can employ to attempt to ensure the VIP's safety. The Traitor is by far the biggest threat to the VIP, as without the Traitor in the mix, the humans can focus their defence around a particular player, and so can prioritise their targets. As such, the humans would want to try and coax/force out the Traitor early on, before the zombie horde becomes a major threat.
Conversely, the Traitor wants to appear as an ordinary human until the time is right to either tear through the remaining humans or pick off the VIP. Getting the identity of the VIP depends entirely on how the players interact with the General (since it's unwise for the VIP themselves to reveal their identity), and will depend on the tactics employed by the humans and General.
We played two rounds of Secret VIP. In the first round, I was the Traitor, however the admin had forgotten to mention that the Traitor has a single Traitor zombie tag, and as such I never revealed my identity. Without the single zombie tag, and with the human numbers as they were, I saw no opportunities in which stunning the humans would likely result in a human massacre. I did my fair share of zombie stunning to keep up appearances, but as it happened my assistance was not needed, as the VIP was somehow picked off anyway with ~5 minutes to spare. I believe what happened was the majority of the humans were grouped on one side focusing on the zombies on that side, while the VIP with a few humans on the other side got rushed and overwhelmed. Being that the VIP played effectively identically to the regular humans, there was no hint at all about their identity. Had I had the one Traitor tag at my disposal, I would likely have used it on the General, or possibly on one of the particularly threatening humans.
The second round, I was the General. To protect the VIP from the Traitor, I told noone about the VIP's identity but kept a close eye on them. They played their part well, and were indistinguishable from the regular humans. This time around, the humans were able to survive and work together quite well, and survived with greater number to within 2 minutes of victory. However, the Traitor chose to reveal themselves just before a Tank rush, stunning the majority of the humans, resulting in them getting wiped out, with the VIP falling shortly after in the chaos. I think the humans had a reasonable chance of actually fending off the rush, or at least delaying it, but I believe the sudden betrayal and the chaos distracted them from remembering that they could still fire at the zombies, and simply could not move.
I really like Secret VIP and would very much like to play it again. Perhaps not as General, as I am very distrustful of other players when given that sort of secret information, but besides that it was quite fun.

A link to the post I made on BlasterHub: link

Loadouts 16: Personal Loadouts 5

$
0
0
First new Loadouts post in a while, with new stuff and my standard MHvZ loadout. I've got two Nerf events in the next two days so expect more game reports soon.

Scenario Description: Loadouts that we use, tailored to our needs.
Keys to Victory: N/A
Unnecessary Burdens: N/A
P13c30fch33s3

Clip (Mag) System 1c (Calling People Traitors)


Primary: SW FO Stormtrooper Deluxe Blaster (upgraded spring)
Secondary: Rebelle Sweet Revenge x2
Gear: BSUK Battle Belt, BSUK Small Zip Pouch, MazoFactory HSM1 x4, MazoFactory HDL-SR R+L
Ammo: 12 dart clips (mags), Kooshes/FVJs
Purpose: To call people traitors, survive zombies and compete in superstock
Strengths: Well balanced for superstock, can call people traitors at will
Weaknesses: Slightly low range compared other superstock blasters, awkward side magwell
Description: This loadout is a standard pump action superstock loadout with the extra benefit of being able to shout "TRAITOR" at people. Performance is about the same as an EAT/Rampage with spring upgrade, but the Deluxe Blaster feels more solid than an EAT, and I like the pump more than the Rampage's. I use 12s because 18s do make for quite an ergonomic issue, as I experienced in MHvZ. ROF is naturally severely inferior to semi auto flywheelers and Rapidstrikes, and range and accuracy are slightly inferior to Retaliators, but the cool factor of wielding a Nerf shooting F-11D counts for something, and being able to call people "TRAITOR" is a bonus.
Z6 Riot Control Baton with mandatory sick spins unfortunately not included, I haven't got around to making one yet.

Clip (Mag) System 2e (General Use)


Primary: Bullpup Rapidstrike (Falcon 130s for flywheels, FK180PH-3050 for pusher, 3S LiPo)
Secondary: Rebelle Sweet Revenge x2
Gear: BSUK Battle Belt, BSUK Small Zip Pouch, MazoFactory HSM1 x4, MazoFactory HDL-SR R+L
Ammo: 18 dart clips (mags), Kooshes/FVJs
Purpose: To survive zombies and be competitive in superstock
Strengths: ROF, can dual wield if necessary, reloading is easy, almost no rev time
Weaknesses: Poor long range accuracy, high ammo consumption
Description: This loadout has gotten me to the late stages of many HvZ games and has helped me win many of the games I have with my friends. No other common superstock blaster comes close to the Rapidstrike for dart output, and the mag carrying capacity I now have helps support the Bullpup Rapidstrike's hunger for darts. At longer ranges this loadout is vulnerable to blasters like Retaliators due to poor accuracy at long range, but that is perhaps the only notable flaw of the Rapidstrike in superstock. This loadout is my favourite and will probably be used a lot in the future, unless someone produces a blaster that is somehow better.
If the Bullpup Rapidstrike fails, I usually have my overhauled Rapidstrike, Rapid Red or Elite Rayven as a backup.

Mixed 1 (Buzz Bee)


Primary: Buzz Bee Ultra Rapid Tek (probably a spring uprade)
Secondary: Buzz Bee Extreme Blastzooka (the Shamecannon)
Tertiary: Buzz Bee Air Max Baron x2
Gear: BSUK Battle Belt, BSUK Small Zip Pouch, MazoFactory HSM1 x4, MazoFactory HDL-SR R+L
Ammo: Whatever clips (mags) are available (12s are preferred), whatever darts/missiles available
Purpose: To make use of all major ammo types with Buzz Bee blasters
Strengths: Can scavenge all major ammo types
Weaknesses: Performance is rather lacking all round
Description: This one is a silly thing I used at the most recent MHvZ's pickup round, which I usually spending derping around with silly blasters. I didn't take the Shamecannon as I couldn't be bothered and noone uses Missiles normally, but if there were Missiles to scavenge I probably would take it along. With this particular set of blasters, I will be able to use the FVJs used by MHvZ, Megas of all kinds as well as Buzz Bee and Elite Missiles, while simultaneously advertising for Buzz Bee. I didn't last too long, but I had fun wielding it.

Equalz Dee Game Report 20/2/16 - One Sided Bombing Run, King of the Hill

$
0
0
First event of the weekend.


Gamemodes:
Old:
Survival HvZ - standard HvZ, humans try to survive as long as possible. Players who arrived late become zombies, and the zombies get progressively more upgrades if necessary. Humans will be slowly given more armament later in the game.
Freeze Tag/Tag Teams - if hit, a player is frozen and is stuck. After 20 seconds, they may be touched by a living teammate to return to life. If all members of a team are frozen, that team loses. Last surviving team wins. 


New:
Ace Squad - if hit by a dart the player is out for 20 seconds. After 20 seconds, they may touch a living teammate to return to life. If no members of a team are alive, that team loses. Last surviving team wins.
One Sided Bombing Run - attacking team tries to get all of their rockets into a particular box. The rockets cannot be dropped on the ground or thrown, and are taken back to spawn if the holding player is hit. A player can only carry one rocket at a time. Rockets can be passed between teammates. All players operate on one-hit respawns, attackers respawning instantly and defenders respawning after a short delay.
King of the Hill (Cards) - on the "hill", there is a known set of cards, with 3 face down cards and the rest of the deck free to look through. To win, a player must guess/deduce one of the 3 face down cards from looking through the remainder of the deck. If the guess is correct, that player's team wins. If incorrect, the player must take the guess cards, return them to the deck, reshuffle and draw 3 new face down cards before going to respawn. If a player is hit while looking through the cards, they must put the cards back down before going to respawn.

Other rules:
Double Tapupon a first hit zombies would be stunned for a short time. If hit again the zombie must go out of sight of the humans to respawn. Melee can only stun a zombie and cannot fully doubletap them. Mega, Vortex and Rockets all instantly doubletap a zombie with a single hit.
Grenade (Mini Vortex Howler)- a throwable weapon that stuns shield wielders for 10 seconds. Can be picked up and reused.

Zombie upgrades:
Sword - increases the reach of a zombie, can be used to block non-rocket ammo.
Shield - blocks all non-rocket ammo, a shield hit with a rocket/grenade is a 10-second stun. Shields cannot be used for tagging.
Spitter (Mini Vortex Howler) - stuns a human for 10 seconds, during which they cannot move or fire. Can be picked up and reused as necessary.

Blasters:
Regulars:
Rebelle Sweet Revenges (modded) - my standard modded dual wield pistols, didn't see all that much use today.
Elite Roughcut - performed as usual.
Elite Strongarm - performed as usual.
ZS Hammershots - same usual, solid all round pistols.
Mega Thunderbow - same as before, a large, silly and intimidating Mega firing blaster that gets solid ranges.
ZS Flipfury - as usual, a Strongarm with a higher capacity.
ZS Slingfire - not bad given it being clip (mag) system allowed a good capacity, but otherwise not too notable.

Mega Cycloneshock - as usual, good power but due to design fired slower than Strongarms and sometimes the rotation mech didn't work properly. Quite popular.
N-Strike Thunderblast - operated as usual, an anti-shield blaster good for little else.


New/Infrequent:
Rebelle Codebreaker - good capacity compared to most pistol sized blasters, but had serious misfiring issues. Performance was not notable, and the misfiring was noticably and irritatingly frequent.
ZS Hammershot (modded) - excellent power, however the draw is quite stiff and painful. Much better effective range than stock, but not as good in close quarters.
Elite Retaliator - used with an 18 clip (mag), so had a massive capacity advantage. Performance was not particularly notable.
ZS Sledgefire (modded) - was extremely effective in instantly double-tapping zombies, or guaranteeing taking out a player in close range. Very slow to reload and all round a pain once the shot was made, but a lot of fun to use.


We used the "standard" school, with most action focused in a mostly undercover area between buildings. There's another tight area between buildings, but that area is just two parallel corridors, so less ideal for regular gametypes. This area has the above pictured openish area, but has plenty of cover around, and a lower "trench" along one side.
Weather was not an issue, temperatures around 22C and the sun was not noticably harsh today.


We started with a round of Ace Squad with 4v4, which for the most part worked like TDM. When the opposing team was down to one member, the whole team went running off to try and stall out for a respawn. This presented a big problem as it was unclear who was still alive and who was waiting to respawn, so the next round we switched to Freeze Tag/Tag Teams rules. Though very similar to Ace Squad, having players freeze made it far easier to distinguish live players from the tagged players.
In both rounds my team was able to wipe out the opposing team in a few minutes, usually with minimal casualties. Freeze Tag/Tag Teams is often more fun with multiple teams, however as we had 8 players at the time, 4v4 was the only reasonable team setup.
We then switched to Survival HvZ. We started with 2 OZs and 6 humans. The first round went quite poorly, the humans weren't coordinated and about half the humans were lost through just negligence and poor communication. The last human was lost probably 10-15 minutes in. The second round went for much longer and went much better for the humans. They stick together and worked together very well, and even shield zombies struggled as multiple humans went for one shield zombie. One of the OZs wielded a pair of Spitter grenades, however was helpless against 3 humans, or less if the grenades missed. Another wielded a shield with a sword, and was by far the bigger threat. Good human teamwork kept the humans untouched for probably 15-20 minutes, and humans only started falling after one particular shield rush. Once the zombies were able to attain numbers, the humans were permanently on the run and eventually overwhelmed through sheer numbers. This second round lasted for at least half an hour though, which is quite a while for Survival in these events.

We played a round of 4v4 King of the Hill, using a deck of spades and hearts only. Early on, the opposing team was able to establish a good defensive position and one of their players started going through the cards, however we were able to take them all out just before they were going to make their guess. We were then able to establish a defensive perimeter while I started going through the cards. I was able to make a correct guess only a few seconds before the opposing team would likely have hit me.
The area we used was fairly good for KotH, with several layers of cover on both side. The cards were placed near the hopscotch panda in the above picture, in a doorway out of the wind. Perhaps the only issue is that all of the combat was focused around a small area in the middle of the play area, and the rest of it was just space to run through.
The game only lasted maybe a minute as going through half a deck of cards and guessing just one of the three missing cards is relatively easy.It's so easy that my team was perhaps a second or two from defeat in the middle of the game. The time required to go and respawn was too long relative to the time required to hold the Hill to win - I was almost unable to even return to combat after being hit by virtue of the game almost being ended by the time I returned. I only kept my team in the game by running at full speed, and even then was about two seconds from defeat. A team should not have a practically automatic win because they eliminate the other team first - they should have to wipe out most of the opposing team as well as fend them off again afterwards before winning, otherwise too much of the game will rely on luck of individual firefights. Since the win time is so short and not much can be done with the respawn time (being that the player has to go back to their respawn point first), the best way to increase win time is to increase the size of the deck, thus increasing the time required to make an almost certain guess. Naturally the game does allow for random lucky guesses, but this is more a limitation of this type of KotH more than the gamemode as a whole. The far more conventional KotH uses a simple timer, but this cards version was designed to give the more intellectually inclined players something they can excel in.
 
We intended to play another round with a larger deck and different spawn locations, however I happened to get a leg cramp and was unable to participate for the rest of the event, unbalancing the teams. As a result, we decided to try a few rounds of One Sided Bombing Run, an assymetric game designed specifically for unbalanced teams.
We played a few rounds of 3 defenders v 4 attackers as the intention is for attackers to always win, with 6 rockets for the attackers to carry.We placed the goal box on one end of the undercover area, with the attacker spawn point on the other, and the defender spawn some distance behind the goal box.
6 rockets for the attackers works well for the game in this instance - assuming the attackers aren't terrible/defenders aren't amazing, it doesn't take too long for the game to end. Conversely, it is impossible for the attackers to win in a single assault, as they can carry a maximum of 4 rockets between all of them, thus requisiting at least a second successful run to win. This gives the defenders a much better chance of prolonging the game to a reasonable length. Since attackers are usually only able to deliver one or two rockets per successful run, and only a small fraction of runs are successful, the attackers have to make a lot of attacks to win.
We equipped the defenders with medium sized shields to help them defend, as a 3v4 game without them would likely end very quickly - the attackers can just leverage their numerical advantage and the long respawn delay of the defenders to make for easy repeated runs.
The balance we had was quite good - a good attack run coupled with a bit of luck would allow for the attackers to deliver up to 2, sometimes even 3 rockets, but these were rare. A decent attack run with some luck could allow a lone attacker to run up and deliver a single rocket, and these were more common as the defenders would often have their hands full holding off the other 3 defenders, or be down a player. The superior positioning of the defenders coupled with the shields would give the defenders an advantage in most combat situations, so a successful run would often occur after several failed runs.

Cover is especially important for emphasising the attack/defence roles and making the game work. In the play area we used, the design of the area made several "stages" of cover, not dissimilar to a sequence of trenches. This allowed the defenders to set up a defensive position ahead of the goal box, while the attackers also had sufficient cover to use to stage attacks. The goal box needs to have nearby cover that the defenders can use effectively, or else it becomes far too easy for the attackers. Similarly, it should also be reasonably but not extremely difficult for an attacker to make a straight sprint for the box - the idea is that the attackers should be able to push the defenders back far enough to get a few rocket runs in, but not so far that the entire team can stroll in and dump all their rockets.
The attackers should have a larger ammo stash, as they have less opportinuty to pick up off the ground. Since most of the combat will happen closer to the goal box, where the defenders will usually be, the defenders will have ample opportinuty to reload off the ground, and so won't need too much spare ammo from the start.

Overall while most of the games we played had a few kinks to iron out, there's serious potential for some really good gamemodes. One Sided Bombing Run is one that I particularly like as I have an annoying ability to get exactly 7 players to my events, and King of the Hill is always something I've been interested in trying.

Melbourne League of Foam (MLF) Game Report 21/2/16

$
0
0
This was my first MLF event, an intermediate level group that acts as a good bridging group from the more casual MHvZ, and the more sophisticated Melbourne Nerf Wars.

Base rules:
If a player is hit with a dart, they are downed. When downed, they can choose to wait for a medic, or go to respawn (if the gamemode has respawns). If the downed player chooses to respawn, once they move from their spot they can no longer be revived by a medic.
A medic revives a downed player by placing their hand on the player, counting to 3 (at a reasonable speed). Once the countdown is complete, the downed player is revived.
A grenade hit forces a player to respawn, and they cannot be revived by a medic.
A melee tag also forces a player to respawn. If a melee weapon is not available, the attacking player can simply tag the target player with their hand and say that they're hit.
 
Gamemodes:
Kill Confirmed - very similar to Freeze Tag/Tag Teams. When a player is hit, they are downed and must wait for a teammate to revive them, which is achieved with a simple hand tag. However, the key difference is that an opposing player may tag a downed player with their hand to "confirm the kill" and eliminate them from the game. Naturally if an entire team is downed, then that team loses even if none of them are "confirmed". The last team with surviving, non-downed players wins.
VIP - one player from each team is designated as the VIP of that team (the teams do not need to tell other teams who their designated VIP is). If the VIP is downed, their team can no longer respawn (but can still be revived by their medic). The VIP must call out when they are downed, and cannot be revived by the medic. One player is designated as the medic of the team (likewise whose identity does not need to be publicly shared). The last team with surviving players wins.
Capture the Flag - classic gamemode, obtain both flags at your team's flag start to win. When hit while holding the flag, drop the flag as well as being downed.

Blasters:
Since the rounds were very fast paced and sometimes quite short, I didn't get to observe every blaster in action. While there were some sidearms carried by players (typically Hammershots or Sweet Revenges), they didn't see enough use to get included here.
Elite Rapidstrike (various motors, LiPos) - excellent ROF made them good suppression blasters, and also effective for mowing down multiple opponents or ensuring a hit from slightly further away. All round pretty good blasters, though ammo consumption could pose a significant problem if the user was too trigger happy or carried an unusually small number of clips (mags). There were a number of Rapidstrikes seen throughout the day.
Elite Stryfe (various motors, LiPos) - pretty much more compact Rapidstrikes with a slower ROF. Slightly less effective for putting a whole lot of darts out, but easier to use and slightly harder to abuse, so ammo consumption was typically much less of a problem. They can still put out more than enough darts to mow down opponents with practice. Also much simpler, cheaper and easier to mod than Rapidstrikes, making them a popular blaster for first time flywheel modders. There were quite a few Stryfes floating around.
Elite Alpha Trooper (upgrade springs) - effective all round blasters, however compared to the significant number of flywheelers, had a slight disadvantage in ROF. Slightly less effective than Stryfes, but good use of cover typically levelled the playing field. Ammo consumption was very rarely a problem, one of my friends who used it went through whole rounds without changing clips (mags). An even simpler entry level option than a Stryfe. The EAT was probably the most popular non-flywheel blaster today.
Stormtrooper Deluxe Blaster (upgrade spring) - performed basically like an EAT, quite good all round but not as effective as the flywheelers. I implemented a fix to the FVJ feeding problem after MHvZ, and it worked excellently today, with no issue in chambering darts. I also switched to 12 dart clips (mags) when using the Deluxe Blaster, which was a substantial improvement. I had much better maneuverability and was able to point the blaster around much more comfortably. I had a lot of fun with this blaster honestly, and also had great fun charging at my friends on the enemy team while shouting "TRAITOR".
N-Strike Longshot (RemedyMetal internals, shotgun grip) - this thing had by far the longest range of all the non-air blasters, and was a challenge to approach to get within striking range. The shotgun grip greatly increased ROF, which made it that much harder to approach. Though the relatively slow ROF did present an issue against multiple opponents in close quarters, overall it was an excellent and quite dangerous blaster.
N-Strike Longstrike (unknown air tank, air compressor, unknown new breech and barrel) - the only thing remaining from a stock Longstrike was the shell. The air tank with an extremely long barrel made for an extremely long ranged blaster, while the compressor substantially sped up ROF, though was still very slow compared to every other blaster. It worked very well for long range suppression or hitting unaware opponents, but required a lot of skill and and team support to be effective.
N-Strike Stampede (unknown mods) - by virtue of the event using FVJs, this Stampede was able to keep up with the flywheelers when it came to effective range. Though lacking in ROF compared to a Rapidstrike or skilled Stryfe user, it was comparable to slam-firing an EAT, which was in most cases more than enough. Overall it worked quite well, quite similar to the EATs except with a small fire delay.
The play area we used had a lot of trees, providing a good amount of shade but also some decent cover. The shade was especially nice as today was quite a warm day, and the sun was quite harsh. One side of the area has an upwards incline to the top of a hill which is not too substantial, but very noticeable. Since the play area was based around a slope on the hill, the hill will be used to indicate positions in the play area. Besides the trees there was no cover, so most combat was tree to tree, and certain tree clusters were very important in terms of positioning. There were just enough trees to make just enough cover for the area, with the exception of one open area on one side.
Player count peaked at about 12, and varied from 8 to 12 throughout the day as people came and went.
In all of the spawn based games, one spawn was placed on the top corner of the hill, while the other spawn was placed in the far corner at the bottom, effectively putting them at opposite corners of a squareish/rectanglish play area. These spawns worked quite well, as it was possible to move cover-to-cover from one spawn to the other without spending too much time running.
Two particular tree clusters were very important/useful in terms of position. Naturally the cluster in the centre of the area is very useful to be in control of, as it offers both good offensive and defensive position. The cluster in the far bottom corner of the area is quite dense with trees, and makes a good staging area to push towards either spawn point, or most of the flag locations.
We played a number of Kill Confirmed rounds, as they require minimal setup and balancing. The only balancing required is to ensure that each team is roughly even, and that every team starts off with easy access to some cover. We played with a variety of team setups, some were 4v4, some 3v3v3, possibly more. These games were usually quite chaotic and fast paced, and worked very well as basic team games.
In the case of the two team games, the games usually progressed relatively evenly up until one side is able to eliminate several players in a short time. Because of the revive mechanic and everyone being able to revive, sticking in small groups worked well for survival, and greatly reduces the severity of a single player getting downed. Usually the way one team grabs an advantage is downing the most exposed player, and then the player(s) who go for the revive. The team can then push forward, utilising their new numerical advantage, allowing them to eliminate the downed players to assure numerical advantage.
Since numerical advantage provides such a massive advantage in Kill Confirmed, keeping your team's numbers up will greatly improve your chances later on. Likewise, any opportunity to eliminate opposing players is a big opportunity to guarantee a numerical advantage for your team. The game is very momentum based - the loss of one player could snowball into the entire team getting wiped out in a minute.
Stopping this momentum is critical to retain any chance of victory - if your team goes two players down, you're pretty much doomed. You have to quickly eliminate one of the opposing players to return to an even game, otherwise you're likely to be overwhelmed by superior numbers.

The 3v3v3 Kill Confirmed rounds were extremely chaotic, and the first losing team was typically decided by which unfortunate team would get caught in the crossfire. Usually this one team would get completely obliterated, and the two remaining teams would go at it as normal.
All round the Kill Confirmed rounds worked relatively well. The necessity for teamwork made it far more sophisticated than a regular TDM game, and the ability to "confirm kills" gave more urgency to reviving downed players where possible.
We played a couple rounds of VIP, which compared to Kill Confirmed has a much more distinct offence/defence playstyle split. Kill Confirmed is basically just regular Nerf combat with a few rules, while VIP is an objective based game. VIP involves balancing offence (trying to take out the opposing team's VIP) and defence (protecting your own VIP). Since VIP has respawning, players defending the VIP can attack approaching opponents quite aggressively with little fear. Since the VIP behaves as a normal player until they are hit, it is usually very difficult to distinguish the VIP from ordinary players.
The VIP is typically quite defensive, so eliminating them usually requires getting quite close to the enemy spawn. As such, there is usually only a short window of opportunity after successfully pushing through the enemy team to take out the enemy VIP.
In all of the rounds of VIP we played, the loss of the VIP meant instant doom for their team. Without the VIP to allow for respawns, the team would have to rely on their medic to stay alive as well as reach every downed player, and if the medic is lost, the team has basically no hope. The attacking team can pretty much throw themselves recklessly on offence, as their living VIP allows them endless respawns. The only chance the VIP-less team has is now to eliminate the other VIP, leaving the teams on roughly equal footing. This however didn't happen in any of our VIP rounds, likely due to the positioning required to eliminate the VIP. If the VIP has been taken out, then typically the attacking team will have established a good offensive position, with their own VIP well out of danger, making it very difficult to push back and get at the remaining VIP.
Medics are extremely useful for offensive pushes, as they negate the need to run back to spawn. This allows the team to apply much more consistent offensive pressure. Medics can get players back into the game much more quickly than respawning, as well as in much better positions. As such, the enemy medic should also be a priority target - without the medic, the opposing team temporarily loses a substantial amount of offensive pressure, and can be fended off much more easily. Medics are somewhat less important on defence, since the spawn point is much closer than on offence, and does not require the medic running to the downed player and reviving them.
Besides obvious player balancing, the only balancing required was to ensure that both spawns had sufficient and roughly equal access to nearby cover. We found two particular spawn locations that felt relatively balanced, both sides having relatively similar nearby cover.
VIP is a more objective based game than Kill Confirmed, but the respawn aspect allows lone players to still perform well.
We played a number of CTF rounds as well, and they generally worked well, though there were more balancing issues than the other rounds. The problem lies in there being in placement of the flags and spawns. Both flags should have sufficient cover that they can be well defended but also effectively attacked, while the spawns should be close enough to their respective flags to defend, but not so close that players can just sit in spawn to defend.
In the first round we played, the flags were far too close to their respective spawns, and as such it was nearly impossible to make an offensive push long enough and far enough to get at the flag. In this particular round, the spawns were left in far corners, while the flags were several metres in diagonally in front, so both flags and spawns were roughly all in a line. In my flag run, I was able to get around the majority of the combat, down a defender and get the flag into roughly middle ground before I was tagged. With the flag in middle ground though, it was far easier for a teammate to rush in, grab it and return it for a victory. If not for my lucky flag run, I suspect the game could have lasted much longer. While both teams had been able to take offensive positions, neither team had been able to make an effective push close enough to the flags to put them in actual danger.
In the second round we played, the flags were moved such that the top one was on the top of the hill, opposite the spawn, while the bottom one was in the middle of the bottom of the hill. The problem here was that the top flag was placed at a tree where there were no trees within 20m between the flag and the enemy spawn, making it practically impossible to attack. The bottom flag was more attackable, however the bottom team was able to defend it effectively, and neither flag moved for about 15 minutes. The game lasted so long that basically every player ran out of darts in their clips (mags), and had to resort to scavenging. I even had to switch to my Sweet Revenges. Eventually the enemy team was able to break through our ammo-less defence and take the flag.
The length of the second round was unintended and the flag placement balance was poor - it is intended that players should not run out of ammo during a round unless they are extremely trigger happy and/or carry few clips (mags), and that both teams should have reasonable ability to attack the opposing flags. As such, flag placement was changed again.
In the remaining two CTF rounds, the flags were opposite each other at roughly equal altitude, which lined up well with the tree cover and so made for the most balanced layout of all the CTF rounds. The spawns were close enough that respawning players could move to defend the flag relatively quickly, but not so close that they could defend from the spawn itself. It was possible to get from either spawn to either flag by moving cover-to-cover, which is ideal for CTF.
My team won both of these CTF rounds, the first of which I fired less than 12 darts. In the first of these, my team was the one on the bottom of the hill, so I ran across the bottom towards the bottom far corner, and took cover near the enemy flag. I engaged two opponents on my own, and though I didn't actually hit either of them, I was able to distract them long enough for two of my teammates to rush in, take out the closest defenders and run off with the flag. Since I was focusing on my two opponents, I actually didn't see what happened until my teammates were pretty much at the enemy flag, after which I fired some suppression shots as rearguard, and we won seconds later. This round of CTF was very short, I think within 2 minutes, which was probably just through the luck of the enemy team not noticing and intercepting my teammates in time.
The last round of CTF was probably the best overall one, with both sides getting close to the enemy flag, and reasonable round time. I was taken out several times, and participated in a lot of both offence and defence. Ultimately I was the one to make the flag run, taking down several defenders before taking the flag and getting clear. I accidentally took the flag towards our spawn instead of our flag, but by then the enemy team had already conceded defeat - once your flag has been taken past about midway, there's pretty much no hope of retrieving it. In fact, in pretty much all of the rounds, every time the flag had been touched by an enemy player, it was taken all the way back and captured. Because of the relatively low speed of Nerf darts, hitting a player who's running away is very difficult after just a second, so once your flag is out of your area, it's almost guaranteed to be lost.

Like with VIP, medics are very valuable in CTF for making flag pushes. The ability to effectively respawn in the middle of the field is very valuable when dealing with pushes, as a few seconds of numerical advantage can be enough to make for a successful flag push and run. Ironically, in my flag runs I often had no backup at all, which perhaps contributed to my successful flag runs. As a lone player, enemy players possibly took less notice of me than they did the cluster of my teammates in the middle and on defence, which perhaps allowed me to get the hits that I achieved. My speed also helped me get in and out quickly before enemy reinforcements arrived. I also used this speed at the start of most rounds to achieve a good position early on - it was this speed that allowed me to get so close to the enemy flag so early on in the third CTF round.

Overall MLF was pretty good. While I would have liked to play perhaps a sillier, assymetric or more casual game to contrast with the relative competitivity of all the games we did play, the event was a lot of fun and I would certainly like to go to more, time permitting. 

A link to the same post on Blasterhub: link

Mod: Elite-ified Longstrike

$
0
0
The Longstrike is a fantastic looking blaster, so it's a real shame that internally it's awful. Though a more traditional Longstrike internal overhaul is to just throw an airtank in there, the release of the Elite blasters with their conveniently sized direct plunger systems provided an alternative. This is my take on putting Retaliator internals in my Longstrike.


First, a few bits added into both sides of the shell to support the new internals. If you're at all familiar with reverse plunger systems and/or the Longstrike, you can probably spot the extra bits.
The breech is spliced together from a Longstrike front and a Retal rear, with a piece of 17/32" brass bridging the two, making for a pretty solid construction. Some slight boltsled modification is required due to replacing the catch.
Since my Longstrike breech got broken some time back, I got a new one from a fellow Nerfer at the MLF game.
This is the spring rest/plunger guide, using various bits from my pipe/tube box, e-tape and hot glue.
The plunger fits through without a problem.
The spring rests nicely on the pipe piece.
All assembled. There's no way of knowing that this Longstrike has Retal internals without taking a close look.

The priming indicator still works, though is much less clear.

If you've done even basic internal modding, an Elite-ified Longstrike is actually not very complicated. Adding in the support pieces and fabricating the spring rest/plunger guide are extremely easy provided you have the parts on hand (and said parts are easy to obtain/replace anyway). The only potential spot of bother is fabrication of the breech because of how tight the margins are, however with a joining piece of brass as I've done, it's easy to mock-up and test the breech length without any adhesive, then glue it together once everything is in a good place.

Performance is solid, though not quite Retal level. The length of the Longstrike bolt introduces extra dead space which cuts down power a little, but it's still more than usable. Overall the mod was quite a success - the Longstrike is now working, easily usable and also better than before.

Review: Nerf Rebelle Codebreaker (20m Aus grey trigger)

$
0
0
The Codebreaker Crossbow is an unusual blaster that I thought had promise, a pump action stringer revolver rifle/crossbow. I wasn't interested enough to pick it up myself, but a friend of mine picked it up and let me borrow it for this review.
My friend who owns this particular Codebreaker removed all locks as well as the combination lock before I could try it out. As a result my review may not be entirely relevant to a completely stock Codebreaker, and doesn't cover the combination lock at all.

The Codebreaker is an interesting blaster, with the typical sleek Rebelle style which I think works well for this design. One big aesthetic issue is the lack of detail on the left side, which is quite disappointing, especially as the Rebelle shell design tends to lack engraved details.
Interestingly, the Codebreaker feels very thin and light - not the norm for nerf blasters. In fact, I'd suggest that some of Buzz Bee's newer blasters, particularly the larger Ultra Tek blasters, feel as good, if not even better than the Codebreaker.

The Codebreaker is relatively narrow and fairly small. I was surprised how small its box was, and then how small the blaster is as well.
The handle and thumbhole stock are quite small, and the stock piece looks a little strange, as if it was an afterthought and just thrown on.
While the handle is nicely shaped, it's very small. My hand just fits on it, and I'm by no means a large person.
Additionally, the stock is exceptionally short, almost to the point of unusability. The Rayven doesn't have the longest stock, and yet it dwarfs the Codebreaker for stock length. The Codebreaker certainly feels like it's been designed for very small people.


The Codebreaker is a pump-action crossbow, and unlike its handle and stock, the pump grip is well sized. Though not the longest grip, it is quite wide and is very easy to grip.
The pump feels quite good to hold, and is very easy to actuate.


The Codebreaker is an 8 dart revolver, however being a stringer blaster, has a very unusual cylinder design. Unlike the conventional cylinder design, the Codebreaker's cylinder does not have full barrels, instead having a half-pipe barrel design to allow the string to fire the dart.
This halfpipe cylinder design is particularly evident once the cylinder is loaded up. Because of the halfpipe design, the cylinder feels somewhat strange to load, as you don't have a full barrel guiding the dart. It certainly feels a little tighter than loading a conventional cylinder.
Note the minimal clearance that the string has to engage the dart, the space between the edges of the cylinder and the far edge of the dart. This can result in issues with thin or worn out darts, where the string will simply slip past the dart instead of firing it. The Codebreaker is particularly picky about dart quality, I couldn't get it to fire my thin green Kooshes reliably, and even lightly used Elite darts were sometimes a problem.


The Codebreaker is a pump action blaster so the priming cycle is very basic.
The first portion of pump travel rotates the cylinder. The cylinder rotates counter-clockwise from the user's perspective.
The rest of the travel simply takes the string all the way back.

Then push the pump all the way forward to ready the blaster for firing. With the locks removed, it is actually possible to fire the blaster as soon as the pump is all the way back, as by design, the forward stroke of the pump does nothing. This allows a sort of psuedo-slam-fire which, though my experience is that it isn't too practical or reliable.
Here's a closer look of how the string aligns with the bottom dart in the cylinder.
And with the trigger pulled. Note the piece that raises when the trigger is pulled, this helps to ensure that the string pushes the dart and doesn't just slip past, though as mentioned earlier, thinner and used darts tend to misfire anyway.

Here's the Codebreaker next to the Elite Crossbolt. The Crossbolt is more compact, but also significantly less comfortable to hold.

Here's a comparison of the draw lengths - the Codebreaker's is much longer than the Crossbolt's.
Here's a comparison of how the bow arm widths compare - the Codebreaker's bow arms are noticeably wider.
Overall, the Codebreaker is smoother and easier to use, and also more comfortable. Ironically, as I'll get into in a moment, the Crossbolt is actually the better blaster.
Finally, performance.
Ranges are unimpressive, about 9-10m with good Elites. The prime feels excessively weak, but at least being a stringer, getting a bit more power out of it is easy. It should be noted though that I have heard that the Codebreaker's arms are not particularly robust, certainly less so than the Crossbolt's.
Accuracy is surprisingly not that great. Even with the low power, I was getting a lot of spread from good quality Elites and even Kooshes. It's not the worst I've seen, but it's far from the best and certainly incomparable to the Crossbolt.
Rate of fire is pretty decent, being pump action and having an easy prime, 3dps is easily possible (at least with locks removed). 4dps can probably be achieved with pseudo-slam-fire, but I find it too unreliable and inconsistent to be useful.

When first unveiled, I was hoping that the Codebreaker could be a stylish scavenging carbine, as its design leaves it no other practical use. It's small for a primary blaster and doesn't have the capacity or performance to hold its own, and it's too big and impractical as a secondary. Unfortunately, the Codebreaker's deep hatred of and refusal to fire non-perfect darts ruins its potential as a scavenging blaster. The only reason to use a Codebreaker in combat is against pistol-sized blasters, and even then your only advantage will be capacity, as the performance is not notably good.

The Codebreaker retails for 29AUD at best, which is certainly not that good a deal when the Retal is available for the same price. While it does compare favourably to the (slightly overpriced) Hammershot at 25AUD, the Codebreaker is generally not worth buying for its blasting ability. For 6AUD more, the Crossbolt is a far superior and more practical stringer blaster (though it shares the Codebreaker's hatred of imperfect darts), while the cheaper Flipfury and the same priced Retal are practically superior in many aspects. Unless you're in love with the shell, I'd give the Codebreaker a miss.

Power: 4/7
Accuracy: 3/5
Rate of Fire: 3.5/5
Usability: 3/5
Value for Money: 3/5
Overall: 3.07/5

Personal Rating: 2.5/5 - while really cool in concept, I feel like it hasn't been executed too well. The Codebreaker is awkwardly small, notoriously unreliable with non-perfect darts and not all that good a blaster.

MHvZ Game Report 12/3/16 - More Traitors, Rival Appearance

$
0
0
Another HvZ game, I had to leave a little early because reasons, but we still got to play quite a few rounds.


Gamemodes:
Old:
Survival - Standard HvZ gametype, humans try to survive for a given amount of time (or until the last human falls). Zombies are given access to upgrades at various times, for instance Infectors at 5 minutes, Tanks at 10 minutes and Husk at 13 minutes.

New:
Secret VIP - There are 3 special players in this game: the VIP, the General and the Traitor. The VIP is a human who the other humans are trying to protect and is restricted to a given area (we used the usual tambark area), while the Traitor is a zombie masquerading as a human. When stunned, zombies must move outside of the VIP's area before counting down their stun. The only person who knows the VIP's identity is the General, while all original zombies know the Traitor's identity. Everyone knows the identity of the General, making them the only guaranteed trustworthy human. The Traitor acts as a human, but can at any point do a single Traitor zombie tag, revealing that they are the Traitor, and thus turn into a regular zombie. Additionally, if a human hits another human, the hit human is stunned for 25 seconds. If the humans protect the VIP for a given period of time (we used 15 minutes), the humans win. If the zombies successfully tag the VIP, the zombies win. Zombie upgrades are unlocked on a timer like Survival, something along the lines of 3 minutes for Infectors, 6 minutes for Tanks and 10 minutes for Husk (I don't think we used those exact numbers).
6 Round Pair Sweep - Each player is given 6 darts to start with, and may take any number of blasters or a single melee weapon. Humans have 3 respawns at the nearest tree, and go to respawn when they are hit. A melee hit or a zombie tag immediately turns a human into a zombie. Humans try to deposit as many darts to a dart collector as possible and are safe during the depositing, and can no longer deposit darts as a zombie. The only change is that humans now work in pairs instead alone. Once all humans have been turned, the game ends and the winner is the pair who deposited the most darts as humans.

Zombie rules:
Zombies tag humans with their hands onto any body part, blaster, tactical gear, etc, turning the human into a zombie. If a human hits a zombie with a dart, the zombie is stunned for 25 seconds. A human can also stun a zombie with melee, but only with a direct hit to the back.
There are 3 standard zombie upgrades/mutations/perks: 
Infector - zombie(s) get to use foam swords, pool noodles, etc. Tags with said foam melee weapons on humans count as regular tags. Said melee weapons can also be used to block darts.
Tank - zombie(s) get to use shields, which block darts. The shields cannot be used to tag humans, presumably as a precaution against shieldbashing which could certainly cause injury.
Husk - zombie gets to use a ranged attack, in this case a handbag full of throwable rubber hands and feet. A ranged Husk attack counts as a regular tag. Husk ammo can be picked up by any zombie, but can only be used by the Husk naturally.
Zombie upgrades can be stacked in some games, so for instance a player could take both a pool noodle and a shield.
If in play, grenades can stun a zombie with a hit to any equipment, including swords and shields, and can be reused at will, though in some gametypes special grenade replenishing rules are in place.

Blasters:
Since there were a lot of different blasters there, I've generalised them and only listed down the ones that I saw as significant or noteworthy, or remember for that matter. Being that I can't be everywhere at once, it's entirely possible I completely missed some blasters.
Regulars:
Rebelle Sweet Revenge (light mods)- my standard dual pistols, worked well when I went to them against several zombies, but easily overwhelmed by more than ~4.

Star Wars Stormtrooper Deluxe Blaster (upgrade spring) - with the FVJ fix I implemented before the previous MLF, it worked excellently. Switching to 12 clips (mags) helped substantially, as did switching stocks to the shorter one that comes with the blaster. It's replaced the EAT as my main springer as it feels more solid to me and I think looks far cooler.

Elite Rapidstrike (various motors, LiPos) - as usual, the best close quarters point defence blaster around. Somewhat poor accuracy compared to most other things makes them rather ineffective at long range, but raw dart output allows tearing apart hordes at close range. 

ZS Slingfire (upgrade spring) - a few internal issues greatly inhibited its abilities, and it would have worked decently well if not for that. The upgrade spring would give it pretty good range, and although one-hand priming is substantially harder. Not as good overall as say an EAT, but quite fun to use and more than good enough for casual HvZ-ing.
 
Elite Alpha Trooper/Rampage (unknown mods, assumed spring) - standard all round blasters that make for excellent entry level blasters. Pump action allows for decent ROF - nowhere near a flywheeler but more than enough for a newbie against a couple of zombies. Decent power is more than usable in a HvZ game.
 
 
Elite Stryfe (various motors, LiPos) -effectively mini-Rapidstrikes with a slightly lower ROF. Accuracy seems to be better with them, but I have no actual evidence to back that up. The significantly smaller size and lower weight makes them a lot easier to handle, and the lower ROF is generally not an issue for more experienced users.

New:
N-Strike Raider (unknown mods, if any) - they sucked. Very poor range and the newbies using them seemed to have trouble using them properly.

Rival Zeus (stock) - was nice to finally see a Rival blaster in person. Since this is my first experience with a Zeus, I thought I'd put a few notes on what I thought of it. It handles decently well, decent handle and stock length along with most of the weight in the rear make it relatively easy to point and turn. The reload is ridiculously awkward and annoying, it would take a lot of practice to get used to, and even then it's a very poor reload. In terms of actual firing, the Zeus does well, very good maximum range and good initial velocity. However, because it fires spinning balls, the velocity drops massively after about 10m, so for the rest of the range (which is probably a good 20m or more), the ball pretty much floats and is super easy to dodge. Accuracy is excellent even at full range, but the very low velocity at that range makes it irrelevant. I also had issues trying to rapid fire it. The balls were smaller than I expected, but felt about what I thought they would.
Overall while the Zeus does get very good ranges for a stock blaster, you just can't hit anyone who's even the slightest bit aware at that range. In the ranges in which a stock Zeus is effective, you might as well just use a standard modded dart blaster like an EAT, and that will give you better capacity, reloading, ROF and ammo compatability.

Modulus Recon MkII (AR removed) - worked as you would expect a stock Retal pistol to work, nothing special or interesting really. I just included it here because it's the first time I've seen one in action, and I thought it looked quite cool. I wasn't interested in one before, but I might pick one up now.

Same play area as with all MHvZs, a reasonably large triangular area that's mostly open. Weather wasn't an issue, temperature was around 25 degrees C with cloud cover. Player count was a little lower than usual, peaking just below 20 I think. More than enough for some good games, but HvZ is always more fun with more people. A number of today's players seemed to be inexperienced with HvZ, it certainly seemed like more newbies today than usual.


We started off with a Survival round as per usual. It went pretty much as expected up until the zombies had tagged about 3 humans. The bulk of the newbie humans stuck together and generally kept movement to a minimum, combating zombies in one particular area in the far north of the area. While this meant that one side was automatically covered by the northern border of the play area, they became surrounded by zombies on all other sides. Eventually some of the humans (including me) split off from the group to escape the ever closing box of zombies, and the subsequent poor human coordination resulted in several humans getting tagged.
While the humans generally tried to stay around the higher up north end, the number of zombies made defending an area pretty much unfeasible. Unlike the previous event, I didn't really stick with any particular human group, and overall the humans didn't work all that well together. As a result, the Survival round ended rather quickly, and I was the last survivor.
The lack of human coordination was easily the biggest weakness later in the game. A lot of humans panicked when getting charged by zombies, and generally poor awareness let zombies occasionally pick off a few humans before being noticed. Some humans were lost to non-Tanks, with Tanks either nowhere near or stunned - this is not typical behaviour as a group of well coordinated and sufficiently armed humans should be able to take down even a fairly large (10+ in this context) horde of non-Tanks/Husks. A lone human with a decent blaster (and experience with said blaster) should be able to fend off around 4 regular/Infector zombies without too much trouble.
One possible contributor to the unusually fast downfall of the humans was the different Husk. Usually the Husk is armed with a Titan with a single rocket - a ranged attack that is very easy to dodge, very easy to see and extremely slow firing. In this event, the Husk is armed with throwable hands and feet. Although they have awful aerodynamics and thus have worse consistency and accuracy than a good rocket, the ability to rapidly throw many hands and feet is massive. In HvZ, most humans generally don't bother firing at zombies unless they're 10 metres away or closer. At this range, humans are completely safe from regular/Infector zombies, and although the Husk can reach them, having only a single shot (and having a very long time between shots) makes them mostly a non-threat. The Husk being armed with hands and feet can constantly attack the humans from ~10m away - they're close enough that thrown hands and feet can easily reach the humans, and the ability to keep throwing means the humans have to be constantly watching the husk, ready to dodge. This naturally makes the humans far more vulnerable to zombie charges, especially Tanks.

Conversely, any zombie charges are made far more threatening from the fact that they can distract human attention away from the Husk, who can then throw at will with a much lower chance of humans dodging. In most events, the Husk usually gets very few tags, and often those tags could have been achieved by an ordinary zombie a couple seconds later. In this event, I saw a lot of Husk tags (by a lot, I mean at least 3, which is a lot for a Husk in a single round), and they were often tags on humans who were in combat with, but otherwise would likely have fended off, several other zombies. Furthermore, the Husk would on occasion achieve multiple tags in quick succession - something that a Titan Husk could not do.
This hands and feet Husk is far more dangerous than a Titan Husk, and in my opinion substantially changes the human-zombie dynamic. Previously, Tanks were the only zombie who could threaten a lone human in small zombie numbers - regular, Infectors and the Titan Husk are basically useless alone or even in a small group against an experienced, well armed human. A hands and feet Husk backed up by even a few non-Tanks is far more effective than usual because the Husk can repeatedly pelt away at the human while the other zombies charge/distract/get stunned/whatever.
We played a number of Secret VIP rounds, I think around 4. Overall I think they worked quite well as a secondary gametype.
The first round ended very early by complete chance. The Traitor revealed themselves early, stunning nearby humans and then using their Traitor tag on the nearest human - who turned out to be the VIP! There was nothing that the humans could have done really, and it's highly unlikely that a Traitor would get tag VIP through pure luck. We all had a good laugh about the situation, then went to play another round.
The second and third rounds lasted nearly the full time limit, with the zombies usually being able to pick off a few humans, but typically not make significant progress until the Traitor revealed themselves and attacked. In both of these rounds, the Traitor usually opened fire on the humans but didn't use their Traitor tag. While they may not have been able to get the VIP themselves, the distraction and overall chaos introduced by the Traitor allowed the zombies to pick off the VIP somewhere. In both cases I was usually nowhere near the Traitor, and didn't see the VIP get tagged either time. After one of the rounds I asked another player who the VIP was, and was answered with "I don't know, but he's dead". Since the VIP and Traitor are picked by an admin who does not participate in the game, the admin will declare when the game is over if the VIP does not, so I ended up not knowing who the VIP was half the time.
In the final round, I was the Traitor. For the most part, the humans performed very well - they were always alert and lost very few of their number. I had a suspicion of who the VIP was, but chose instead to just take the General. This was perhaps a huge mistake, but it was a good experience as I hadn't played a round of VIP where the Traitor had taken the General before. I also chose not to fire at the humans and risk not being able to use my tag. This was perhaps also a mistake as the zombies were never able to make any serious inroads into the human defences at any point, even with Tanks and the Husk. In previous rounds, the Traitor often plays a key role in breaking the human defences when they are at their most distracted. I am an especially poor Traitor, I don't like turning on the human group and firing on them, and I'm very poor at recognising the best situations to do so.
Taking the General allows everyone to know who the VIP is - the General tells the zombies, while the VIP is free to reveal themself to ensure protection. This takes away one of the only advantages the zombies have, in that the humans are now free to trust one another and no longer need to keep an eye on other shifty humans. In all honesty, revealing the VIP's identity to everyone is not particularly beneficial to the zombies (unless the Traitor is still in the human group of course), as the zombies will take any humans they can tag, and any humans they do get will just make getting the VIP easier.

Another possible contributor to my hesitance was the introduction of new grenade rules. In the final round, the grenade was reintroduced as a human weapon that turns a human into a zombie (on top of regular anti-zombie abilities). The grenade is the counter to the Traitor, as without the grenade, the threat of the Traitor is not neutralised until they tag someone - a Traitor could choose to stay as a turncoat human and just keep blasting the other humans, and there's no way to permanently stop them. The grenade allows forcing the Traitor into a zombie without the Traitor tagging someone. The grenade starts with the General, the only completely trustworthy human.
The overall combination of better human defence, me being an awful Traitor and the new grenade in play allowed the humans to win quite easily - something very rare for Secret VIP.

Something else to note is that the shields that the Tanks used were substantially smaller than usual - they covered the entire torso and arms, but left the legs exposed. These Tanks are far, far less intimidating to go up against, and are far easier to deal with in 1v1. As a human, all you need to do is go for the legs - even if you don't hit them, they're forced to dodge or block, both of which force them onto the defensive and stop them from charging. With the full body shields that are normally used, a lone human has almost no chance against a Tank.

The last round I played was a 6 Round Pair Sweep, and I think it worked very well. In regular 6 Round Sweep, the humans trying to pick up darts tend to avoid each other, and this tends to leave around darts that people didn't notice as they were too worried about survival. Additionally, everyone is on edge and always looking around in case someone is trying to sneak up on them, thus reducing their dart pickup effectiveness. Having a partner not only doubles your maximum dart retrieval speed, but also allows one partner to focus purely on picking up darts without worrying about getting snuck up on. This results in a much faster and much more efficient dart pickup overall - I think we picked up more darts in about 2/3rds of the time compared to regular 6 Round Sweep.
Pair Sweep also makes it harder for those humans who just like to attack other humans, as they now have to contend with two humans instead of just one. This helps the dart pickup aspect of the game a lot, as there have been times in regular 6 Round Sweep where I have had to abandon a patch of darts due to attacking humans who I don't want to engage.

I would like to see more Secret VIP games with the anti-Traitor grenade in play where I am not the Traitor - thus far the humans have lost the majority of rounds, often due to the Traitor being unstoppable, and only stunnable. I think 6 Round Pair Sweep works far better than regular 6 Round Sweep as a pickup game, and would like to see Pair Sweep as the default pickup game.

A link to the same post on Blasterhub: link

MLF Game Report 20/3/16 - Black Hawk Down, Shields

$
0
0
My second MLF event, with some shields and a new (to me at least) gamemode.


Base rules:
If a player is hit with a dart, they are downed ("hit" and "downed" are often used interchangeably). When downed, they can choose to wait for a medic, or go to respawn (if the gamemode has respawns). If the downed player chooses to respawn, once they move from their spot they can no longer be revived by a medic.
A medic revives a downed player by placing their hand on the player, counting to 3 (at a reasonable speed). Once the countdown is complete, the downed player is revived.
A grenade hit forces a player to respawn, and they cannot be revived by a medic.
A melee tag also forces a player to respawn. If a melee weapon is not available, the attacking player can simply tag the target player with their hand.
A shield naturally blocks darts, but breaks when hit by a grenade - the shield must be dropped immediately and cannot be picked up by the same person for the rest of the round. Depending on the mode, other teammates may be able to use the shield.

Gamemodes:
Old:
Kill Confirmed - very similar to Freeze Tag/Tag Teams. When a player is hit, they are downed and must wait for a teammate to revive them, which is achieved with a simple hand tag. In Kill Confirmed, all players are medics. An opposing player may tag a downed player with their hand to "confirm the kill" and eliminate them from the game. Naturally if an entire team is downed, then that team loses even if none of them are "confirmed". The last team with surviving, non-downed players wins.
Capture the Flag - classic gamemode, obtain both flags at your team's flag post to win. When hit while holding the flag, drop the flag as well as being downed.
New:
Black Hawk Down - assymetric gametype with two teams: the smaller Special Forces (SF) and larger Insurgents (who often go by a variety of less politically correct names). The SF win if they eliminate all Insurgents. The Insurgents win if they eliminate all SF, or capture the SF's flag. The SF players are all medics and revive with a tag, while the Insurgents have a single medic.
Team Elimination (w/ medic) - basic elimination gametype where each team has 1 medic. Last surviving team wins.

Blasters:
Only the blasters that saw significant action (that I saw) are listed here.
Regulars:

Elite Rapidstrike (various motors, LiPos) - a staple for these sorts of games, performed as usual. Excellent for raw dart output but somewhat lacking in longer range accuracy. 
Star Wars Stormtrooper Deluxe Blaster (upgrade spring) - performed as usual, a standard pump action blaster like an EAT/Rampage. Easy to use and get the hang of, but the lack of ROF really hurts it when going up against flywheelers.
Elite Stryfe (various motors, LiPos) - the standard semi auto flywheeler, easy to use and control, and also substantially lighter than a Rapidstrike. Has lower dart output compared to a Rapidstrike, which is not usually an issue for experienced users.
Rebelle Rapid Red (Banshee motors, 2s LiPo) - as usual, basically a stockless Stryfe. Worked fairly well, but a stock does help stabilise shots. 
N-Strike Stampede (~5kg spring, Trustfires [soon to be upgraded to LiPo]) - had the range to compete with most other blasters, and has enough ROF to be usable. Flywheelers still beat it for ROF, but that's not usually a big issue if utilised correctly. Worked decently well, though personally I'd prefer a flywheeler.
N-Strike Longshot (Remedy Metal internals, pump grip) - powerful long range blaster. A muzzle attachment has been added to bring it under the 150fps limit (without said attachment the LS averages about 180fps). Somewhat vulnerable in close quarters and against multiple opponents due to its relatively slower ROF compared to most other blasters, particularly flywheelers.
 
Elite Retaliator (pump grips, various upgrade springs) - the standard "higher end" pump action. More expensive to build than EATs or Rampages, but generally ergonomically superior and also more powerful and robust. Generally fairly accurate as well, giving it an advantage over flywheelers.
Elite Alpha Trooper (upgrade springs) - the standard pump action. Fairly easy to use and decently effective, though the substantially lower dart output than flywheelers can be an issue in combat.
Buzz Bee Ultimate Missile Blast inside Retaliator - extremely powerful blaster capable of very long range shots, though at such ranges the darts tend to go wild. Extremely slow ROF by virtue of having to be pumped up for every shot, and being breech loaded. Certainly not my style of blaster, and generally didn't appear to be particularly effective for actual hits. Also very vulnerable in close quarters.

New:
Buzz Bee Sentinel (US spec, stock) - these things are absolutely loved by many members of the Nerfing community in the US, and for very good reason. The US spec Sentinel spring is extremely strong, probably 2-3x stronger than a stock Aus spec spring. As a result, a stock Sentinel is comparable in power to a spring upgraded EAT. Though the lever action does slow its ROF down considerably, having such power out of a stock blaster is insane.
Modulus (2s or 3s LiPo) - being that its motors were still stock, it spun up substantially slower than the other flywheelers around. I didn't see too much use of it, but included it as Moduli are quite rare to see.

The play area we used is roughly triangular-ish, though in terms of cover it functions effectively like a very wide, curved rectangle as the central southern area is open. Player count was 12 for the majority of the games, which allowed for some good team games. Weather was very good, temperature in the low 20s Celsius with few clouds. Unlike the previous play area, this play area was mostly flat, with a very slight incline up the east end. Tree cover is also very dense, much denser than the previous area. This area is almost completely shaded and there are a lot of trees, though a lot of them are too thin to take cover behind.


The width of the play area usually results in two fronts of combat - one near the open area to the south, and one further up north far in the tree cover. There are a couple particular trees that provide excellent cover for their respective areas and combat is usually concentrated around those. The presence of those two distinct fronts usually results in teams splitting in half. If either half is able to defeat their opposing half team, they are in an excellent position to flank and wipe out the remaining opposing half, assuming the other half of their own team is not wiped out as well. Likewise, any team that chooses to stick together in the middle usually ends up getting flanked and wiped out pretty quickly.
We played a couple of Kill Confirmed rounds to start the day while waiting for the last few players to arrive and get ready. They progressed pretty much as expected, a couple of tit-for-tat skirmishes, which for the most part are draws. One team gets a substantial and usually winning advantage when they are able to "confirm" their hits. Since most players stay in small groups to ensure revival, "confirming" hits is typically only possible by wiping out the entire group. The new substantial numbers advantage usually leads that team to victory.
Overall worked about as well as usual, a good warmup gamemode that usually requires a little teamwork.

We played a couple of Capture the Flag rounds, and they went quite well. The somewhat unusual flag placement meant that it was much harder to return the flag than usual. Because the flags are so close to the middle but still relatively far apart, teams usually split into two groups - one attacking the enemy flag and one defending their own flag. Thus while stealing the enemy flag is slightly easier, returning the flag is substantially harder as your own flag will typically always be under siege. Furthermore, defenders of a recently stolen flag have a chance to rush towards the enemy flag to try and prevent a capture.
In previous CTF rounds with the flags on opposite ends of the field, once the flag has been stolen it is near impossible to hit the thief after a few seconds as a couple of seconds is all it takes for them to get back into safe territory. In this flag layout, there is no clear safe territory in between the flags unless one team is completely dominating (which doesn't normally happen). Capturing the flag usually puts the flag runner in range of the enemy team when nearing their own flag. The ability to potentially stop a flag run makes the game much better all round.
Shields had a massive impact on CTF given that they made one player pretty much invincible provided they didn't get within grenade throwing range (and even then, they were at worst on equal footing with a grenadier), but I'll talk more about them later on. 
We played two "sets" of Black Hawk Down. Since we had 12 players, we were split into 3 groups of 4, rotating around the group playing as the SF, with the remainder playing as the Insurgents (making the game 4v8). Each set consisted of each group playing once as the SF, so consisted of 3 games.
For the first set of games, the Insurgents had both of the shields and the SF team operated on 3 second revive, and so the SF team usually ended up being wiped out quite quickly. The combination of superior numbers and both shields made the Insurgents pretty much unstoppable, as the SF team would usually be assaulted on two fronts (one next to the open area, one far into the trees), and usually each front would be headed by an Insurgent shield. The SF team were typically unable to hold any defensive position for very long, and got overrun pretty quickly by the superior Insurgent numbers and shields.
For the second set, the SF took one of the shields and operated on instant revives. These changes made the rounds substantially more competitive, and my group was actually able to win playing as the SF (we were the only SF team to win today). In this setup, the SF can hold position far more effectively as they have a shield of their own, and the Insurgents only have one shield. Although the Insurgents' superior numbers can still easily overrun the SF, the SF's instant revive can get their players back in the game much more quickly, allowing them to more easily reestablish a defensive position. Additionally, the SF's shield offers them reliable cover that they can use to try and push back the Insurgent shield, which are otherwise rather difficult to hold off.
Quickly reviving players is critical to the SF team maintaining any chance of success. Since they're already at a substantial numerical disadvantage, losing any of their players makes it even harder to maintain their already relatively weak defence. If an SF player is not revived quickly, then it is very likely that the Insurgents will be able to push the SF back quite quickly, thus making the downed SF player unreachable and usually resulting in the SF team getting wiped out shortly after.
The Insurgent medic is a critical player to the Insurgent offensive. Since the medic is the only Insurgent player who can revive, they must be quite fast as they will likely be needed in two places at once. Losing the numerical advantage is very dangerous for the Insurgents, as unlike the SF, they cannot normally revive one another, and so in a 1:1 fight with the SF, will probably lose. Unlike for the SF, prompt Insurgent revival is not critical to Insurgent success. Unless they are running low on numbers (say 1:1 ratio with the SF), a downed Insurgent will not usually be in immediate danger of being eliminated. Additionally, the medic is more important to the Insurgent team than any ordinary Insurgent, so it's not usually worth risking the medic in an exposed location to revive just one Insurgent.
Since the Insurgent medic maintains the Insurgents' offensive pressure, the medic should be a priority target of the SF - with the medic eliminated, the SF can actually take down the Insurgents. Additionally, since the medic usually won't expose themselves unless they're trying to revive someone, the medic will usually get hit while trying to revive other downed Insurgents, and so if the medic is lost, usually so are several other Insurgents. This can all happen very quickly due to the fast pace of Nerf games, and so if the SF can bait out and hit the medic, they can go from being on the defensive to having a substantial advantage within 10 seconds. Without the numerical advantage and their medic, the Insurgents are at a massive disadvantage and will probably be wiped out.
The Insurgent medic was hit in two of the BHD games. In the one of them, I was a medic and was trying to revive an Insurgent who had been downed pretty much in the crossfire. Although I was hit as well, the Insurgents still had the numerical advantage 6 to 4, and shortly after me getting hit, the Insurgents were able to force the SF team back with a shield rush. Eventually the Insurgents won the round, wiping out the SF team in the chaos, though I believe a few more Insurgents were lost as well. Even without the medic to revive them, the still superior numbers of the Insurgent team was enough to wipe out the SF.
In the other game where the Insurgent medic was lost, I was on the SF team. I was in the inner area of the field fighting several Insurgents and the medic, while the other part of the team was on the southern edge against the open area, fending off the remaining Insurgents and the shield. My teammate and I were able to down two Insurgents, after whom the medic ran to revive. We were able to down the medic before they could revive anyone, and so were left with near even numbers (4 SF to 5 Insurgents) and superior position. From there we linked up with the other half of the SF team, and flanked and wiped out the remaining Insurgents. While a shield is a formidable opponent, it is no match for several well placed flanking players with the element of surprise. We pinned down and eliminated the Insurgent shield without too much trouble.
Typically in the BHD games, the SF team plays quite defensively, setting up their defensive position quite far back. This lets the Insurgents pick their angle of attack, thus allowing them to pummel away at theSF defenses from all directions. Sure the SF would often be able to get several hits on Insurgents, but the constant attack by the surviving Insurgents would often give the medic enough time and space to revive most, if not all of the downed Insurgents. Setting up position too far back also leaves the SF little room to fall back to, and also makes their flag vulnerable very easily if they are forced back, though the flag is really just an anti-coward device rather than a proper objective. My group played as SF very offensively - our shield set up in a very good forward position and pretty much didn't move for the whole game, while I and a teammate charged forward. We were able to trap half of the insurgents in effectively a corridor in which we were able to pick off their medic and win from there. The key was taking away the Insurgents' ability to position themselves well, as we were able to engage them on our own terms, down a corridor with no fear of flanking. In fairness we were perhaps rather lucky - had either me or my teammate been hit, it would have been somewhat difficult for the other to get the revive. We would likely have lost from that position, but that's the risk you take when playing offensively.

We ended with a couple of rounds of 3 team elimination, with 4 players per team. These rounds were pretty chaotic and usually involved one team getting caught in the middle and wiped out. Given the chaos, the threat of facing two opposing teams and each team having only one medic, teams generally performed better if they stuck together more and made themselves less of a target. In the first round, my team was stuck in the middle in the green start area, and was pinned down by both other teams. Though we were able to get a fair few hits on enemy players, we were unable to hold both teams off and were eliminated quickly. In both the second and third rounds, we ended up in the eastern area near the blue start (despite starting at yellow in the third round). Both times we split up to engage the nearby green team and hold off any of the outlying yellow players, however in both cases splitting up resulted in half of our players getting hit, and that team moving up before I could revive them (I was our medic in all three rounds). As a result, our team would quickly drop to half strength, shortly after which we would be overrun by superior numbers.
Both other teams tended to stick together more, and although they suffered their fair share of hits from being relatively immobile, their medics were able to revive their players much more easily than I was able to revive my teammates. Additionally, the other teams seemed to prioritise eliminating my team first over engaging each other - in the second and third rounds we were often engaging about 6 players at once despite each team only having 4 players. In the third round, we were able to mostly eliminate the middle team, but suffered losses doing so and were unable to eliminate the full remaining team. 3 team games are always like this though, it's pretty much inevitable that one team will bear the brunt of the attacking. I expected nothing less really.

Let's talk about the shields. The two shields are basically identical besides the team identifying coloured tape on the handles, pictured above with one of my Longshots for scale. They're a decent size, large enough to be completely covered when crouching, but small enough that you can't effortlessly take cover behind them. Shields are immune to darts, and break if hit by a grenade - they must be dropped immediately and cannot be used by the same player for the rest of the round. We used the shields in the CTF and BHD rounds.
Because the shield merely breaks upon grenade contact and the player is not downed, even with everyone having grenades, the shield bearer basically has two lives. Additionally, since we played with thrown grenades, throwing a grenade requires readying a grenade for throwing which usually means temporarily putting your primary away - a massive disadvantage in a firefight. Since the shield bearer is free to use any blaster with the shield, it is extremely hard to get out a grenade and throw it effectively while under attack from a shield. Making matters worse is that it isn't too difficult for a shield to simply dodge a grenade to render it ineffective even if it is thrown well. Given the blasters we used (a lot of flywheelers), shields provided pretty much no disadvantage to the player wielding it, besides perhaps becoming more of a target and having more responsibility to the team.
In CTF, the shields were a massive boon as they could be used equally effectively on offence or defence. Offensively, the shields give the attackers a reliable source of cover whereever they needed it, allowing them to progressively push up at will instead of having to move tree-to-tree. Additionally, the shield made it easy for a player to set up near the enemy flag, making it much more difficult for the enemy team to return any flags. Defensively the shield offers the defenders cover wherever they need it, giving them an additional reliable defensive position. Effective use of the shield can make or break the CTF game given how powerful they are, and given how hard it is to get a good grenade throw off under fire, a good shield is almost impossible to take out for a regular player.
In the first BHD set, both shields were on the Insurgents team, which on top of the Insurgents having twice the players, made it basically impossible for the SF team to hold a position for more than probably ~45 seconds. This was naturally completely broken, so the second set had the SF team take one of the shields. This allowed the SF team to much better hold a position, and significantly reduced the Insurgents' ability to push the SF back. Without the shield, the SF team is too easily overrun by sheer numbers, as the Insurgents can very easily push forward and get some good hits in with some suppressing fire and coordination. The game is pretty much decided by which shield is lost first. If the SF team loses their shield, it becomes pretty much as with the first set of BHD games and the SF team will most likely get wiped out really quickly. If the Insurgents lose their shield first, then the SF team is pretty much free to push up with their own shield and assault the remaining Insurgents. If the Insurgents lose their medic before the SF team loses their shield, the Insurgents are again put at a major disadvantage as the SF team instantly eliminates any Insurgents who get hit. Without any reviving/respawning ability, even with a shield the Insurgent team is put at a massive advantage.

Overall Black Hawk Down is a pretty fun and different gamemode and I would definitely enjoy playing it again. It's a stark contrast to all of the completely symmetric games like CTF that usually require quite a symmetric play area to work properly, and it's also playable with odd numbers. The introduction of shields added an extra element to the games, especially CTF, but as they were used in this event I think they're perhaps overpowered and give a shield player too much of a buff without enough disadvantages.

A link to the same post on Blasterhub: link

Review: Nerf Elite Dual-Strike (grey trigger)

$
0
0

The Dual-Strike is one of the more unusual new blasters, a blaster capable of firing both Elites and Megas, and switch between them at will. Naturally this system, assuming it is relatively efficient and effective, is intruiging and present a lot of potential.

Note that this blaster belongs to a friend and I borrowed it for this review, so I may not be able to answer subsequent questions about it as accurately as I would like.
Box is pretty standard.


The Dual-Strike is quite big and chunky for a pistol style blaster, especially up front with the giant barrel block. Unfortunately, it isn't particularly well decorated, with very minimal extra colouring on the sides, making for a somewhat duller looking blaster than many Nerf blasters nowadays. Surprisingly, the Dual-Strike is not particularly heavy for its size.
Surprisingly, it's not the thickest blaster and maintains its width throughout its profile. There's not much of interest on top.
A look at the underside, not much here either.

The handle is decently sized, though not the most comfortable one I've handled.

Both the front and rear edges are perhaps sharper than ideal, which seems to be becoming a more common problem with more recent blasters.


The Dual-Strike uses a basic pullback priming mechanism, like that of a Firestrike. It has quite a long draw and a large plunger tube, allowing for it to get some decent power even without a strong spring.

The pullback handle is quite well designed and is fairly comfortable to grasp and pull.
 

Being that it fires both Elite darts and Megas, the Dual-Strike also has a MEGA logo embossed on the side, just behind the Mega barrels.

Switching between Elites and Megas is down by this switch, which rotates a valve within the blaster. This valve redirects airflow to go to either the Elite barrels on top, or the Mega barrels on the bottom. The switch has a good amount of friction and makes a nice audible click when it switches.


The Dual-Strike has 6 barrels, 3 for each dart type. The top barrels are for Elites, while the bottom ones are for Megas. Having all 6 barrels up front aligned vertically contributes much to the Dual-Strike's height - the removal of the Mega barrels would make for effectively a Messenger, which is far smaller.
A look down the barrels. The Dual-Strike uses Smart ARs to advance, which serves well to limit how bulky it has to be.

Barrels loaded up.

Being that the Dual-Strike uses Smart ARs, all that is necessary to fire all of its darts is to repeatedly prime and fire it. The Elite barrels fire the top right dart first (from user's perspective), while the Mega barrels the top dart first.
Next, the bottom Elite barrel and middle Mega barrel fire. Finally, the top left Elite barrel (from user's perspective) and bottom Mega barrel fire. Pretty simple, thanks to the magic of the Smart AR system.
Here's the Dual-Strike next to a base Retal, it's pretty darn big, especially for a pistol style blaster. Certainly not something I think can be (or should be) holstered easily.

Finally for performance. Has the ability to fire two different ammo types affected how well the Dual-Strike can fire?
Ranges with Elites are wildly erratic, ranging from 7m with nosedives to 14m+ with soarers, all fired at true flat. I don't think I've ever fired a stock blaster that is so variable in range. Ranges with Megas are somewhat more consistent, averaging about 9-10m at true flat, but still not the most consistent.
Accuracy is pretty poor. Though most of the Elites would pass through the usual testing doorway, from there a lot of them would veer off in every direction - at the end of my test firing, there were darts spread out pretty much everywhere. Likewise Megas are not particularly accurate, I had more of them hit the doorway, but generally had less spread at range.
Rate of Fire is a bit of an iffy subject given that you only have three shots before having to reload or switch ammo types, but regardless I got a similar ROF to a Triad, about 2 darts per second.

The only practical use I can think of for an ordinary Dual-Strike is use in a game where Megas have special power/abilities, but you still want to use Elites for combat. Maybe something like "Defend the Core", a gamemode where you get ammo into the enemy's box (core) to score points, and Megas are worth more than Elites. Perhaps a HvZ where there are special zombies that can only be taken out by Megas? These don't make perfect sense though, in most cases when you want to use both Elites and Megas, you'd probably just take two blasters or have one integrated into the other (like say a Stryfe and Bigshock). The only reason why you'd take a Dual-Strike instead is if you could only take one blaster, or you had a limited capacity of 6 darts total or something. Even then though, a Dual-Strike is only better than a Cycloneshock if Megas are too rare to use as a regular combat ammo type, but you still need to use Megas and you can only have one blaster.
In stock form I can't think of a non-super-specific situation in which a Dual-Strike is the best, or even a good option. For the most part just taking two blasters or even just a dedicated Mega blaster is likely a better option.

The Dual-Strike can be found for 29AUD at Kmart, and has dropped to 25AUD before on sale. Even then though, I think the Dual-Strike is slightly overpriced. Yes it is somewhat justified by being effectively two blasters in one, but even for its sale price you could get 2 Strongarms (plus something extra), 3 Triads or even a Cycloneshock or Flipfury, all of which I think are better value-for-money, or just better as a blaster. The ability to switch between two ammo types is a neat gimmick that works well, and its plunger tube (as we'll see in a moment) is massive allowing for excellent mod potential, but overall the Dual-Strike is not a very practical blaster, and is quite expensive for what it is. Unless you have specific use for the switching ability or you like its massive plunger tube, I'd give the Dual-Strike a pass.

Power: 6/7
Accuracy: 1.5/5
Rate of Fire: 2.5/5
Usability: 4/5
Value for Money: 3/5
Overall: 3.06/5

Personal Rating: 3/5 - while it is fun plinking around and switching effortlessly between two different ammo types, I just have no use for such a blaster. It doesn't fit into my playstyle or most of the games I run/play, and the price is rather high for what is basically a big pistol.


The Dual-Strike's internals, besides the valve in the middle, are nothing new. The two barrel blocks use the now-well-established Smart AR which redirects air into the next barrel when a dart is not loaded. The Dual-Strike packs quite a big plunger tube, necessary for firing the Megas with decent power. To prevent the Elites from being too powerful, and to maintain consistency between subsequent barrels, there are many air release holes throughout the Dual-Strike - I counted at least 8 or 9. Plugging up all these holes and patching up the rather poor plunger seal boosts performance significantly - I was getting 15m+ ranges roughly flat with Elites, and about 12-13m ranges roughly flat with Megas.
Such a big plunger tube presents a tremendous amount of potential power, and the Dual-Strike could certainly be turned into an extremely powerful hand cannon without too much trouble. Even better, from what I can tell, the central valve is reasonably well sealed and redirects airflow quite well, giving the Dual-Strike potential to quickly switch between two different barrels/barrel sets/etc.

A link to the review I posted on BlasterHub: link
Viewing all 346 articles
Browse latest View live