The Hyperfire is one of the more exciting 2016 releases for me. I'm personally not into things like the Mastodon or Khaos, but I love full auto. The Hyperfire presented itself as a replacement for the now hard-to-find Rapidstrike (at least in Australia), and though its extremely high retail price was annoying, still presented great potential. My enthusiasm was blunted substantially when it was revealed/discovered that the Hyperfire uses a conveyor belt feeding mechanism instead of a traditional pusher, but I still wanted to see for myself how it compares to the beloved Rapidstrike.
Fairly standard box art stuff. Something to note is that the background seems a bit more plain than usual, or maybe that's just me.
No paper ties in the Hyperfire box, everything is kept in place with folded cardboard. Note that as far as I can tell, the included 25 drum differs to the older 25 drums simply in front plate and dart pusher colour.
The Hyperfire is an oddly designed blaster. On the one hand, it has a lot of the sharp edges and angles of the Elite styling, yet has a large and completely superfluous large front end. Where most Elite blasters have a modern style to them, the Hyperfire has more of a futuristic, sci-fi look. The front end suggests it's trying to be big and bulky, yet the stock is not particularly big or long.
It's actually somewhat smaller than I expected, which is a good thing, as I expected it to be a horrendously large and clunky pile of plastic.
Oddly, the Hyperfire has only a single tactical rail at the very front, and does not accept barrel extensions. To me this defeats part of the purpose of being in the Elite line, which has such a well established set of attachments. There's definitely space for more tactical rails and a barrel accepting muzzle, so the lack of such is baffling to me, when that attachment modularity is one of Nerf's big draws.
It has 4 sling points, two up front and two at the back of the stock.
The stock contains the Hyperfire's battery tray. It takes 4 D batteries, unlike the Rapidstrike which used 4 C batteries. These batteries add quite a significant weight to the stock, though this does help balance out the blaster.
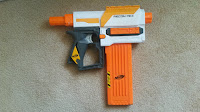
A closer look at the gigantic front end. This was one of the features I was most dubious about when we got the first pictures, as it looked excessively large and completely unnecessary. Unfortunately, it seems my fears were well founded, as to me this front end distances the Hyperfire further from the already established Elite styling, and adds unnecessary bulk.
While this round part does provide a decent grip, it feels too low to me to be properly comfortable. It's not as low as say the Demolisher, but it's still a lot lower than say a Rapidstrike. A fore end much higher up closer to the muzzle would have been preferable, ideally with a tac rail to use a variety of other foregrips. The entire orange section below the muzzle is completely hollow, so absolutely did not have to be there.
The stock is a decent thumbhole design, with a neat cheek rest piece. I personally find the stock a little too short to be particularly comfortable, but it's definitely usable.
The handle is fairly well designed, being nicely curved and decently roomy. The handguard is a relatively uncommon feature that I personally quite like. It could get a little squishy if your fingers are particularly large, but besides that the handle would have been quite good if not for one annoyance.
It seems Nerf has yet to master how to design a thumbhole stock. The Hyperfire's thumbhole is too close to the battery tray and so the inside of your hand is pressed against the edge of the battery tray. This is particularly annoying and fairly uncomfortable, which is rather a shame because the thumbhole stock and handle look really cool.
The mag release button is on the inside of the handguard. I find it to be one of the better mag releases, as it is easily actuated with your middle finger. Unfortunately, its placement within the handguard means you can't actuate it with your off hand, though that's only really a problem if you're making a bullpup Hyperfire.
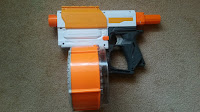
A look at the Hyperfire's jam door. It is locked in place by the orange piece on top. If the jam door is unlocked, a switch prevents the Hyperfire from operating. Instead of using a conventional pusher, the Hyperfire uses a conveyor belt housed in the jam door, hence the strange jam door design.
The Hyperfire has all the other locks and safeties you'd expect to see in a flywheeler. This shot also gives a look at the conveyor belt position.
There are two main issues with the jam door. Due to the conveyor belt design, the jam door cannot open very far, and also exposes only a very small aperture. I personally struggle to use the jam door opening to any significant effect on the Hyperfire. On flywheelers this is generally less of an issue as flywheel blasters don't normally jam up that badly. Most flywheeler jams can be cleared just by pulling out the mag.
![]()
The second main issue is by far the more serious, and makes the Hyperfire almost unusable out of box. It concerns the aforementioned jam door lock, which also deactivates a safety. If the jam door lock is even slightly out of locked position, the blaster will be completely disabled. This wouldn't be a problem if the lock was fairly stiff, but unfortunately it can be displaced incredibly easily. Changing mags with any sort of force will likely dislodge the lock, as will any significant shaking. In fact, I've witnessed the lock dislodging itself on its own, turning off the blaster after a couple seconds of firing. This problem is so bad that any time I wanted to fire the blaster for longer than 2 seconds, I had to actively hold the lock closed.
This problem does not appear to apply to every Hyperfire, as some of the videos I've seen on it demonstrate no such issue. I believe it is too common to be considered a lemon however, the other Hyperfire I saw at MHvZ had the same problem, and I have heard at least one other report of the same issue.
Being a clip (mag) system blaster, the Hyperfire works with all manner of mags and drums. These are just a selection of the mags and drums it is compatible with. Personally, my favourites are the 15 dart Worker Dmag and the 25 drum aesthetically.
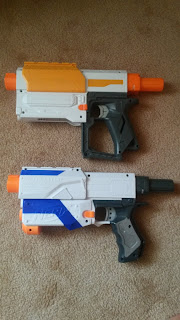
Here's the Hyperfire next to a Stryfe and Rapidstrike, particularly to demonstrate how well (I think) it is scaled. It's large enough to feel like a significant blaster and have reasonable stock length, but small enough to not feel too excessively large. I still think the front end is ridiculous, but besides that the Hyperfire is fairly well scaled.
Finally for performance. How does the Hyperfire stack up to its Elite brethren, particularly in rate of fire?
Operation of the Hyperfire is the same as anny other flywheeler, press the rev trigger to spin up the flywheels then pull the trigger to fire. Because of the lack of cycle control on the conveyor belt, there is no guarantee how long it will take after trigger pull for the first dart to actually fire.
Range for the grey trigger model is nothing special, at full rev darts typically reach 8-10m true flat with good quality new batteries. Naturally range decreases dramatically in rapid fire, down to around 5-6m at a minimum. Unlike the Rapidstrike, the Hyperfire's flywheels don't speed up when firing, so are unable to maintain a constant range. Something worth noting is that the flywheels are set up with active braking - that is when the rev trigger is released, the flywheel motors will brake to a stop, rather than coasting. This is the first flywheeler I've seen that naturally has active braking on the rev trigger. Personally I don't like active braking on flywheels, especially on stock flywheelers which have significant rev time.
Accuracy is perhaps a little better than average, certainly not the worst I've seen, but also not the best. The majority of darts do go through the my testing doorway at ~8m range, but beyond that they can spread out a fair bit.
Rate of fire is the Hyperfire's main selling point, and thankfully is one of the few performances that actually lives up to Nerf's claim. The box claims a ROF of 5 darts per second, and with good batteries, it certainly reaches and exceeds that. Depending on the quality of the batteries, a ROF of 5-6dps is possible out of box.
Unfortunately, the above ROF is only relevant with perfect darts and perfect mags. While a conveyor belt design might seem neat, in practice it is rather flawed. Because of its design, a dart must be at the very top of the mag, right up against the mag lips, and completely horizontal, to feed properly. If not, the conveyor belt will skip it. The conveyor belt will also skip over a dart that is not perfectly round and plump. A dart angled downwards may get pushed forward by the conveyor belt, however unlike every other flywheeler, the Hyperfire doesn't have feed ramps that lead into flywheel cage. Instead, it simply has a closed off round aperture. As such, any downward facing dart that gets pushed forward will jam against the outside of the flywheel cage, causing the conveyor belt to jam up and get damaged, jamming up the entire system.
I have had feed issues with some darts and mags that feed perfectly even in my ~15dps Bullpup RS, so for me those issues are inexcusable.
Let's suppose for a second that you fix the Hyperfire's critical flaws, but don't alter its performance. Being that the Hyperfire's only notably good feature is ROF, it is best suited to a suppressive fire/area saturation blaster. Its ROF is higher than most other stock blasters, and its use of Nerf's clip (mag) system allows fast reloads and very good capacity, as demonstrated by the included 25 drum. I believe that its ROF is ideal as an entry point into full auto. It's fast enough to begin to appreciate what full auto provides, but still slow enough to be controlled with minimal practice. Relatively poor range means that you'll likely be firing a lot of angled shots.
Keep the Hyperfire away from any games where you expect to scavenge, or use non-perfect darts. The aforementioned feeding issues will likely get you into trouble if you have to panic fire some slightly squished or worn out darts. Stay away from any dart missing a chunk out of the back as well.
The Hyperfire can be found for 80-90AUD outside of sales. I got mine on sale for 58AUD from BigW. Even though I got a significant discount, I don't feel that I got that good a deal. The 25 drum is nice, but something like a pair of 18 mags would have been much preferred. However, the deal breaker for me is the unusability of the Hyperfire out of box and in general all the flaws it has over every other flywheeler. There are just too many problems with it, especially in stock form, and though some of them can be fixed very quickly (e.g. the faulty lock),
I shouldn't have to fix them in the first place. To me, the Hyperfire just doesn't have enough merit and has too many issues to justify the purchase. Maybe if you can get one quite cheap and intend to mod it, but certainly not at near retail price in stock form. Even if you do intend to mod it, I would recommend a Rapidstrike much more highly.
Power: 3.5/7
Accuracy: 3.5/5
Rate of Fire: 4.5/5
Usability: 1/5
Value for Money: 2/5
Overall: 2.7/5
Personal Rating: 2/5 - there was so much potential for the Hyperfire to be a great blaster, but there are so many things wrong with it, not just out of box but also inherent to the entire system. I'd much rather take a Rapidstrike any day.
Besides the unusual conveyor belt feeding mechanism, the Hyperfire has pretty standard flywheeler internals. A number of switches, a bunch of locks, some weak motors connected to some horrible components like resistors, pathetically thin wires, PTCs, if you've been inside a flywheeler before, you've seen all of this already.
Rather conveniently, with the removal of some internal screws, the Hyperfire shell will split into 3 distinct parts - the main grey shell, the front orange piece and the outer blue shell. Only the grey shell actually contains internals, so for the sake of maintenence and testing, the other parts can be left off. The shell splitting is also very helpful for aesthetic mods.
![]()
A close up of the canted flywheels. They aren't on that much of an angle, but it's still enough to cause some issues at higher speeds. Even just rewired and on 2S, I'm getting a lot more helicopter darts than any other blaster I have. When set up with mod motors such as Rhinos/Falcons on 3S, they can helicopter out more than half of the darts fired. This can be fixed by something like a brass dart guide, but the annoying part is that such a mod must be implemented just to make the blaster work properly. No other flywheeler so far has necessitated significant alteration to the flywheel cage to accomodate for effective glass ceiling blasting.
![]()
A close up of the belt system. While it is easier to deal with than a pusher, it is also much more heavily limited in ROF, and far less reliable with imperfect darts. Fixing this problem would require complete replacement of the belt itself, which is in itself not an easy thing to do. While it is easier to deal with than a pusher, it is also much more heavily limited.
This is the current state of my Hyperfire, new switches and wires, set up for a LiPo. It works decently well on a 2S, getting nearly 10dps off nominal charge provided the mag perfectly feeds perfect darts. Range is still pretty rubbish though and the flywheels decelerate massively in rapid fire, further reinforcing my belief that at least some grey trigger flywheelers have inferior motors, instead of changing anything else.
A link to the review I posted on BlasterHub:
link